Table Of Contents
Notifications | Game Center and iCloud Gaming | Twitter Integration | iCloud | Siri, Dictation & Wireless iTunes Syncing | iMessage | Camera and Photos | Settings | Safari | Mail | Calendar & Contacts | Reminders | Newsstand | Text Editing | iPad Only & Conclusion
If you were in the audience at WWDC this June when Apple, along with then-CEO Steve Jobs, introduced iOS 5 to the audience of developers and journalists, you would have felt how stunned many of the attendees were at the sheer breadth of changes brought by iOS 5. This was no minor update to Apple’s mobile OS, this felt like years worth of work compressed into the 12 months since the release of iOS 4.
At the clear center of the changes was the new Apple product personally announced by Steve Jobs: iCloud. The culmination of a decade’s worth of work converting the ‘digital hub’ from the Mac to a cloud-based seamless syncing service, you could sense right away that iCloud was obviously intertwined deeply with the future of Apple’s products.
Nearly every changed part of iOS 5 is touched in some way by iCloud and very few bits of iOS have remained unchanged this time around. A deep and staggering array of changes, some 250+ in all, have made this the most exciting release of iOS since the App Store and native developer API’s were introduced. It’s truly an exciting product for iOS device users and developers and should propel the ecosystem forward by leaps and bounds.
If you’ve been with the iPhone from the beginning then you will be absolutely stunned by how fresh and agressive the changes in iOS 5 feel to you. If you’re a newcomer, then this is the perfect jumping off point as Apple embarks on its iCloud-enabled future.
The work that has gone into iOS 5 is frankly staggering. Walking out of the WWDC keynote, I just couldn’t imagine how so much got added and whether it would be as polished as it looked in the presentations. After living with it day in and day out for several months, I can tell you that I am still stunned.
It’s easy to be overwhelmed by how much is different here so lets dig into the major changes in iOS 5 and its iCloud integration to see whether it lives up to the last 5 paragraph’s—and the last 5 month’s worth—of hype.
A caveat, before we begin, is that I will only be covering Apple’s newly announced Siri voice service and Dictation feature here as an overview as I have not been able to test it personally and we don’t review what we can’t test. Look for separate reviews of those in the coming days as we review the iPhone 4S.
Notifications
If there is one feature that could be pointed to both as a lighting rod for criticism of iOS and a frequently flaunted advantage of Android, it was the way that it handled notifications. Any event, whether it was a text message, an app needing your attention or a low battery warning, notifications on iOS 4 and earlier were just terrible.
Any of these triggers would provide you with a modal popup that you had to dismiss before you could do anything on the screen again. It was less than ideal.
The new notifications system in iOS 5 has been reworked from the ground up and sports a long list of features to help you tweak and prod it into the shape that you desire. It owes some debt to the way that Android notifications work and looks even more like the MobileNotifier app that works on jailbroken iPhones running iOS 4.
The developer of that app, Peter Hajas, was hired on by Apple shortly before it introduced the new notification system along with iOS 5 at WWDC earlier this year. While Hajas has remained mum on what he was hired on to do, and much of the work on Notification Center had obviously been completed this time, the most likely answer is that Apple saw something that it liked in the way that Mobile Notifier worked and wanted Hajas to get to work integrating it.
The new system for application alerts centers around the Notification Center (NC), a panel that can be pulled down from above the menu bar in any application or while on the home screen. The easiest way to think of it is that you’re grabbing the top status bar and pulling it downwards.

Once you’ve pulled it down you can put it away by flicking upwards from the small ridged handle at the bottom.
The NC gathers all of the notifications that any app sends out so that you can pull it down to get a record of them. Each notification is tappable and will take you to the app that generated it when you do so. Once you have tapped it, it will clear itself from the pane. You can also clear a batch of notifications from a given app by tapping the small ‘x’ at the top right of the section header.


There is, for some reason, no option to clear all notifications at once from the NC. You must clear each section individually. This seems like an oversight and hopefully one that will be rectified soon.
If you visit any of the applications that has notifications waiting in the NC, they will be cleared automatically.
There are several settings related to the NC in your Settings app under Notifications. Among these are the ability to sort the order of the notifications manually or by the time that they came in. If you’ve chosen manual, then you can hit edit and re-order each of the apps to show the notifications that you would like at the top and the others below in the order that you choose.


If you tap on any of the apps in the list, you can choose from several options. You can toggle whether they appear in the NC at all, choose whether 1, 5 or 10 notifications are displayed and even choose how the notifications are displayed. This means you can even get back the old-style popups if you would rather have them back, although who knows why.

You can also choose whether notifications from the app appear in the lock screen and whether a count is displayed in badge form on the app’s icon. I prefer no badges on most apps myself, unless it is one that I visit very infrequently. The notifications elsewhere give you ample warning that you have something waiting for you.
On this screen, you can also toggle whether the notifications appear as they used to, in a modal popup fashion, the new ‘banner style’ or not at all.
As you use iOS 5, you may notice some of the ‘old-fashioned’ notifications are still in use by system messages like ‘failure to connect to WiFi’ notices and anything else that absolutely requires your attention. This is exactly how it should have been in the first place and isn’t a huge bother as generally when you get these messages now they are actually important.
Depending on the app, you may see a couple of additional options on this screen. For Messages, you can choose whether it shows you a preview that displays the text of the message or just the sender’s name. You can also choose whether it alerts you never, once, twice, 3, 5 or 10 times for each missed message. Some other applications also have a ‘sound’ toggle to turn off the custom alert noise.

The ‘banner notification’ is the new default way that you will get alerts from apps while you’re using your phone. Instead of a modal popup window, the top 1/16th of the screen will rotate over in an animation reminiscent of old flight status boards. The notification will be displayed for a couple of seconds and then it will rotate back away.
While it is visible it becomes a tappable area that you can use to launch the app that is notifying you. If you wait, it will just go away. You can also swipe from right to left to dismiss it (in fact, Rene Ritchie of TiPB has the correct behavior in that it is really a slight pull down and flick up that dismisses the notification). This is a far better solution than the modal popup window and, honestly, one of my favorite things about iOS 5.
The old modal style popups were always a hassle, interrupting whatever you were doing in the app and, if multiple notifications came in at the same time, requiring a lengthy process to get rid of them before you could get back to using your phone. This is a huge improvement and finally brings iOS notifications on par with Android, behind which it has been trailing in this area for some time.


The lock screen gives you no access to the NC, but it will now display more than one notification at a time that you have missed. When a new notification comes in it will be displayed in the prominent singular fashion as it used to be, but it will drop back to a thin space on the screen, allowing other notifications to stack up. The app’s icon is displayed in miniature to the left of the notification.

If more notifications come in than can be displayed, you can scroll through them. Any one of these notifications can be ‘swipe to view’-ed. In a motion similar to unlocking, you can launch directly into the app that gave you the notification.
There is an excellent example here of Apple’s intensely detail oriented efforts. When you pull down the NC, hold on to it all the way to the bottom and watch the left and right corners. After it has reached the bottom and you let go, there is a quick animation to round the corners out. This matches the top left and right corners of the NC and reinforces the fact that you’re looking at a panel and not the home screen, which has square corners.
Not a big deal, but a good example of how much care goes into this stuff.
Widgets
The two widgets offered in iOS are a good followup to Notification Center as they are also visible here. By default, both Stocks and Weather are displayed, but either can be disabled in Settings>Notifications.
Widgets are, for some reason, not available at all on the iPad.

The weather widget shows you today’s weather with the high, low and current temperature, as well as the location and a visual of the weather. Swiping right or left on the widget will give you a 5 day forecast instead of the single day.
The stock widget is a running ticker of the indexes and whatever stocks you have selected in the Stocks app. You can pause the ticker by tapping and holding and swipe to the left or right to reverse or forward the feed.
Tapping on either of the widgets will launch the applications associated with them.
These widgets are the only two currently offered by Apple and—at least so far—it will not be allowing third-party widgets or allowing developers to send information to them.
It seems like a logical step, but at the same time there are considerations about whether this will steal focus from an app, effectively creating placeholder icons that just feed widgets. Much of this goes on on Android and it leads to a lot of terrible, ugly widgets.
Any widget that a developer creates effectively becomes a part of Apple’s iOS software as it is embedded into Notification Center. This means that Apple will most likely want to keep this particular feature under lock and key for now. I wouldn’t be surprised to see this as one of the first areas cracked open by jailbreak tweaks though.
Table Of Contents
Notifications | Game Center and iCloud Gaming | Twitter Integration | iCloud | Siri, Dictation & Wireless iTunes Syncing | iMessage | Camera and Photos | Settings | Safari |Mail | Calendar & Contacts | Reminders | Newsstand | Text Editing | iPad Only & Conclusion
Game Center and iCloud gaming
Game Center got some attention in iOs 5, if not as much as many other apps in the standard arsenal. There were many sessions at WWDC about using the new data synchronization features of iOS 5 to allow users to switch back and forth between devices with the same game state, this was probably the most exciting application of iCloud for serious gamers.
Unfortunately, this is something that has to be implemented on a per-app basis by developers and is not some magic toggle that Apple can flip on with the release of iOS 5.
Once developers start taking advantage of Core Data syncing with iCloud, this should usher in a new era in iOS gaming. No other mobile platform offers this kind of syncing service between the various devices in its ecosystem and it could lead to a huge surge in more involved games that require lengthy playing times to get through.
Being able to pick up any iPhone, iPad or iPod touch you own and begin playing a game right from where you left off is a definite killer feature for iOS gaming and a huge feather in the cap of iCloud.
Beyond the data syncing, Game Center also got some other improvements.
There is now a turn-based framework built into Game Center for developers to take advantage of. This means that you can set up truly turn-based games like Neuroshima Hex, Scrabble or Risk without having to have your own servers and syncing service. This wont’ make much of a difference for those develops who have already gone through the trouble of making this happen on their own, but it should lower the barrier for indie developers and those without the resources needed.
Other new additions include the ability to add ‘perks’ and ‘points’ systems to further incentivize gamers to play games beyond just ‘beating’ them. I think the idea of perks is an excellent one and should allow more game companies to add cool features like access to weapons or unlocks in their games based on playtime or achievements. I loved this feature when testing out the excellent Tiny Heroes recently and hope it shows up in more games in the future.

You also are able to set up an image on your profile now, instead of just a name, which should make it easier for you to identify yourself and feels a bit more personal.
Game Center will also give you recommendations on those who it thinks you might like to be friends with based on the games that they play and it will recommend games to you using the same criteria.

Taking a cue from Facebook, there is also now a ‘friends-of-friends’ list for you to browse.

Finding and buying new apps and games can also be done from within Game Center now without having to bounce out to the App Store. This should help with some user curation of games based on taste and lower the annoyance factor of having to track a game down on Game Center.
Just a basic refresh on the surface for most gamers, but some really great improvements that should expand on the usefulness of Game Center for developers and eventually lead to a seamless ‘pick up and play’ experience for iOS gaming.
Table Of Contents
Notifications | Game Center and iCloud Gaming | Twitter Integration | iCloud | Siri, Dictation & Wireless iTunes Syncing | iMessage | Camera and Photos | Settings | Safari |Mail | Calendar & Contacts | Reminders | Newsstand | Text Editing | iPad Only & Conclusion
Twitter Integration
As far back as early last year, Apple had been rumored to be working on deep iOS integration with social network Facebook. Evidence of this had popped up in internal builds of iOS, with Facebook appearing in the system level Settings menu.
This rumored partnership never materialized and instead Apple revealed that it had worked to thread rival service Twitter into iOS 5 to an extensive degree. With this partnership, Twitter effectively signed an immortality clause and became the first outside service to become an integral part of Apple’s OS since the exclusive deal that we have heard Apple cut for Google’s map data before the release of the iPhone.
Single Sign-On
This integration of Twitter comes in many forms, but the basic underpinning is single sign-on . This is a feature that allows users with a Twitter account to sign in to that account at Settings>Twitter on their iOS devices. They are also presented at this point with an opportunity to download the official Twitter app for iOS, if it is not already installed.
You can add multiple accounts here and all of these accounts will be added to any compatible Twitter client when you load it up. Currently the official Twitter app and Tweetbot both support this.


Once a user has signed on to Twitter they can update their existing contacts with the profile image of people on Twitter. This is similar to a feature that currently exists in the Facebook app for iPhone, but is done from the system menu, rather than from inside an app.
This feature will use email addresses and phone numbers to locate Twitter user names and photos and add those to your Contacts app’s entries. This worked generally well for me although I don’t have a ton of crossover here. There is a new field that has been added to the Contacts app for Twitter user names.
The single sign-on feature also has other benefits. Once developers of apps that have Twitter integration begin using this hook, you will be able to automatically log on to any Twitter app. This means that once you have signed in to Twitter at the system level, you can jump right into any Twitter app or client without having to log back on to Twitter.
This does not apply to any applications that use Twitter through Safari though, so you will still have to log on to Twitter.com manually for instance. But it should lower the barrier one step further for anyone with Twitter integration on iOS that wants people to interact with their app.
The ramifications of this for developers are that if you want a user to be able to download an app that is a gateway to a service, like Flickr or Instagram for instance, and begin using it immediately, you can simply add Twitter integration and the user can immediately use it once installed, with now time consuming account signup.
Tweet Integration
Once you have signed in to Twitter at the OS level, you can also now Tweet right from many Apple apps that come installed on your iOS device.
You can Tweet a location in Maps, a picture from the camera roll, a link from Safari or a video from YouTube.


When in an app that supports this, you will see a ‘Tweet’ option once you hit the Share button that you would normally use to email or copy an item. Once you select Tweet, you’ll be presented with a ‘Tweet sheet’ that lets you type your message to go along with the automatically attached item. You’ll notice a character counter here as well as a specially customized keyboard with a shorter spacebar and a dedicated ‘@’ symbol.

In general, this Tweet feature has worked brilliantly for me. There is an option to tap-to-include a current location, although that was a bit annoying as there is a system-level toggle in the Twitter section of the Settings app that is supposed to enable this but it never seemed to work outside of the Maps tweets. I assume this is a bug at this point. Nevertheless, simply tapping the ‘Add Location’ button pops your location right in there.
There is also a nice auto complete that fills in Twitter usernames once you begin typing with the @ button, although this was a crapshoot. It seemed to work well with any hugely popular Twitter accounts, but was not consistent across accounts, even ones that I had added specifically to contacts.
Scoring this prime position as the social partner of Apple’s iOS is a huge win for Twitter and its developer ecosystem. Although Twitter developers have had a lot of issues trusting that Twitter was interested in their survival, most of the ones I have spoken to about this integration seem incredibly happy with the possibilities.
Twitter for its part also seems excited, holding two international Twitter Tea Time events to answer developers questions about Twitter integration in iOs 5 and workshops for developers that are more local.

The amount of effort that Apple has put into making Twitter feel like a seamless part of the environment shouldn’t be taken for granted. This was an immense amount of effort both on behalf of Twitter and Apple. This integration appears destined to stay for the long haul and this spells great things for Twitter and for any developers looking to ship products on Apple’s iOS platform using Twitter services.
The potential for growth here is huge and for developers looking to provide a seamless experience to their users, a system-level single sign-on service will look incredibly attractive. I wouldn’t be surprised to see less apps offering Facebook a as primary account integrator and more using Twitter, at least on iOS.
The benefit of this for a user is largely dependent on whether you use one service or the other, but I think that this will be an interesting trend to watch as iOS 5 gets out there and developers cast their votes by using it.
Regardless of the developer benefits though, the ability to Tweet out images, directions, videos and links directly is a cool one and should cut down on a lot of copying and pasting from Apple’s integrated apps.
Table Of Contents
Notifications | Game Center and iCloud Gaming | Twitter Integration | iCloud | Siri, Dictation & Wireless iTunes Syncing | iMessage | Camera and Photos | Settings | Safari |Mail | Calendar & Contacts | Reminders | Newsstand | Text Editing | iPad Only & Conclusion
iCloud and the PC Free iOS experience
When Steve Jobs introduced the new iMac in 2003, he described it as a ‘digital hub’. This meant that no matter what music, photos, videos or any other type of digital information you had the Mac was the place that would store it all. At WWDC earlier this year, Jobs introduced the replacement for this digital hub which will be called iCloud and reside on mostly on Apple’s servers rather than in your home.
iCloud
As the new digital hub for everything iOS, iCloud is comprised of several different components that are bundled together into one service to make things more seamless for users. Here’s a list of the various aspects of iCloud:
- iCloud syncing – Keeps data synchronized between iDevices and iCloud web services.
- iCloud.com- Web services like Mail, Contacts, Calendars, iWork and Find my iPhone/Mac that can be accessed on the web at iCloud.com. This replaces MobileMe.
- iCloud backups – Backs up iDevices to allow restoring over-the-air and without iTunes.
- Over-The-Air Updates – Devices like iPhones and iPads can now be updated on the fly, without computers.
- iTunes in the Cloud – Re-download purchased songs, music videos and TV shows from any iDevice or computer.
- iTunes Match – A service that matches your existing library with songs in Apple’s iTunes Store, upgrades them and makes them available for download anywhere. Not to be confused with iTunes in the Cloud, although they are tightly integrated.
- Automatic Installation – Any apps installed or music purchased on any of your devices gets automatically downloaded to all other devices.
- iCloud Storage – Space to keep iCloud backups and other synchronized data.
- Photo Stream – A separate stream of photos stored locally on your iDevice and synced to your computer automatically.
- PC Free Setup – Allows users to set up and use iDevices without connecting them to computers. Technically not a part of iCloud, but related to it closely.
iCloud setup and settings
iCloud’s setup is actually very simple. As mentioned in the PC-Free section below, you will be asked to provide your Apple ID and then asked if you would like to enable iCloud when you fire up your device. There is a simple ‘on-off’ toggle for iCloud and no further setup is mandatory.

If you would like to tweak exactly what iCloud features you want to take advantage of you can head to Settings>iCloud to choose which items are synced and which are not. Just toggle any of these items on or off to stop them from syncing with iCloud. You can still sync them with iTunes.
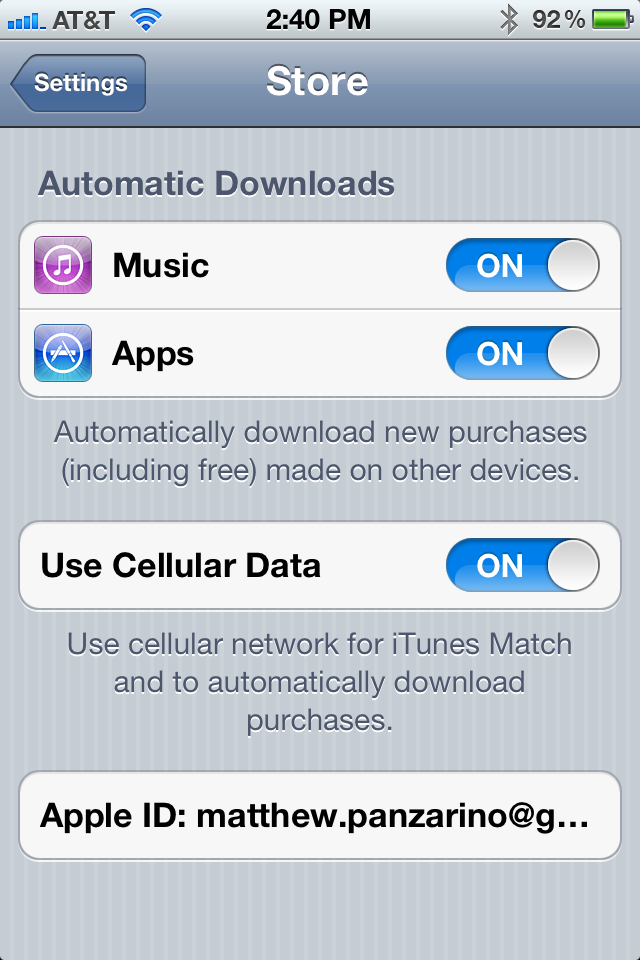
Another set of options that you’ll want to make sure to check out is under the App Store section, where you will find two toggles for Automatic Downloads. Turning these on will automatically download any app or song (or TV Show) you purchase from the App Store onto all of your iDevices and computers with iCloud enabled. It works really, really well and downloads normally begin within a few seconds of purchase.

The Use Cellular Data toggle controls whether iTunes Match and Automatic Downloads work over WiFi only or over your cellular data connection as well.
iCloud Syncing
iCloud syncing is the umbrella under which the various types of data that will be matched between your devices are kept in line. Although Apple itself refuses to use the term ‘syncing’ when referring to many iCloud feature,s it doesn’t’ change the fact that the service does involve an extensive mount of synchronization features.
What Apple has done differently from most syncing services, however, is to remove any thought of conflicts or making syncing choices based on versions of a file. Instead it handles all of the dirty work behind the scenes, turning iCloud into a basic ‘on or off’ choice that a user can make.
Once enabled, many different types of data will be kept in sync across your iDevices and your computers running Lion or Windows computers with the iCloud control panel installed. The basic types of data that will be automatically propagated across your whole collection of Apple devices includes:
- Contacts
- Calendars
- Reminders
- Bookmarks
- Notes
- Photos
- Documents and App Data
If you add a contact on your iPhone, you will see it nearly immediately on your iPad and vice-versa. If you make a change to a Pages document, it will automatically update the versions of that document on iCloud.com and in Pages on any of your iDevices.
Note that you cannot sync your contacts with Google Sync and iCloud at the same time, it is one or the other.
As developers integrate iCloud into their apps, you will be able to do the same with any that you have installed on multiple devices or on your Mac and your iPhone. No longer will you have to transfer documents using Dropbox integration just to continue working on them. Instead the experience will be seamless.
That doesn’t mean that there won’t be a place for services like Dropbox as currently iCloud does not allow you to manipulate or even browse files directly. It is meant as a transparent service that most users will never even see working.
But until others begin using this syncing, you can see it in action now in any iWork application for iOS as well as through the way that the items above ‘copy’ themselves across your devices. I tested out the iCloud-enabled versions of iWork myself and found them to work pretty much as advertised at WWDC.
http://www.youtube.com/watch?feature=player_embedded&v=DCjeSNomXrU
If I created or edited a document in the iPhone version of Pages, the changes were synced very quickly to iCloud.com as well as Pages on my iPad. If you do a lot of iWork editing, this is a great way to have everything working together seamlessly. The updating does not happen in ‘realtime’ so you won’t see it typing along if you have a doc open in two places. Instead, iCloud updates every time an auto-save occurs or you manually save a document. This also happens on exit from an app.
Other than that, there is not much to say about document syncing at the moment.
App data syncing is another matter as this is another use of the APIs that are being introduced to developers in Game Center that will allow you to play a game on one device, pick up another device and play it right from where you left off. With this turned on, you will be able to use any app from any device and have the state and data transferred between these apps automatically.
The easiest way to sum up the way that the app data syncing works is to explain it as Amazon’s Kindle Whispersync service, but for every kind of app. Whispersync is the way that Amazon keeps all of your Kindle devices, including apps on iPhone, iPad and iPod as well as its physical Kindle devices, including the upcoming Fire tablet, talking to one another about the spot that you’re at in a book. If you switch devices, the service will alert you and you can choose to jump right to that spot.
This experience should translate to any and all apps that allow you to work on documents or play around with them on more than one device. This way the iPad version of your Scrabble game will look exactly as you left it during your last play session on the iPhone. Reading through your RSS feeds in Reeder on your iPad? Shut it down and pick up your iPhone. On opening the app, it will sync with the data from the iPad version and you can begin reading your feeds right where you left off.
iCloud syncing has the potential to make your iPhone, iPad, iPod touch and Mac all work seamlessly together. Whether it reaches that potential will depend on developer adoption as well as the speed and reliability of iCloud as it launches and gets under load. It’s a future that I would love to live in though so here’s hoping this works out well.
Over-the-air Updates
Another banner feature of Apple’s PC free iDevice experience is over-the-air or OTA updates to iOS. This is the process of issuing updates to a device without it having to be plugged in to a computer or even erased and restored.
A typical update to iOS previously required that you plug it into iTunes, allow the entire file system to be replaced and then restore your data from a backup.
You will no longer have to do this for most updates, although the initial installation of iOS 5 will be required to be performed this way and any major updates to the iOS software will most likely have to be done this way.

If an update to iOS 5 comes out from Apple, you will be notified that there is an update waiting for you by a small notifications badge on your Settings app icon. When you see the badge, open up Settings>General>Software Update and your device will check to see if there is a new version available for install.
If there is, you can read the release notes and see the version number. When you’re ready to install, make sure that you have a decent amount of battery available, your iPhone will warn you if there is not enough to perform an update. Then tap the install button and it will download the update and begin to install it automatically.
The update process will reboot your iPhone and display a progress bar and the Apple icon. When it is done, your phone will reboot and be ready for use immediately, there is no restore necessary.
This process, also known as a ‘delta’ update, only replaces the files that have been changed or updated by Apple and not the entire operating system. This means that the file sizes of the updates are far lower, 125-175MB versus 800MB+ for a major update.
This means that you can update over WiFi or even 3G much quicker than you would if the update was full-size. Issuing OTA updates that were full-size was never an option for Apple on any data network, so it had to make the transition to delta updates before it could begin to offer this feature.
Like the improved—and non-modal—notifications, this is a feature that Android users have been enjoying for some time and it is an incredible relief to see it come to iOS.
My experience with the OTA updates has been largely positive and it has proven to be a fairly painless procedure, especially in the later versions of the beta, but I still recommend that you make sure that you have a backup of your iDevice before you perform one, whether that is an iCloud or iTunes backup.
PC Free setup
To go along with iCloud, Apple also introduced a brand-new PC free experience for using iOS devices. This PC free experience includes several different aspects. These include wireless syncing to iTunes and iCloud backups which will backup your device without ever having to connect it to a computer but perhaps one of the most dramatic improvements, especially for users without computers at all is the ability to set up an iDevice without plugging it in to a computer running iTunes.
Previously, if you received an iPhone or iPad as a gift, took it out of the box and powered it on, you were immediately greeted with a ‘Connect to iTunes screen’ which stopped you from doing anything else until you plugged it into your computer physically. This was a jarring halt to what is otherwise a beautiful unboxing experience. It felt like it was foreign to the whole iOS device philosophy and it seems that Apple agreed as well.
With iOS 5, when you remove an eye device from a box you are no longer greeted with a connect to iTunes screen. Instead there’s a welcome screen that simply says iPhone or iPad or iPod Touch and a ‘Slide to set up’ where the unlock slider normally sits. Once you slide to set up you’ll be greeted with a series of screens that allow you to set up various aspects of your device.


The first screen is Location services which allows you to enable or disable location Services which allows maps and other apps to gather and use data indicating your location. It does stress that it is the approximate location, which is true. This should do to alleviate the fears of some users that the iPhone is tracking them personally.
Next you’ll get to choose your Wi-Fi network from a list of any of those available. If you have an iPad that is Wi-Fi only or iPod Touch, you’ll need to choose one of these for some aspects of the setup if you do not pick one here the items that the setup wizard presents you will be limited.


Once you’ve chosen your Wi-Fi network, it will lead you into the actual iPhone setup section of the wizard. The choices here are Set up as new iPhone, Restore from iCloud backup or Restore from iTunes backup. The three options will allow you to set up a new device or restore a previous backup either from your computer or from iCloud.
Next, the wizard will ask you to enter an Apple ID with which to associate your device. This will give you access to iCloud, purchased apps and music and more. If you do not have an Apple ID currently, you have the option to create one here as well.


If you choose to set up your device as a new device you will be guided through two more steps. The first will ask you if you would like to turn on contact syncing, photo syncing and other types of features that are all contained within Apple’s iCloud umbrella. This is represented by a simple on-off toggle for iCloud. We definitely recommend you do this, as the service is free by default and provides a very nice way of backing up and synchronizing your device with other iDevices and your computer.
Next you will be asked if you would like to sign on to the Find my iPhone service. This service will allow you to locate your iPhone or other device if lost or stolen, send messages to it, remotely wipe the information to prevent it from falling into the wrong hands and more. There’s really no reason not to enable this service, it’s highly useful.
If, however, you choose the other path and decide to restore from a backup of your device, you’ll be asked whether that backup is from iCloud or from iTunes. If it’s from iTunes, you’ll plug it in and follow the instructions as requested and restore it as you always have. If you would like to restore from an iCloud backup, you’ll be asked to agree to the IOS and iCloud terms and conditions and then it will poll the server with your Apple ID looking for backups.


It will then display the latest backups for the device as well as other backups from other devices. Simply choose a backup and hit restore.
Once you’ve chosen to restore, your device will fall back to a blank screen with an Apple logo and progress bar. Once this portion of the restore is complete, your phone will reboot and you will be presented with a device pre-loaded with contacts and other info as contained in your backup.
If you had a lot of apps installed on your device, you will see that they are re-downloading themselves from Apple’s servers. Only the application settings are stored in your iCloud backup in order to limit the size. This means that once your apps have finished re-installing, they will be in the same state as the backup that you restored from.
iCloud backups
As mentioned, iCloud backups do not contain an image of your entire iPhone. Instead they contain information like your camera roll, accounts, contacts, calendars, documents and settings. They also contain files that store application data, preserving the state of your apps and any information that you have entered into them.
If, for instance, you delete your phone and restore from an iCloud backup, you can pick a game back up from where you left off.
This is important because an iCloud backup does not contain your apps. Instead, it re-downloads the applications that you had installed after you restore from a backup. It does, however, retain your app icon layout, which is nice.

After you restore from an iCloud backup, the apps will begin re-downloading themselves. This takes advantage of the new ability of iOS 5 to download multiple apps at one time from the App Store cloud. This also applies when purchasing or manually downloading apps.
iCloud backups also do not contain music or TV shows. These are instead re-downloaded automatically from Apple’s servers once the restore has been completed. If you have iTunes Match, this will include any songs that have been added to Apple’s database from your library or matched with songs that you have purchased.
You can check the status of your iCloud backups by visiting Settings>iCloud>Storage & Backup. This new settings screen will show you how much total storage you have as well as show you the status of your iCloud backup and allow you to enable it if it is disabled.

This screen will also tell you exactly when your device was last backed up to iCloud and will allow you to force a backup by tapping the ‘Back Up Now’ button. iCloud backups can be initiated over WiFi only. No 3G here.
Photo Stream
The image syncing service of iCloud comes in a couple of forms. First of all, every photo that you shoot gets pushed to all of your iDevices and to iPhoto (as long as you have updated to the latest version, which supports iCloud). This means that every image you shoot is archived in multiple spots.
Photo Stream takes a limited number of these shots, 1,000 to be exact, and keeps them available on all of your iDevices that have iCloud enabled.

This takes the form of a rotating series of images that appears in the Photo Stream album, which appears below the other albums in your Photos app. The images will show up in Photo Stream for 30 days. If you want to keep any of them permanently on your devices simply copy them into another album on your device. Remember though that this is still the low resolution version of the image. If you want the full res, go back to your Mac.
These images do not include videos, which are not synced with Photo Stream currently. They do include any images shot on your iDevices or imported into iPhoto on your Mac. You can toggle that last option off if you wish to keep Photo Stream clear of images that you’re importing from memory cards on your computer.
Here’s a quick video of Photo Stream updating after being enabled on an iPad connected to the same iCloud ID of an iPhone:
Any iPhone, iPad or iPod touch connected to your iCloud ID will get the images in a format that is optimized for viewing only, but your Mac gets the full resolution images. Your Mac also keeps all of these high-resolution images, only the iDevices have a limited amount of storage.
I found Photo Stream to be a complete delight to use. I love the fact that every image I shoot shows up on every one of my devices as I shoot it. It is kept separate from the regular albums so it doesn’t matter that I take a lot of screenshots that show up here too.
This is important because for many people, their Apple ID will also be their iCloud ID. This will lead to every device in the family having access to that stream of photos. So, beware, everyone will be seeing whatever you shoot if you have Photo Stream turned on. There is a toggle to disable it in the iCloud control panel though.
In general, Photo Stream was one of the slickest and most reliable aspects of iCloud for me during the test period. I think that this is going to be an incredibly useful feature that many are going to love.
iCloud Storage
By default, you are provided with 5GB of free iCloud storage space. This can be upgraded to several higher tiers if you run out of space. It has been stated that you will stop getting email to your iCloud email address if you run out of space.
These items are not calculated as a part of your iCloud storage limit:
- Music
- Apps
- Books
- Photo Stream
These items are calculated against your limit:
- App data
- Documents
- iCloud Backups (the biggest chunk of which is usually your camera roll)
If you tap on the Manage Storage button on this screen, you can see how much space you are using out of what you have available. It will also allow you to see the amount each of your backed up devices uses as well as the amount dedicated to your email.
You can tap on any device here to see when the latest backup was, see the backup size and delete the backup if no longer needed. This will free up space for you in your iCloud storage.


There is a link here to allow you to purchase more storage if you need it. The pricing is as follows:
- 10GB $20/yr – 15GB of total iCloud storage
- 20GB $40/yr – 25GB of total iCloud storage
- 50GB $100/yr – 55GB of total iCloud storage
Note that any amount you purchase is added to your existing 5GB of free storage.
If you were a paying MobileMe customer whose account was still active when iCloud went live, then you will be receiving an additional 20GB of free storage.
If you purchase an iCloud storage upgrade, a ‘Downgrade Options’ button appears. You can use this to drop your upgraded plan if you no longer need it. You can downgrade to any tier that is lower than the one you’re using, including the free plan if necessary.
When you choose to downgrade your plan it will take effect on your next payment due date, which could be as much as a year out if you have just purchased the plan. It has not been made clear whether there will be any option for a pro-rated early downgrade but if so, it is not available on the device.
While these storage options should be just fine for any normal iOS device user, it gets a bit more hairy when you consider families with multiple iOS devices all using the same Apple ID to connect to iCloud. Or schools that use a universal ID for staff and student devices.
Apple has not made any statements about larger iCloud storage options being made available to educational or enterprise customers.
Table Of Contents
Notifications | Game Center and iCloud Gaming | Twitter Integration | iCloud | Siri, Dictation & Wireless iTunes Syncing | iMessage | Camera and Photos | Settings | Safari |Mail | Calendar & Contacts | Reminders | Newsstand | Text Editing | iPad Only & Conclusion
Siri and Dictation
Apple specifically calls it “Siri: the intelligent assistant to get things done just by asking.” This technology was built out of Siri, an assistant app that Apple purchased last year.
The feature is activated using a long-press on the home button and a command spoken to the iPhone.

Many different commands were demonstrated including getting the weather, directions on maps, recommendations for restaurants and more.

A typical exchange goes something like this:
- Scott Forstall: “Find me a great Greek restaurant in Palo Alto.”
- Siri on iPhone: “I’ve found five Greek restaurants, and I’ve sorted them by rating.”
Scott Forstall said that “I’ve been in the AI field a long time. This blows me away.”

Siri also features integration with Wikipedia and popular data engine Wolfram Alpha to provide definitions and more.

“Compose and dictate email right to Siri,” said Forstall, demonstrating the new feautre. “Set timers. Look up contacts, create notes, search the web, search Wikipedia. It’s absolutely blow-away. Well, who is Siri? Just ask!”
Siri: “I am a humble personal assistant.”
Another component of Siri is Dictation, a new speech to text feature that will be built into the new iOS5. Dictation processes natural language, contextual and conversational, and works with built-in apps. We first wrote about Dictation in August, when we discovered a microphone icon in the keyboard of iOS 5.
“Now whenever you see a keyboard, you’ll see a microphone. Talk to Siri, tap done, and in the blink of an eye it comes back with your text. Speak with your natural language,” said Schiller.

As you can see in the screenshot above, once the Dictation feature has been enabled, it will appear next to the global keyboard button, making the Spacebar slightly smaller. The microphone icon can be tapped, allowing you to speak into it. Once you’re done speaking the text appears in the field above.
Wireless iTunes Syncing over WiFi
In addition to being able to back up your device with iCloud, you are also able to set up wireless syncing to iTunes across a WiFi network. This syncing happens automatically when your device is plugged in to power and connected to WiFi.
You can force a sync by going to Settings>General>WiFi Sync and tapping Sync Now. If you plug your device in to sync it with iTunes over a cord, this will disable iTunes WiFi syncing.

Regardless of how you sync, whether it is wireless or by cable, you can now continue to use your device. This seems like a silly addition to mention but I’ve already extensively utilized this. I never realized how annoying it was to have to wait to use my device until the sync was done before.
Every time you sync with iTunes, a backup will be created, as has always been the case. These backups are only available to restore from if you plug the device into the machine that you synced it to. If you would like to restore from a backup while not plugged into the computer, you should take advantage of iCloud backups.
iTunes in the Cloud
iTunes Match, as a service largely confined to iTunes, is best discussed elsewhere. But another component of iCloud related to iTunes is worth talking about here. iTunes in the Cloud is a service that allows you to re-download any songs, apps or TV shows that you have purchased through iTunes.
You can then download any of these items on any iDevice or computer with iTunes installed. To do so, visit the purchased section of the iTunes store and tap the cloud icon to re-download them.


This does dovetail nicely with iTunes Match in one aspect. With iTunes Match, any song that you have in your personal library gets matched with Apple’s iTunes library. If it matches and is of a lower quality, it gets upgraded to a higher quality version and if it does not match, it is uploaded and available to you on any of your iDevices through iTunes Match.
If you have iTunes Match then your songs will be visible right in your Music app and you simply tap any song to stream it instantly from the cloud or tap the cloud icon to download it.
TV shows were recently added to the allowed downloads and it has been rumored that Apple has been working to add movies to the available options but it is apparently still cutting deals as no announcement was made at the event introducing the iPhone 4S.
Table Of Contents
Notifications | Game Center and iCloud Gaming | Twitter Integration | iCloud | Siri, Dictation & Wireless iTunes Syncing | iMessage | Camera and Photos | Settings | Safari |Mail | Calendar & Contacts | Reminders | Newsstand | Text Editing | iPad Only & Conclusion
iMessage
Announced right along side the rest of the features of iOS 5, iMessage took on the appearance of just another aspect of Apple’s new OS. A convenience feature or marketing tool, much the way in which Facetime was received at its announcement with iOS 4.
But iMessage is actually a very stealthy and potentially incredibly disruptive system. It could very well shift the balance of power in Apple’s ongoing war to democratize carrier choice.
iMessage is basically a messaging protocol that is used to allow users of iOS devices to text message one another. It is similar to the popular BBM service used by BlackBerry owners in that is a cross device (but in-platform) service that features read receipts and typing indicators, but differs in that it is a point-to-point service that does not require an intermediary server. Instead it uses Apple’s push notification system to establish a connection and handles the communication between the two devices.
The stealthy aspect of it lies in the fact that it is not its own app. Instead, it is integrated directly into the Messages app on iPhone, iPad and iPod touch.
The Messages app is, of course, new to the iPod touch and iPad, but the iPhone has used this as the place to send picture, video and text messages since iOS 4, when it was renamed. This remains constant as you can still send any of those kinds of messages out to any mobile phone.


The difference now comes in that there are two modes used for sending. There is the normal mode, in which your text bubbles are green. This is your normal SMS/MMS mode and you will se this when messaging any phone that is not an iPhone or any iPhone that is not on iOS 5.
If the iPhone, or iPad or iPod touch, is on iOS 5 however, you will see a blue bubble instead and the ‘send’ box will display a faint ‘iMessage’ text.
When you’re in this mode, you can send message to any iPhone user, iPad user or iPod touch user on iOS 5 completely free. This is what we like to call a ‘very big deal’. You can thank this tectonic change for the recent policy change by AT&T to limit text message plans to ‘pay per text’ and unlimited. It needs to get its pound of flesh somehow.
When typing an iMessage, it works exactly as any other message does and yes, you can send pictures and videos through the service, also free of charge. For those of you addicted to Cinematographs, iMessage also supports animated GIFs.
If you’re on the receiving end of a message, you can choose to turn on read receipts which will add a small notice under the last message on the senders phone letting them know that you have read it. Regardless, you will always be notified that it has been received by the other device properly.

If you happen to still be looking at the conversation when the other party replies, you will even get a ‘typing’ symbol that tells you the other person is in the process of crafting a reply.
A nice tweak in the conversation view allows you to scroll down to see all of the conversation, at which point your keyboard will automatically hide.
On an iPad or iPod touch, the service is used by assigning it an email address and advising people to message you at that email. Once you’ve linked an email any messages sent to either your phone number (if you have an iPhone) or that email address will get sent to all of your devices so that your conversation is kept up to date on any of them.


One difference is the way that push notifications are handled. In my testing whatever device was used last seems to get pushed message alerts the most regularly. I saw some other ideas floated that played around with the way that Apple assigned priority but the ‘device with the least idle time’ seemed to be the most likely result.
The settings for iMessage will allow you to disable the service entirely if you would like to for some odd reason. It will also allow you to enable or disable falling back to sending an iMessage as an SMS when it fails as an iMessage. Note that this does not disable sending SMS messages, it only prevents iOS from sending your iMessage as a regular text message if you initiate it and then it fails. If the text input field says ‘Text message’ to begin with, then it will just send a text message.
Being able to message someone on the iPhone, then continue the conversation seamlessly on an iPad is very cool. It is especially nice in the evenings when I am more likely to have iPad in hand rather than iPhone.
None of this is very new, as IM clients have been doing it for years. It is a nice improvement to the way that iOS messaging works though and should be a very nice bonus for those that find themselves messaging other iPhone users most of the time.
Without any intervention by the user, they will find themselves automatically saving money on messaging whenever they’re doing so to fellow iPhone users. That is pretty powerful.
Table Of Contents
Notifications | Game Center and iCloud Gaming | Twitter Integration | iCloud | Siri, Dictation & Wireless iTunes Syncing | iMessage | Camera and Photos | Settings | Safari |Mail | Calendar & Contacts | Reminders | Newsstand | Text Editing | iPad Only & Conclusion
Camera and Photos
In keeping with the focus of the iPhone 4S as your standard pocket camera and its enhanced 1st shot and shot-to-shot times, iOS 5 ’s Camera and Photos apps have gotten a makeover as well.
In order to improve the speed with which you can use your iPhone to shoot an image, you can now double-tap the home button while your iPhone is locked to reveal a camera icon to the right of the ‘slide to unlock’ bar.

This button launches you directly into your camera app ready to take an image. The camera app will open in the mode that you last used it in. When you tap the home button after you’re done using it, you will be deposited on the home screen. If you have a passcode lock enabled, you will have to enter your passcode to get access to the home screen.
There is a bit of an issue here though in that you can shoot an image, that is saved to your camera roll, without entering the passcode. I would like to see an option placed in the Settings menu under Camera that allows you to toggle this behavior on and off, if only to prevent people from grabbing your iPhone and shooting potentially embarrassing images on your device for you to discover later.
Let’s call this setting ‘No pictures of my friend’s junk’.
There is one concession to security in that when you activate the camera this way with a passcode lock enabled, only the images that have been shot in that session are visible and both your Camera Roll and your Photo Stream are invisible.
Once you’ve fired up the camera app you can also now shoot an image with the physical ‘volume up’ button of your device. This is a welcome addition and leads to a more natural ‘crab claw’ hold that approximates the way that you hold a standard point-and-shoot.
In my experience, this had led to more speed and less blur when shooting images. The physical button is easy to find without looking so you can concentrate on snapping the picture and it is far easier to hold the phone steady without having to tap the screen to fire a shot. In a nice carry over move, you can also use the volume up button on your iPhone compatible headphones to shoot it. If your iPhone is mounted on a tripod or sitting somewhere on a table, this can act as a ‘cable release’ to help further prevent blur.

In addition to the quick shooting upgrades, the Camera app has also gotten a nice focus and auto-exposure lock. This is activated by tapping where you would like to lockt he focus and exposure and holding your finger down until the focus box enlarges twice. It’s a sort of ‘pop pop’ animation, you’ll know that you were successful as the focus box gets smaller and pulses.
This engages AE/AF Lock, which locks your auto focus to that point on the screen and your auto exposure to that level of light. This is a very useful tool for photographing backlit subjects and shooting in off-center compositions. This is a popular reason that many people purchase third-party apps like Camera+. There is still no way to lock exposure in one place and focus in another, but this is a nice upgrade.

If you enjoy getting your photos dead straight there is a new Grid Lines option which can be toggled via a menu at the top of the camera view.
You can now pinch the camera view to zoom, instead of using a slider. I almost never zoom but if you do, this makes it a tad quicker.
When you tap on the Camera Roll button in the bottom corner you are taken to your normal view, but the button is now replaced with a blue camera icon that makes it more evident that you can jump back to shooting images.
If you would prefer, you can also now swipe to the right to switch from your Camera to the last image in your Camera Roll. Swiping to the left will bring back the Camera. Nice way to quickly check your last image, think of this as a ‘quick review’.
In the Camera Roll view you can now tap edit to get access to four editing features. Rotate, Auto-Enhance, Remove Red-Eye and Crop are all welcome additions to the Photos app.


The Auto-Enhance feature works best with images that are borderline but a bit dark. This includes the aforementioned backlit images. If you’re familiar with photo editing, this is basically the equivalent of giving it a little fill light, a bit of contrast and a boost in saturation. In my testing it took some iffy images over the line into keepers and made some good nighttime photos a bit brighter and more colorful. Nevertheless it is still a relatively subtle effect.
The Remove Red-Eye feature also works pretty well but, like its counterparts on point-and-shoot cameras, it only works with well delienated red eyes. No pet-eye correction or ‘white-eye’ correction here. Just tap the icon then the red eyes to correct them.

The crop tool will start out in the proportion of the image you’re editing and allow you to freehand crop your image by grabbing the handles at the corners and moving them around. If you’d rather keep the proportions of the image fixed at a particular ratio you can tap the Constrain button at the bottom.
This menu will give you a set of proportions to choose from including many popular print and display sizes.
I found this useful when cropping images to post in Instagram, which still has very poor internal cropping. It could also be nice to edit images that you will print at a photo lab so that you know exactly where your borders will be when you print.
When you’re done editing, tap the save button in the upper right corner. The Auto-Enhanced version of your image saves over the top but you can toggle it back off by re-editing the image. If you make a crop, it will ask you if you would like to save an edited version in your camera roll.
The Photos app itself is largely unchanged besides the addition of Photo Stream, but you can now tap the Edit button to add or delete photo albums directly on your device.
On the whole, Apple has done a great job overhauling the Camera app to reflect the new focus on quality and the iPhone 4S as a point-and-shoot camera. Thankfully, iPhone 3GS and iPhone 4 users also benefit from these new features.
Table Of Contents
Notifications | Game Center and iCloud Gaming | Twitter Integration | iCloud | Siri, Dictation & Wireless iTunes Syncing | iMessage | Camera and Photos | Settings | Safari |Mail | Calendar & Contacts | Reminders | Newsstand | Text Editing | iPad Only & Conclusion
Settings
The Settings app has gotten an absolute ton of new options that allows you to tweak your device and take control of the new iCloud features. Where applicable, I’ve talked about the settings panels related to those items in their sections, but there are a few items that are related to the iPhone’s system services that should be mentioned. Lets take a look at some of the new settings here.
Throughout the Settings app you’ll get a face full of the new toggle switch design that Apple cooked up for iOS 5. The earlier design was a rectangle with rounded corners, but this new look is more round than rect and has a pleasant effect.
Sounds
The Sounds panel has gotten a nice update and now allows you to choose a variety of tones for the alerts: New Voicemail, New Mail, Sent Mail, Calendar Alerts and the new Reminder Alerts and Tweets. In addition to the standard Ringtones section, you now have an Alert Tones section, which allows you to select from a list of shorter sounds that are more appropriate for alerts like incoming emails than a full-on ringtone.


This is an expansion on the old Text Tone section and offers a wide array of choices now, as opposed to the 6 available before.
Vibrations
Buried under the Sounds settings pane is the Vibration controls and a new section called Create New Vibration. This allows you to choose from a series of preset vibrations or, and this is very cool, create a custom vibration of your own by tapping.


These can also be assigned to individual people and incoming alerts, allowing you to create a custom vibration for certain callers and events. This way you will know exactly what is coming in without having to take your device out of your pocket.
Location Services/System Services
In keeping with its concession to Congress that it could make it even more evident when an app is requesting a user’s location and exactly what types of information are gathered and used, Apple has expanded on the Location Services menu by adding a sub-menu at Location Services>System Services.
The System Services menu shows you exactly what parts of the OS are accessing location-based information. These include:
- Cell Network Search
- Compass Calibration
- Diagnostics & Usage
- Location-Based iAds
- Setting Time Zone
- Traffic
Most of these are pretty boring as it is a no-brainer that your device would need access to your device’s location for these features (some may not display on your iPad). But there are a couple of standouts.


For one, if you’re absolutely opposed to getting location-targeted iAds, you can toggle those off here.
The really interesting bit, however, is the the last toggle, the one labeled ‘Traffic’. You may remember that when Apple was discussing its location data collection earlier this year that it said it was working on a ‘traffic service’ although it didn’t elaborate on what that meant. It could be a vehicular traffic service, as many have supposed, or it could instead be a way to measure network traffic to improve the service of iDevices on carrier backbones.
Heck, it could even be Apple gathering data in order to build its own network to run iDevice data service on, it’s impossible to know at this point. Whatever it is, you can toggle it on and off here.
Note that I did some testing and do not believe that this is related to the traffic option you can turn on and off in the Maps app.
The Location Services section of the Settings app really demonstrates how granular the control that Apple gives you over how your location information gets used really is. This is a far cry from the single toggle of iOS 4 and a nice improvement over the per-app control that came after ‘location gate’. If you’re concerned about how your device uses this information, you now have an extensive array of controls to govern it.
Usage
This section, found at General>Usage is where you can check to see how much storage apps are using on your system. You can delete apps right from this list, which is sorted in order of the amount of data used. This is the first time that Apple has offered more than one way to delete apps on the device itself.

The iCloud storage section is a duplicate of the information that you can see in the iCloud menu, a rare duplication of functionality for Apple but one that is not unprecedented as the WiFi settings is similarly doubled.
At General>Usage>Manage Storage, you can see what size your backups are, purchase more iCloud storage and see what amount of storage is still available on iCloud.


The marquee feature here is the ability to toggle certain apps off so that they do not back up in iCloud. This is a very useful way to minimize the size of your iCloud backups if you have apps that aren’t as critical and that you can do without backing up. In general the Camera Roll will top this list but as it’s unwise not to back up your images, I advise that you do not toggle this off.
Restrictions
There are a few new options here that allow you to restrict if changes are made to your Location Settings toggles and whether multiplayer games or adding friends is allowed in Game Center, but the real juice here is a fix to the long-standing complaint about in-app purchases and kids.
See, if you purchase an app and then hand your device off to your child, they then have a 15 minute window in which your ID stays active and they can make as many in-app (or App Store for that matter) purchases as they wish. This has led to extensive complaints from parents whose kids have racked up big bills doing so.


Now, there is a selection that allows you to require your password immediately, rather than only every 15 minutes. This means that you can leave in-app purchases and App Store purchases active, but require you to re-enter your password every time anything will be charged to you. This is a nice improvement over the previous option that allowed you to turn off IAP entirely, which could be inconvenient if you wanted to use your device as well.
My Number/Device Name
You can now change your device’s name under Settings>General>About, something that used to only be possible via iTunes. This is fitting as a component of the PC-free philosophy of iOS 5. You can also change your phone number under Settings>Phone.
Table Of Contents
Notifications | Game Center and iCloud Gaming | Twitter Integration | iCloud | Siri, Dictation & Wireless iTunes Syncing | iMessage | Camera and Photos | Settings | Safari |Mail | Calendar & Contacts | Reminders | Newsstand | Text Editing | iPad Only & Conclusion
Safari
Safari has gotten a ton of under-the-hood improvements to its Webkit rendering engine that have boosted performance significantly. In addition there are more options available to those developers looking to make web apps that look more like native apps.
Apple has also dropped a bunch of little tweaks into the app along with two major features.
Safari Reader and Reading List are two items that are focused on the article reading aspects of Safari Use. Reader allows you to tap on a contextual icon that appears in the address bar. This icon will open up a new modal popup that displays the text of a page stripped of adds and re-flowed to fit the window. It’s basically the popular Readability service, now built in to Safari.
Reading list is a quick way to add pages to a list that is synced over iCloud and sent to all of your iDevices and Mac computers. It’s basically a glorified sync list for articles that you don’t want to add to your permanent bookmarks.

Still, it works well and items sync almost immediately. This is a good way to send items from your iPhone to your Mac or iPad for reading on a larger screen. I still largely prefer Instapaper to either of these services as it does it all in one go and offers more features.
Private browsing, which can now be toggled on in the Settings>Safari menu, is a welcome addition to those using a shared device to browse websites that require a personal login. Once toggled on, the UI of Safari turns black, a clear identifier that makes it obvious you’re in private browsing mode, where no browsing history or cookies are recorded.

The iPad version of Safari gets a couple of unique features. The biggest of these is tabbed browsing which allows you to browse in a much speedier and more convenient manner than having to choose between pages in an expose-like interface.

There is a ‘find on page’ dialog that sits above the keyboard, allowing you to search for text on that page. Also, if you hold down on the back button it will show you the recent history of visited websites.
In the Safari section of the Settings app, you can now choose to have all of the pages you open get sent to a new tab in the background, or to a new page in the background if you’re on the iPhone.
Also in Settings>Safari is a section that lets you delete data saved on your device by websites or web services.

The changes for web developers are extensive but you can read about some of them here but the gist of them is that Apple is making it easier than ever for developers to make great looking web apps that look and feel like native web apps including momentum-enabled scrolling, uniquely placed toolbars and more.
My experiences with Safari in iOS 5, both on iPad and iPhone, have been largely positive. The changes under the hood have made this one of the fastest browsers on any mobile device once again and the improvements to the architecture for building web apps will lead to even more choice for developers and consumers.
Table Of Contents
Notifications | Game Center and iCloud Gaming | Twitter Integration | iCloud | Siri, Dictation & Wireless iTunes Syncing | iMessage | Camera and Photos | Settings | Safari |Mail | Calendar & Contacts | Reminders | Newsstand | Text Editing | iPad Only & Conclusion
Rejoice, all who love bold, italics and underline formatting in your email as iOS 5 finally brings these options to Mail.app.
When you select a word or phrase you are now given some options in addition to copy and paste that allows you to choose from these three formatting choices.


Another button added to the contextual box that pops up, which has actually been made subtly larger in this version of iOS 5, with a bigger hit target, is Indentation control.
You can select blocks of text and move them up or down in indentation level. This should help when editing or creating threaded email conversations, which Mail also now supports on the iPad. Instead of a list of emails between users, you’ll get a single page view with previously quoted conversations in progressively deep threaded indents. You can also set your default replies to indent one quote level in Settings>Mail, Contacts and Calendars.
It’s much more viewable and a nice improvement over the way that it still shows as separate emails inside a thread.
Mail also gets the addition of a basic ‘Flag’ option that you can access through the ‘Mark’ menu on each email.


When writing an email you can now drag recipients in the address fields so you can re-arrange the ‘send to’ and ‘CC’ addresses.
Another couple of tweaks worth mentioning are that Mail.app will now warn you if you send a message without a subject and that you can now create folders for mail right on the device itself. Mail will also now warn you if you’re sending an email that has no subject.


Many of the tweaks here are designed bring Mail.app more in line with its Lion counterpart and they succeed fairly admirably. There is very little left that you cannot do in the iOS version of Mail that you can on a Mac. As more users are turning to the iPad to help them get through their email in a given day this is a welcome update.
Table Of Contents
Notifications | Game Center and iCloud Gaming | Twitter Integration | iCloud | Siri, Dictation & Wireless iTunes Syncing | iMessage | Camera and Photos | Settings | Safari |Mail | Calendar & Contacts | Reminders | Newsstand | Text Editing | iPad Only & Conclusion
Calendar, Contacts, Maps & Weather
In the interest of enhancing your ability to use all of its apps from the devices themselves, rather than requiring a computer, Apple has added the ability to create and rename calendars on any iOS device. You can also delete old ones that you don’t use any more.
Tapping and holding, or double-tapping, on a day and time will create a new event. You can now drag appointments around the calendar once you’ve created them instead of having to change the time manually and duration can be adjusted with handles that appear on either side of a selected event. This makes tweaking start times and lengths very easy and much more touch friendly.

On the iPad there is a nice new yearly view that allows you to see the entire year at a glance with days that you are busier color coded in yellow and orange. You can also swipe to change the months in the monthly view.

There is also an iCloud-based invite system that allows you to create an event and invite any of your contacts by email. If they are also on iOS 5, they will get reminder alerts from iCloud when the event nears. You access this by tapping on the Invitees field inside an event.

Contacts, however, still lack one major feature that would allow them to break the cord completely: the ability to add and remove groups and to edit their members. I don’t understand why this is still a non-feature as it effectively requires you to connect your iPhone to a computer to create and edit the groups in Address Book or whatever application you use to manage your contacts on a Windows PC.
Aside from the lack of group editing though, Contacts has been enhanced with a few more fields, including additions for Twitter and for relationships. This Relationship field will enable applications like Reminders and Siri voice assistant to incorporate your family into their programming. Reminders even asks you to specify relationships when you fire up your first reminder.
This way you can say things like “remind me to call my Mom” and these apps will search your contacts for the item with ‘Mom’ in the relationship field.
The Weather app is largely unchanged, although you can now tap on the daily display to get an hourly forecast for your given day. This forecast is scrollable. In addition, Location Services will now give you your local weather automatically.

The Maps app has also only gotten a couple of tweaks. You can now print your Maps and directions using AirPrint, in an option that appears with the traffic and map display choices.


Maps will also provide you with up to 3 alternate routes to a location, which will appear as faint blue lines on the map after you’ve asked it for directions. You can choose between these directions by tapping on each route, allowing you to switch between highways and city streets, for instance. This can be especially useful for biking or walking directions as it allows you to get a route that avoids busy streets.
Reminders
Reminders is another particularly useful tool that doesn’t just serve as a way to keep you on top of tasking by listing them ready for you to complete them, it can also be set to display your tasks with due dates but also be reminded to perform a task or complete something when you physically arrive at a location,
Apple has made sure to make it easy to remember the things you shouldn’t forget. Before, you would have to take out your phone, write down a note and hope you remember it or set an alarm, but with the new app and Apple’s new Siri functionality, you can either enter a reminder in your to-do list or tell Siri to add it.


If you own an iPhone 4S, you could theoretically ask Siri to remind you to feed your neighbour’s cat as soon as you get home. When you do this, the assistant will bring up the Reminders app, add in the task and then set a location flag, meaning that when you arrive home, the app will immediately notify you of the task you need to complete – in this case feed the cat.
There is one annoying bug in Reminders in that you cannot set an address other than your current location or one attached to a contact. It would be nice to be able to choose from a location with the Maps dialog or simply to punch in one as well. I’m not sure if this was intended, but it seems silly.
All reminders can be synced with iCal, Outlook, and iCloud, ensuring changes you make are updated automatically on all your devices, but also your calendars on different machines.
Gone are the days are being moaned at by your significant other, boss or friend. Fire up Reminders and enter your tasks and locations, or if you have an iPhone 4S tell it what you need to do, and never forget another important reminder.
Newsstand
As part of the iOS 5 update, Newsstand comes as another native iOS application in iOS 5 that cannot be deleted, even if you don’t think you will use it. The app itself is an extension of the App Store, providing a way to subscribe, read and manage your magazine and newspaper app subscriptions in one place.
To utilise the new Newsstand application, simply launch the app from your homescreen and if you have already subscribed to any publications via the App Store, they will all be listed within the virtual bookshelf in the app itself – if you are new to these subscriptions, hit the ‘Store’ link and you will be whisked away to the App Store to choose from the long list of publications offering iOS versions of their newspaper or magazine.

When you make a purchase, it will automatically be added to your Newsstand app. Every time a publication pushes a new issue, the app will update them in the background, delivering you the latest news and information as soon as it becomes available.
If a publication issues updates to that issue after it Newsstand has done its ‘once daily’ pushed update, you will still get the updates, but only if you launch the publication itself. Newsstand is limited to a single daily release for each publication in order to keep data transfer rates down.
One irritating issue is the fact that, as it is effectively a folder itself, you cannot place Newsstand inside any other folder. This means that you cannot tuck it away if you plan on not using it. I’ve resigned myself to shoving it on the last page of my iOS devices as I rarely use them to read magazines, but if you’re a regular reader that has been looking for a way to collate your various subscriptions, this should be a nice addition.
Newsstand is a bid by Apple to bolster the popularity of periodicals on iOS devices by collating them together in one place in a similar fashion to the iBookstore. It remains to be seen whether this will be successful, although the fact that it will be present on the home screen of every iOS 5 updated device and every new one sold from now on probably doesn’t hurt its chances.
Text Editing
Text editors who use the iPad and iPhone to type large volumes of text should rejoice as you’ve gotten a couple of nice features here.
One is the new Shortcuts option that is tucked away in Settings>General>Keyboard. This is basically a TextExpander feature for iOS that allows you to assign short text strings that trigger longer phrases. This way you can type ‘adr.’ and have Shortcuts fill out your address or, as the example is given, type ‘omw’ and have ‘On my way!’ appear. This is obviously a feature that is aimed at texting, but if you do a significant amount of text editing on iDevices, this could become a valuable tool for entering strings of frequently used text.
There are also some enhancements to the text editing popup that you get when you select a bit of text. The size of each of the sections has been slightly enlarged and the touch-targets are bigger, making it easier to choose from the editing options.
Unfortunately there is no support for rich text editing outside of mail at this point so no options for italics, bold or underlining here.
The Replace option is gone, and ‘Suggest…’ has taken its place, offering you a selection of word options for unknown text entries. You can also now tap the right arrow to reveal a Define option that allows you to grab the definition of a given word, which appears in a popup.
AirPlay Mirroring
Apple has added the ability to mirror the iPad’s entire display to an HDTV with iOS 5. This AirPlay Mirroring was previously thought to be limited to the iPad 2 but Apple announced last week that it would also be on the iPhone 4S.
This feature requires that you have an iPad 2 or an iPhone 4S and an Apple TV all running their latest versions of iOS.
In any app, iOS wide, you can now double-tap the home button to bring up the multitasking bar. Once you do, you can swipe over to the left to reveal the AirPlay button. Tap the button and choose the Apple TV from the list of options.

AirPlay Mirroring is another stealth feature of iOS 5 that I think will have a wide spread impact on the way that people use their TV’s to game and video chat from their living rooms. It effectively turns the iPad and iPhone into gaming consoles and remote teleconferencing systems. I can’t stress enough how cool of a feature this is for those that own an Apple TV.
Music and Videos
The ‘iPod’ app has been split into two separate apps in iOS 5, the Music and Videos apps. Not much has been changed about the way that they operate though so there’s not much to talk about but there are a couple of tweaks worth mentioning.
The Music app now has access to iTunes in the Cloud downloads of your songs, as the Video app does your TV shows. These are accessed by tapping the cloud icon next to each item in the list as we mentioned earlier in the iTunes in the Cloud section.
Long song names now scroll by while you listen, rather than just getting truncated with an ellipsis and you can also now hold down on a song’s name to get a popup that shows you the name of the track and artist.


The iPad’s version of the Music app has also been redesigned with a clean and simple layout.

Accessibility
Apple has added a feature called AssistiveTouch its already extensive arsenal of accessibility features in iOS 5. This is a system that allows you to turn on a touch based panel which activates the hardware features of the device.

You can use AssistiveTouch to activate the home button or lock the screen, or change the volume, for instance. There is also a provision for creating custom gestures that you can assign to actions. These gestures can be activated using 3, 4 or even 5 fingers.

While these are designed for use by those who need a primarily gesture-based interface for one reason or another, there is also some potential here to create some shortcuts that anyone who prefers a touch-based device to be ‘only touch’ could use to make that happen. There are also some applications for times when the hardware controls are obscured, as when locked down in brackets at a school, museum or in another industrial application.
Whatever the use, it just goes to show that Apple is always thinking when it comes to making its devices more usable for more people.
There is also a new ‘Speak Selection’ option that allows you to select a chunk of text and use an option in the contextual popup to have your iPhone speak that text out loud to you. Pretty cool, and should help those with impaired vision, especially on the smaller screen of the iPhone.


iPad Only
A few of the tweaks made to iOS 5 are limited to just the iPad alone. Some of these, like the tabbed browsing in Safari, are integrated into certain apps. But some stand alone as part of the system and make the iPad iOS experience that much better.
Two of these changes make using the iPad so much better than it has ever been. First, iOS 5 introduces a split keyboard for the iPad. This allows you to pull up the regular keyboard and pinch it apart in the middle, splitting it into two smaller thumb-sized panels that sit on the sides of the iPad. This revolutionizes typing while holding the iPad in portrait, effectively turning the huge ‘regular’ keyboard into a comfortable thumb typing keyboard.


You can also tap the small keyboard butto in the bottom right corner of the screen and choose to simply un-dock the keyboard, floating it up to the lower third of the screen. This is less useful but perhaps still nice for people with larger thumbs. To re-join the split keyboard you can pinch it back together or use the button. This feature makes typing while holding the iPad comfortably a huge joy, rather than a huge pain.
The other major change is the official addition of the ‘Multitasking gestures’ introduced to developers in the beta of iOS 4.3. These gestures, which you can enable via the Settings>General menu, allow you to pinch out of an app to the home screen with 4 fingers, swipe up to reveal the multitasking bar and swipe left or right while inside an app to switch back and forth.
Since beginning to use the gestures earlier this year, I have grown completely addicted to the quickness and slickness of their use. I rarely ever touch my home button besides waking the device now and it truly feels great to be able to jam around between apps and access the multitasking bar with just a swipe of your fingers. It makes using the iPad feel fresh and truly makes you feel like you’re living in the future.
There are a scattering of other items that are different on the iPad, like the ability to pick a particular event while using the iPad as a digital picture frame, but these are the two major ones.
These concessions to the iPad as a much larger device that has room for more fingers and that may be a bit too large for thumbs to type on are a good sign. I hope to see more enhancements to iOS in the future that take advantage of the iPad’s larger screen real estate.
Conclusion
Should you upgrade? Yes. Absolutely with no hesitation do it now. My devices have been almost completely stable on iOS 5 since beta 7 and the GM seed, which is apparently nearly identical to the release version of iOS 5, is top notch. There hasn’t been a jump forward like this in many versions of iOS and it literally makes your device feel brand new it’s so good.
Yes, there are bugs and quirks, but that doesn’t surprise me as so much work has been done on this release. Overall I found any issues to be so minor as to be unnoticeable by most users.
What we’re seeing with iOS 5 and iCloud is the culmination years worth of blood, sweat and tears expended chasing the vision of Steve Jobs. This vision was set out 14 years ago by Jobs himself in a Q&A session shortly after returning to Apple as CEO in 1997. This wasn’t even a prepared presentation, Jobs’ statement was in response to a question from the audience, but in that detailed answer, he laid out the seeds of what would become iCloud, Apple’s array of connected devices and the future of the Mac as just another device, rather than the collect-all “digital hub”.
Apple may have taken a detour in 2001 in describing the iMac as that hub, but the vision was clear. That vision has begun to be realized with iOS 5 and iCloud.
I say ‘begun’ because the elements that are in place do feel great, but it is up to developers to adopt and expand on the themes and uses of iCloud to truly make it successful. Only then will we see whether iCloud can not only bear up under the logistical strain of millions of users, but also whether it can deliver on the promise of a connected hub in the cloud that allows us a seamless client-based experience across all of our devices.
It is also up to Apple to ensure that the service runs smoothly and that it drives forward with plans to integrate iCloud into every aspect of the iDevice and Mac experience.
That being said, it works very well now and the addition of a host of upgrades and tweaks like Notification Center, the Camera upgrades and more, this is easily the best version of iOS yet and makes the iPhone and iPad feel less static and more like the part of a living, breathing service. Go get it now, you won’t be sorry.
Get the TNW newsletter
Get the most important tech news in your inbox each week.