
The story of Victor Frankenstein and his infamous monster has been told time and time again: a young doctor animates new life by piecing together bits of old, decaying materials.
Though this morbid experiment seems like it should only succeed in vintage horror novels, its concept can actually be applied to your blog content. At a high level, the strategy is about taking an old blog post and adding fresh content so that it continues to drive traffic to your site.
While this strategy focuses on creating a fresh, evergreen piece of content rather than a homicidal monster, the theory is really quite the same.
Reanimating blog content
The idea of bringing life to old articles initially struck the content team at Sprout Social when we saw one our highest converting blog posts start to lose visibility in the search results. In an effort to get the post to climb the rankings we looked at our analytics to see what users were looking for when they visited that article and we re-optimized the post by adding content we knew would help answer their questions. After seeing incredible success with that first post our content team developed a strategy to scale the process so here is a step-by-step guide on how we used this strategy to double our blog traffic.
Find the right blog post

The 💜 of EU tech
The latest rumblings from the EU tech scene, a story from our wise ol' founder Boris, and some questionable AI art. It's free, every week, in your inbox. Sign up now!
The first portion of the process is all about pulling and analyzing your blog data in order to find the best posts to reanimate. Here is how we did it at Sprout.
Step 1: Pull analytics data
Go into your company’s analytics provider, and create a report that shows you visitor data on a landing-page level across all pages.
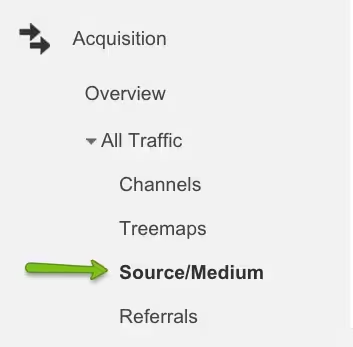
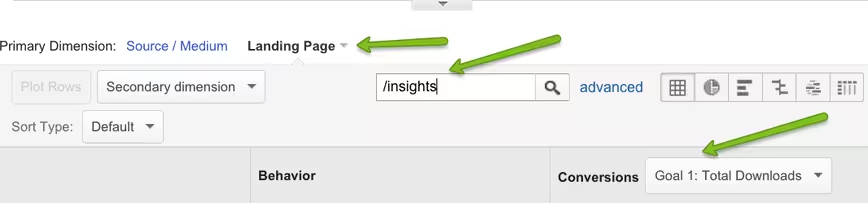 If you use Google Analytics, you can copy the setup in the image above. First, navigate to “Acquisition” in the right-hand column of your page and look at traffic by the “Source/Medium.” Then choose “Landing Page” as the primary to sort by and type in your blog’s unique URL into the search field. Make sure you’re filtering to look only at the organic traffic.
Choose to look at the conversion goal that you’re most interested in increasing with your blog posts:
- New users
- Total sessions
- Guide downloads
- Email opt-Ins
- Leads
- Subscriptions
- Sales
Now, if you use Google Analytics you’ll have to manually export one month of data at a time, as bulk downloading several months of data as a time won’t break it down by specific period. Start exporting your data and combine it into one spreadsheet. Make sure to manually add a separate column and input each month as you go, since some analytics providers don’t include it as a column.
 Pull as many months as you’d like, but remember that the more data you pull, the stronger your insights.
Step 2: Visualize Your Data
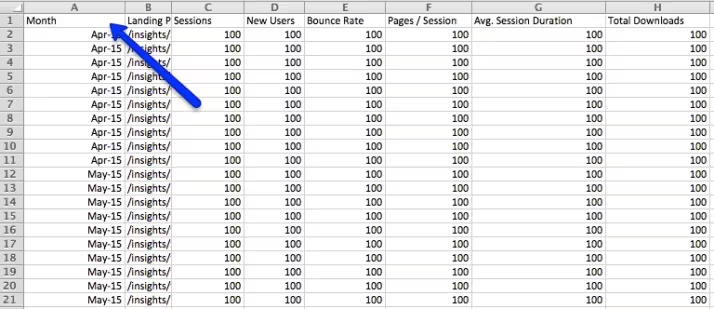
Your raw sheet of data should look something like this:
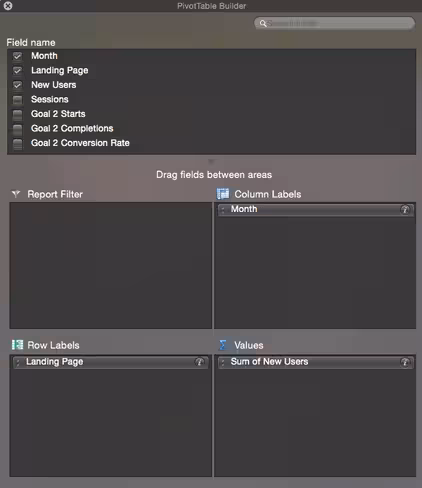
 Next, you’ll need to create a pivot table to view individual landing-page performance over time.
- Highlight all of your columns
- Click the Data tab at the top of your spreadsheet
- Choose Pivot Table, and click OK on the following screen
- Set up your pivot-table builder to look like the example below
 After your Pivot Table is constructed, you’ll want to create a chart to examine the information. Highlight an entire row of data, starting with the landing page on the left and include all the months’ worth of data you pulled.
 Next, click Chart at the top of the page and choose a Line chart. This presents you with a graph on a landing page’s performance over the course of all the months you’ve pulled.
 Step 3: Find a Post Losing Traffic
If you drag the chart’s highlighted section over various rows, it will show you how various landing pages have performed over time. Keep dragging that section over the rows until you find one that has performed well in the past but has since stopped driving conversions.
Here’s one of our blog posts that slowed considerably, making it an ideal candidate for flipping.
 Find your creation’s keyword data
After you have your blog post picked out, you’ll have to figure out exactly what it is people are looking for when they land at your page. Then you can use that data to build an improved post.
You’ll have to access Google Search Console (formerly Webmaster Tools). It’s a totally free tool, and if you don’t have it set up already, this post will have you up and running in no time.
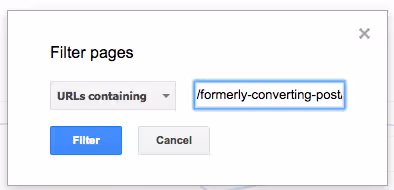
Once you’re in, navigate to the Search Analytics page and click No Filter under the Pages section.
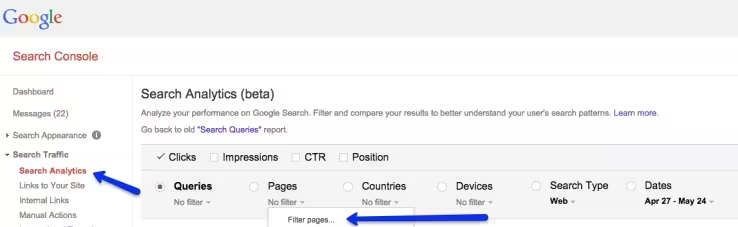 Tip: Increase your date range to the max to get the most query data.
Now, in the page filter view, paste your target URL so that WMT will pull you the query data for that specific page.
 Assuming your page drives enough traffic, you’ll be able to see the queries that drive post impressions, clicks and traffic. This shows exactly what people are looking for when they’re visiting your page, which is a huge advantage when it comes to restructuring the content.
Build your new creation
Bringing it back to our analogy, your original blog post is the frame of Frankenstein’s Monster, and they keywords you found make up the body. Look at some of the keywords driving the most traffic to your site and imagine yourself as a person who arrived at your article from that keyword: does the post answer your question?
If the answer is no, go back into your post and build out the section. In doing this you’re creating a better experience for the people who are visiting your article, and likely increasing the amount of time they spend on your page, which will likely help you increase in the search results.
Once you go through and build out your content for all of the popular keywords sending it traffic, you’re ready to give it life.
Give your creation new life
Flipping the switch and creating your post involves mass promotion. If you want to make sure your post sustains life, you’ll need to make sure it gets social shares, traffic and links.
Email Promotion
Include the post in one of your email newsletters, and make sure to include social share buttons. Just because it’s based off an older post doesn’t mean your subscribers won’t enjoy the content.
Social Promotion
Start sharing your article across your social pages like Twitter, Facebook and LinkedIn. You can use a social media scheduling tool like Sprout Social to post to all of your networks simultaneously.
If you think the post will convert readers to customers, you can even set aside some budget for paid ads.
Site Submissions
If it fits the content–and make sure to understand the respective rules and audiences for each site–add your post to websites like Inbound.org, Growthackers, BizSugar or even Reddit.
Let your creation loose
It’s likely going to take a while for your post to climb the search engine rankings, but assuming you optimized it for searcher intent, and did your best to promote it, you’ve done everything right. It’s now just a matter of letting it work its way up the search engine rankings.
Just hope that it doesn’t go berserk and start attacking the locals.
➤This post originally appeared on Moz
Read next:
Get the TNW newsletter
Get the most important tech news in your inbox each week.