
Node.js is popular among developers as an asynchronous and event-driven language used for backend development. It has a syntax easy enough to understand even for beginners.
Whether you’re a beginner or a seasoned developer using Node, following the best practices of Node.js programming is a must when developing applications aimed for production.
In this post, we’re going to point out 10 best practices every Node developer should follow. On top of the general best coding practices you should be following as a programmer, these will help you get the maximum use out of Node’s unique features.
[Read: What audience intelligence data tells us about the 2020 US presidential election]
Save the exact package version to package.json

The 💜 of EU tech
The latest rumblings from the EU tech scene, a story from our wise ol' founder Boris, and some questionable AI art. It's free, every week, in your inbox. Sign up now!
During development, we need to add a new package to the application using the following command:

It saves the package with its installed version to the package.json file like this:

Here, the use of caret sign (^) indicates that a package with a version within the region from “>=4.17.1 <5.0.0” is accepted by the application. (If you want to know more about how symbols like caret define version ranges, read the SemVar documentation).
This becomes problematic when someone else uses the package.json file we created to set up the application environment and install the dependencies (using the command npm install).
In this case, npm doesn’t install the version of the package we used for development, but instead, the latest version available at the time of the other user installed the dependencies. If the latest version is not compatible with the version we used in the initial implementation, it results in an error. Especially, if the project is open source, so we need to be mindful of this possibility.
We can use two methods to prevent this clash of package versions.
One method is using --save-exact every time you’re installing and saving the package to the package.json file. It looks like this:

Or configure the npmrc file once using the following command so that, by default, the accepted version of every package installed is its exact version. It looks like this:

Both these methods save every new package installed to the package.json file without the preceding caret.
"express": "4.17.1",
Now, every time someone else uses the package.json file to install dependencies, npm will install the exact version mentioned in the file instead of the latest version.
Use a tool to restart your app after every code change
While still in the developing stage, you’ll have to stop and restart your application to apply even a simple change made to the code base if you’re not using additional tools. After coding for a while, this becomes a hassle preventing you from completely focusing on the given task.
As a solution, you can use a tool that monitors the application’s codebase and restarts the app automatically every time a change is made.
Some of the popular code monitoring packages available for Node are:
- Nodemon: Nodemon automatically restarts the application whenever a new change is added to the code. You can initialize Nodemon by replacing node by nodemon on the command.-line. For example, nodemon app instead of node app.
- Forever: Forever also provides the automatic restarting feature Nodemon provides, but with additional configuration options. These options include setting a working directory and writing logs that would normally be printed on stdout to a file.
- PM2: PM2 is another process management tool you can use. It allows more control and features to manage processes running in production compared to the other two.
You can use these tools, especially Forever and PM2, even in a production environment. It will guarantee the application recovers without an issue after a runtime error. It will also ensure the application restarts as quickly as possible in case the server it’s running on goes down.
Use a style guide
When various developers are working on the same project at the same time, inevitably, there are differences in the styles of their codes. Because, unfortunately, programmers are a very opinionated bunch.
If your style of code is different from the previous developer who worked on the project you’re currently working on, you will most likely be tempted to reformat the position of braces or replace spaces with tabs to your liking. And you’ll end up spending hours on this mundane, useless task.
Though programmers love to argue about what is the best style for Node programming in our free time, that choice is mostly subjective. So, for the sake of your peace of mind and productivity, I suggest you choose and agree on a particular style guide before the start of a project. You can even find an existing style guide used by other programmers.
Here are a few style guides used by popular tech companies:
There are tools we can use to ensure the rules of the selected style guide are enforced throughout the program. We can use ESLint to validate the written code and Prettier for automatic formatting purposes.
Use async/await in place of callbacks
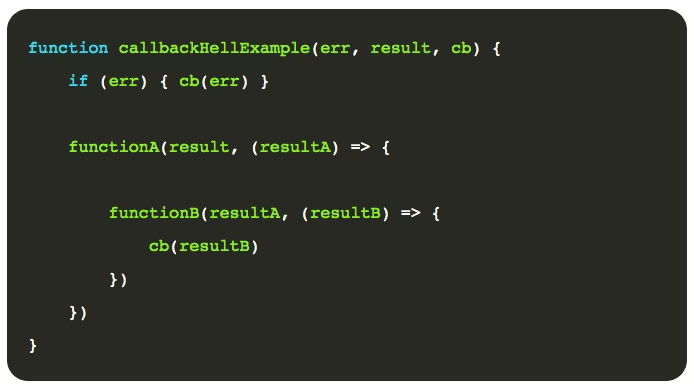
When Node was first introduced, its asynchronous nature was maintained by the use of callbacks. But as any Node developer would know from experience, it doesn’t take long for callbacks to spiral out of control when they’re nested one after the other. This is what we call ‘callback hell.’ At this point, your code will be quite unreadable.
However, with the introduction of async/await in ES6 (and promises before that), Node has provided a solution to this problem. So, as a Node developer, it’s your duty to make use of this new introduction instead of falling back into a callback hell when there are ways to avoid it.
This is a mild version of a callback hell:
We can easily avoid running into a scenario like this using async/await:
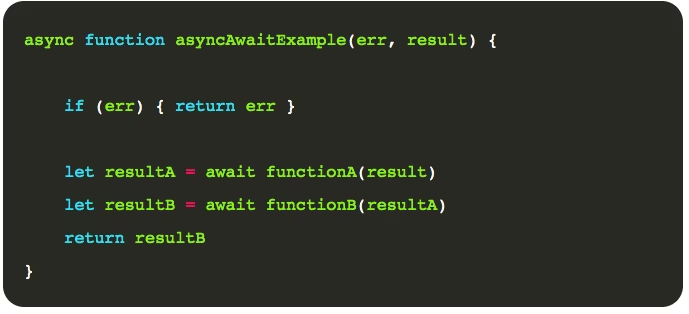
As a best practice in Node programming, always try to replace the callback functions with async and await.
Use a proper logging tool
First off, console.log is not a proper logging tool. Forget about using it for your application’s every logging purpose. Among many limitations, console.log doesn’t provide enough configuration options for logging including an option to filter them as required.
Node has several dedicated logging frameworks you can use in your application. Winston, Bunyan, and Pino are a few examples of such tools. You can test and select a one that suits your application’s needs.
In addition to simply logging, they give you the option to define logging levels like error, warning, info, and debug. With a dedicated logging tool, you can also turn on only the logs of necessary levels according to the situation even when the application is in production.
Don’t forget to follow the best logging practices when creating a logging system using your selected tool.
Always try to use ‘const’ over ‘let’
Use const to declare a variable over let whenever possible.
When you use const to declare a variable, you can’t reassign a value to it after the first assignment. This prevents you from reusing the same variable on several occasions. Since const forces you to declare new variables with appropriate names without reusing existing variables, it makes your code cleaner and clearer.
But there are occasions you may want the flexibility of being able to change the variable value. Then, you can use ‘let’ to declare the variable, but only if you have properly identified it as a variable that changes its value. For example, you have to declare the incrementing variable inside a for loop using the let keyword.
Before let was introduced in ES6, var was used in Node to declare variables. Some developers still use var in their code out of habit. But as a Node best practice, don’t use var in your code any longer.
It’s also important to be mindful of the scopes of these keywords , whether it’s const or let, before using it to declare a variable.
Use a code coverage tool to track untested code
We didn’t list testing your Node application as one of the best practices because it’s something that goes without saying. Using a code coverage tool, however, is one of the best practices you should definitely follow as a Node developer.
We can use a code coverage tool to determine the level of test coverage in the program. Such a tool identifies if there is a decrease in testing coverage and highlights testing mismatches.
Istanbul/NYC is a great tool you can use for this purpose. It provides colored code coverage reports to help you easily identify areas that are not covered by unit tests you have written. You can easily set up NYC to work with your preferred testing framework.
First, install the package from npm as a development dependency:

Then, add the script to run NYC and generate the code coverage report:
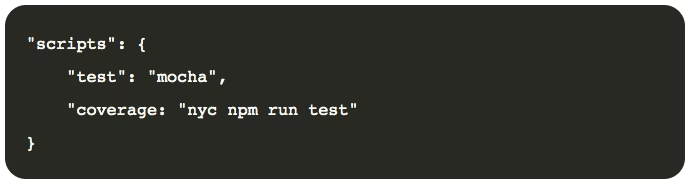
Now you can use the npm coverage command to generate the report.
Read the documentation I have linked above to understand how you can configure NYC to suit your application.
Use the === operator over == operator
In Node, you can use both === operator and == operator to check the equality of two variables. While the first one is more exacting, the second one accepts weaker equalities as well.
With the === operator, both variables must be of the same type in addition to being similar in value:
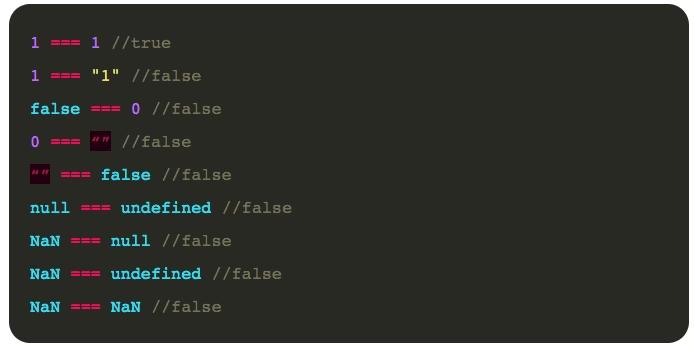
The second operator, ==, accepts two variables as equal if their values are equal even when the types are different. It converts both variables to a common type (type coercion) before carrying out the comparison:
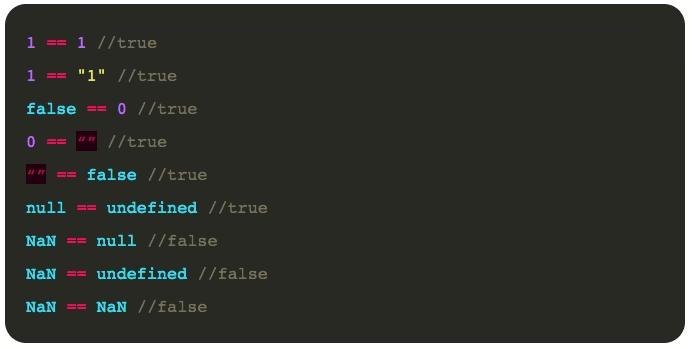
As you saw in the above examples, using the == operator gives different answers than what we may normally expect. This is because Javascript behaves against our intuition during type coercion. It won’t be a problem if you can remember all the odd cases and stay mindful of them when writing the program using the == operator.
But you can easily save worrying about this unintuitive behavior by using the strict equality operator === for comparison.
Don’t serve your frontend assets from Node
Node, by its nature, uses only a single thread to serve all the requests made to the server. We have to be mindful about maximizing the efficiency of this single thread because, otherwise, it can have a great impact on the application’s performance.
If we use the Node server to send static content, like HTML, CSS files, and images, they can hog the single thread. This unfairly affects the dynamic content of the application as they are the ones that actually make use of the application’s inner components and logic. As a result of the unbalanced distribution of execution time between dynamic and static content, our app then considerably slows down.
To avoid this imbalance, you can move the static content from the Node server and use a dedicated middleware, like Nginx, S3, or CDN, to serve them to the users. Then Node gets the opportunity to serve dynamic content that actually makes use of its internal logic and prevents the performance dip static content causes.
Keep your application stateless
Store any type of data you need to store, like user sessions, user data, and the cache, through the application in external data stores. Don’t store any information in the application itself.
In short, keep your application stateless. You should be able to kill your server every day and restart it without affecting its services to the users. Alternatively to this practice, you can use a serverless platform like AWS Lambda that imposes stateless behavior by default.
Keeping the server stateless prepares the application to survive any eventual system failure without damaging its services and performance.
Conclusion
In this post, we discussed 10 best coding practices you should follow as a Node developer. These practices help you to write better code to ensure the best performance of your application.
It’s important to note these are the practices you should follow along with other best coding practices that apply to any programming language. You may not be able to use all these practices the first time you try. Pick the one or two you think are the most important and start from there. Eventually, you’ll be able to follow all of them when writing Node.js code.
This article was originally published on Live Code Stream by Juan Cruz Martinez (twitter: @bajcmartinez), founder and publisher of Live Code Stream, entrepreneur, developer, author, speaker, and doer of things.
Live Code Stream is also available as a free weekly newsletter. Sign up for updates on everything related to programming, AI, and computer science in general.
Get the TNW newsletter
Get the most important tech news in your inbox each week.