When we took a look at the five most powerful apps on the Mac, Dropbox made it on to our list. We also briefly mentioned in the article how you could use a free third-party app called MacDropAny to keep your default Documents folder in sync with Dropbox. Here, we give you an in-depth tutorial on how to use Dropxbox with MacDropAny to keep the Documents folder on various Macs in sync.
We have tried to make this tutorial as detailed and easy to understand as possible and have tested it repeatedly on several Macs to verify that it works properly, but please proceed with care and try to follow the instructions as closely as you can. Also, though this tutorial is very safe, it might be a good idea to back up the contents of your Documents folder before trying to set this up.
First Steps
For the sake of simplicity, we’ll assume that you are trying to set this up on just two Macs, but you can repeat the steps mentioned here to hook up as many Macs as you want. The first step is to download Dropbox and MacDropAny, both of which are free. You should copy Dropbox to your Applications folder, but feel free to run MacDropAny from anywhere on the system, because it can be deleted once you’re done with it.

What we are going to do is create a symbolic link (or ‘symlink’) for the Documents folder in your user directory in the root of your Dropbox folder. Once done, the Documents folder in your user directory and the one in your Dropbox folder will be the same, so any changes you make to one of them will be reflected in the other. In fact, it won’t be “the other”, because you’ll just be seeing two references to the same folder. It’s a bit like aliases, but not exactly so.
On the First Mac
To get started, launch Dropbox and set it up on the first Mac. Then, open the Dropbox folder on one of the Macs and delete the Documents folder within it. If you have been using Dropbox for a while and already have files within that folder, you can either move them to the Documents folder in your user directory or rename that folder. Alternatively, you can choose a different name for the symlinked folder when you create it later.
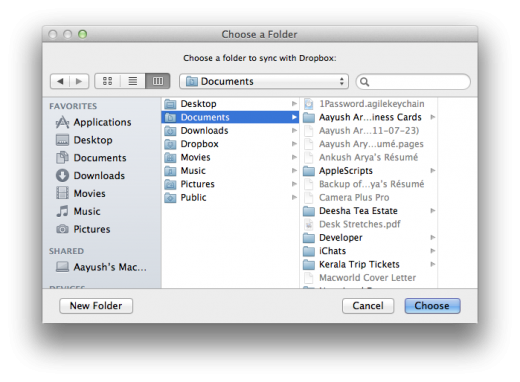
Launch MacDropAny and choose the Documents folder in your user directory from the Browse dialog box, like so:
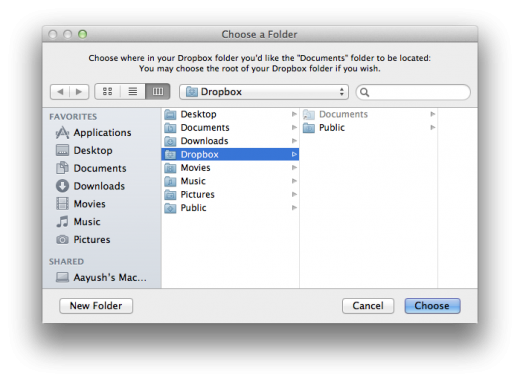
In the next dialog box, choose your Dropbox folder (which is selected by default) if you deleted your Documents folder earlier and want to put the symlinked Documents folder there. Alternatively, choose another location within your Dropbox folder and hit Choose.
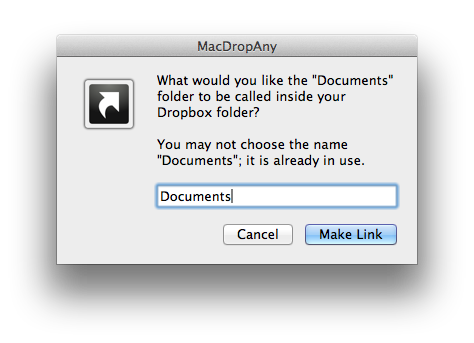
On the next screen, you will be asked for a name for the symlinked folder. Again, enter “Documents” if you’d like to keep it simple, but you can enter any name you want to here. Hit the ‘Make Link’ button and you are all set.
Wait for Dropbox to complete the sync after making these changes. The changes so far mean that whatever additions or subtractions you make to the Documents folder on your first Mac will be synced with Dropbox. Once the icon in the menu bar displays a green checkmark, you’re free to proceed to the next Mac.
On the Second Mac
On the second Mac, make sure that Dropbox is set up and ready to go (using the same account as on the first one) and wait for it to sync your Documents folder from the first Mac. Depending on the size of that folder, it may take a while for it to finish synchronising the changes. To speed things along, you can manually copy the files from the Documents folder on your other Mac to the Documents folder within Dropbox on this one: Dropbox is smart enough to figure out that the files are the same and the sync will finish much faster.
Once done, you now have to make sure that the contents of the Documents folder within Dropbox on the second Mac are the same as those of the Documents folder within its user directory. To do that, simply copy the contents from the former to the latter, merging the contents of both, with the Documents folder in your user directory having all the files.
The next step is an important one: quit the Dropbox app on the second Mac by clicking on its menu bar icon and selecting Quit Dropbox. If you skip this step, the app will start syncing changes while you are making them and it may result in something going wrong.
Now, delete the Documents folder (or whichever folder you’d created while symlinking) within your Dropbox folder (not the one in the user directory) on the second Mac. Launch MacDropAny on this Mac and use it to create a symlink for the Documents folder in the user directory into the Dropbox folder in exactly the same location and with the same name as you’d done before.
Wrapping Things Up
Launch Dropbox now and let it sync everything again. Once it’s done, try deleting a file from or adding one to the Documents folder on either Mac and watch as Dropbox magically syncs it to the Documents folder on the other. The Documents folder in the user directories of both your Macs and in your Dropbox folder are all now just a single folder and will forever stay in sync.
Feel free to delete MacDropAny from both your Macs once the whole thing is done. Also, be sure to keep the size of your Documents folder in check, lest it exceeds 2GB. If it does, Dropbox does offer some tiered pricing plans for users with higher storage space requirements.
[Header image courtesy of Korionov / Shutterstock.com.]
Get the TNW newsletter
Get the most important tech news in your inbox each week.

