We’ve all been there: you’re using your Mac when someone rings the doorbell and you get up to attend to the visitor. When you come back, your cat is sitting on your keyboard and that tweet you were writing has been published to your timeline incomplete and with a bunch of gibberish added to it.
OK, so we don’t all have cats, but you get the point, don’t you? What you need is a quick and easy way to lock your Mac when you get up to attend a call or take a quick trip to the loo. After having shown you 13 ways to protect your data on iOS and Mac OS X, in this article, we take a look at four ways to lock a Mac, none of which are particularly obvious—in fact, we know from experience that even most seasoned Mac users do not know about all of these available options.
First Things First
Before you use any of the methods described below to lock your Mac, you have to make sure that your user account is set up with a password and your Mac is configured to ask for it when a user tries to unlock it. To set up a password, go to the Users & Groups pane in System Preferences and click on the Change Password button under your user account. Then, go to the Security & Privacy pane and enable the “Require password after sleep or screen saver begins” setting with the duration set according to your preference.
1. Login Window
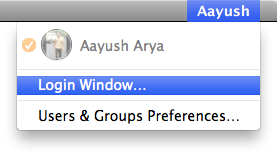 You can have your Mac bring up the Login Window using just two clicks every time you leave your desk, but you have to prepare it first. Launch System Preferences, go to the Users & Groups pane and click on the lock icon on the lower left corner if it is locked. Once it is unlocked, go to Login Options and enable the “Show fast user switching” menu.
You should now see your full or short name or an icon, depending on your preference, show up near the right edge of your menu bar. Click on it to bring up the menu shown on the right and then click on Login Window to lock your Mac. Now, if any bystander wants to take a peek at what you were working on, they’ll have to click on your username and your Mac will halt their progress by asking for your password.
2. Screensaver
 The Login Window is nice and all but it is definitely not pretty. What if you want to bring up your Mac’s screensaver when you leave your desk, but you want it to do it right away? The fastest you can configure your screensaver to kick in on a Mac is after a three-minute interval, which is not nearly fast enough to stop an industrious peeping tom in their tracks. And it is also an inconvenience for you, because you may find the screensaver coming on when you stop to read a lengthy article or look at a YouTube video.
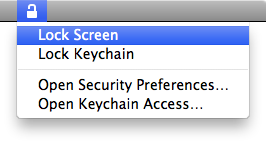
The solution is buried deep in the system, but it is one that handily solves the problem. Launch Keychain Access on your Mac (you will find it in the /Applications/Utilities folder) and open its preferences by hitting Command, on the keyboard. Under the General tab, enable “Show keychain status in menu bar”.
Now look up at your menu bar and you’ll see a new lock icon appear there, nudging its companions out of the way. Clicking on that icon brings up a menu that gives you the option to lock your Mac’s screen. Select it and your screensaver should fire up immediately. Problem solved!
3. Hot Corner
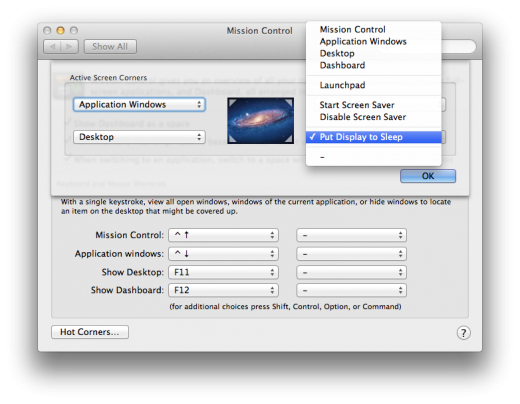
One of the possible assignments you can give you a Hot Corner is to have it put your display to sleep. Go to the Mission Control preference pane in System Preferences and click on the Hot Corners button in the lower left. In the resulting sheet, assign one of the four corners to “Put Display to Sleep”—and the rest to any of the other features, if you so choose.
Henceforth, when you slide your mouse cursor over to the assigned corner, your screen will immediately be completely turned off, saving precious battery life and shielding your work from any onlookers. And, of course, when you hit a key on the keyboard, the screen will spring to life and ask you for your password.
4. Shift-Control-Eject
This last trick enjoys the distinction of being the only one in this list that requires no setting up whatsoever, but it’s also one that will not work with all Macs. Specifically, it will only work if you use one of Apple’s own wired or wireless keyboards, since only they have the Eject key. (We’ve tried it with a Logitech diNovo Edge keyboard, which boasted of Mac compatibility and had the Eject key, but it did not work with it either.)
If you do happen to be using an Apple keyboard, all you have to do to turn off your Mac’s display is hit the Shift-Control-Eject combo on it and the deed is done. As with the Hot Corner trick before it, the screen gets completely turned off and will ask for a password when you turn it back on.
There you have it: four simple ways to lock your Mac and prevent your ongoing projects from prying eyes. Whether you are in a shared office environment, at a busy café or even just at home with a couple of kids, knowing how to prevent access to your Mac at a moment’s notice can be a pretty useful tool to have in your utility belt.
Get the TNW newsletter
Get the most important tech news in your inbox each week.


