
In the past decade, Apple has gone from being a bit player in the PC industry to the largest technology company in the world, making products in several categories that are used by millions of people around the globe. Apple’s two major operating systems—iOS and Mac OS X—power all of its most major products across the PC and consumer electronics segments.
In recent memory, Apple has shown great commitment towards making sure that the OS, along with both its bundled and third-party apps, takes on the responsibility of protecting the user’s data. In this article, we take a look at thirteen ways in which Apple provides such protection. Once you know all the options available to you, you will hopefully be better prepared to take advantage of them to safeguard your own data.
On Mac OS X
1. Time Machine
 Apple introduced Time Machine in Mac OS X 10.5 Leopard as a way for the user to keep automatic backups of every version of all the files across the OS. The feature has a fun, space-themed interface that makes users want to use it, thus giving them more impetus to turn it on. The OS prompts the user to use it for backup when they connect an external hard drive to their Mac for the first time.
Apple also made the Time Capsule, a wi-fi router with a built-in high capacity hard drive, as a complementary accessory for Mac users interested in wirelessly backing up their Macs. The company has been improving the speed and reliability of Time Machine over the years and it’s now much faster than it used to be when it was first released (although there is still room for improvement). It can now also continue working when the backup drive is disconnected, making incremental backups on the startup drive in the meanwhile and copying it over when the latter comes back online.
How to Use it
As mentioned before, all you need to do to enable Time Machine is to plug an external hard drive with your Mac, or into your wireless router. Mac OS X automatically offers to use it for Time Machine backups when you do that. The dock and menu bar icons for the feature allow you to activate Time Machine to restore files from backups. Its configuration options in System Preferences allow you to turn the feature on or off, exempt specific folders from being backed up by it and change the drive you are using to store backups.
2. Migration Assistant
 Migration Assistant in Mac OS X allows you to use another Mac or PC on the same network, a Mac OS X installation on another disk or a Time Machine backup to restore a new Mac (or one with a freshly installed copy of the OS) to the exact same state as your previous Mac. This longstanding feature of Mac OS X makes it painless to transfer your information from one Mac to another and get up and running quickly, thus making system reinstalls and new Mac purchases much easier and safer.
How to Use it
When you boot up a newly purchased Mac, Migration Assistant shows up as part of the setup procedure and offers to let you transfer information from another Mac or Windows-based computer, hard disk or Time Machine backup. If you chose to skip migrating your data during initial setup, you can launch it again from ‘/Applications/Utilities’ or by searching for it in Spotlight. Use a wired ethernet connection to migrate data if possible, because doing it wirelessly is much slower and prone to failure. Make sure you read Apple’s tips about using the feature before attempting it.
3. FireWire Target Disk Mode
![]() FireWire targets disk mode is a feature that allows you to use a working Mac as an external hard drive, in order to get data off it. Since FireWire (both 400 and 800) is faster than ethernet, Migration Assistant can copy data faster from a Mac in target disk mode than over a regular ethernet connection. Even beyond that though, target disk mode is a great way to troubleshoot the hard disk on a Mac that refuses to boot up.
FireWire targets disk mode is a feature that allows you to use a working Mac as an external hard drive, in order to get data off it. Since FireWire (both 400 and 800) is faster than ethernet, Migration Assistant can copy data faster from a Mac in target disk mode than over a regular ethernet connection. Even beyond that though, target disk mode is a great way to troubleshoot the hard disk on a Mac that refuses to boot up.
How to Use it
To start a Mac in FireWire target disk mode, power it down and then press and hold the ‘T’ key on the keyboard while it boots up. When you get to a gray screen with a FireWire logo on it, you can let go of the key on the keyboard. Connect this Mac over FireWire 400 or 800 to another and it will show up on the latter as an external hard drive. It can then be used with Migration Assistant, for troubleshooting purposes or even just to copy some files across.
4. Autosave, Resume and Versions
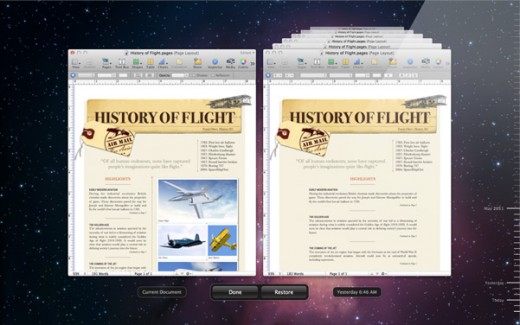
Apple introduced systemwide features in Lion that allow default and third-party applications to automatically save changes to your files and restore them in case of a crash or if the user quits the program without saving the changes. The OS can now also keep track of changes in your documents, so you can go back to past versions and restore things you may have deleted.
A lot of apps have already started incorporating these features and it’s not long before (almost) every app you use has been updated to take advantage of Lion’s new features. That will mean that, throughout the operating system, there will never be any risk of losing data due to unexpected crashes and power failures. The safety of your data will no longer be your exclusive responsibility.
How to Use it
The features are built into the OS and will automatically be a part of apps that are updated to take advantage of them, with no action required from the user. To use versions, roll your mouse over the name of a document-based app (that has at least once been manually saved to disk) to reveal a small inverted triangle next to it. Clicking on this triangle will bring options revert to its last opened version or browse all past versions and restore from any of them at will. You can even copy bits of text and media from different past versions of documents instead of restoring them as a whole.
5. Move to Solid-State Storage
 With the launch of the MacBook Air in 2008, Apple began moving to solid-state storage instead of traditional disk-based hard drives. Today, Apple offers the option of installing an SSD for every Mac in its lineup, and the company continues to move in the direction of making SSDs the only option for its products across the board (with the only limiting factor currently being the high prices of SSDs).
One of the great advantages of SSDs, beyond their much faster read and write speeds, noiseless operation and reduced heat generation and power consumption, is their better shock resistance and, arguably, longer lifespan. Although SSDs have not been around long enough for us to have conclusive data on how the average SSD fares against a traditional HDD, it does seem that they will last much longer than hard drives typically do. There’s no question though that the lack of moving parts allows SSDs to deal with the rare three-feet drop much more capably than an HDD.
How to Use it
If you purchase a new Mac today, you can have Apple configure it with as SSD for you. You’ll get much less storage space for a heftier price tag if it is your only drive (although desktop Macs such as the iMac, Mac mini and Mac Pro can be configured with a secondary HDD as well), but all the other gains described above will be worth the trade. Alternatively, MacBook Pro owners willing to take a screwdriver to their machines can purchase an SSD from external sources (like the OWC Mercury Extreme Pro 3G or OCZ Vertex 3) to get a much better and faster drive than the one Apple puts into its machines.
6. Compatibility

Mac OS X ships with support for Adobe’s PDF and PSD and Microsoft Office formats out of the box, enabling Mac users to make use of those files without installing pricey third-party software. You can also convert any document, image or webpage throughout the system into a PDF, thus making it easy to share it with Windows users. Furthermore, Mac OS X can read hard drives formatted in the Windows-friendly NTFS format, allowing you to copy data from them.
How to Use it
All of the formats described above—DOC, PDF, PSD, PPT and XLS—can be previewed using Quick Look on Mac OS X by selecting them in the Finder and hitting the spacebar. Preview can open files in the PDF, PSD, PPT and XLS formats, while TextEdit can both open and edit Microsoft Word documents. To copy data from an NTFS-formatted disk, all you need to do is plug it into the Mac—it works out of the box.
On iOS
7. iTunes Backups
 iOS backs up the entire system to iTunes whenever it is connected to a Mac or PC. The backups typically only take seconds to complete, happen automatically and cannot be turned off. If you ever restore a device from a backup, it is brought to the exact state that the backup was made in, down to the contacts list and call log and the data and settings in individual applications and their placement on the device’s home screens.
How to Use it
As long as you are occasionally connecting your iOS-based device to your computer (which has iTunes installed), and assuming that you do not have automatic syncing disabled, your data is getting backed up automatically. You can manually delete past backups if you want by going into the Devices tab in iTunes’s preferences. A new or freshly restored device automatically gives you the option to restore from backup during first setup.
8. State-Saving
Similar to the autosave and resume features in Mac OS X, iOS provides APIs for third-party developers to build state-saving features into their apps with little effort. This allows them to always make sure that your data is saved even if the app is abruptly quit or experiences a crash. This autosaving and resuming makes launching and quitting apps on iOS feel like simply switching between them.
How to Use it
This is a systemwide feature for developers to take advantage of and the user is not expected to do anything to take advantage of it.
9. Find My iPhone
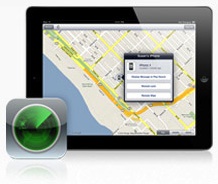 Apple’s free Find My iPhone feature allows iPad, iPhone 4 and fourth-generation iPod touch users to remotely locate their devices and attempt to regain them by tracking them on a map, having them emit a sound or displaying a message on them. It also allows them to lock their devices with a passcode to prevent data theft and, if all else fails, wipe their devices clean if there is no hope of recovering it. Furthermore, an upcoming Find My Mac feature will bring similar features to Macs as well.
How to Use It
Before your iOS device can be tracked, you need to enable Find My iPhone on it. Now, if it ever gets stolen, you can either use the Find My iPhone app to track it from another iOS device or use Apple’s Web-based MobileMe service to track down the device from a Web browser. Both the native and Web apps allow you to use all of the features described above.
In Both Operating Systems
9. Update in Place for OSes
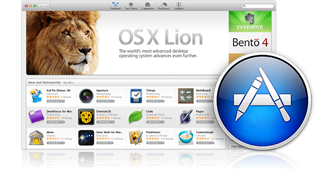
Both iOS and Mac OS X can be updated to major new releases in place, without disturbing any of the existing data. This takes the pain out of OS updates and makes them much safer for the average user. It also helps keep data secure by eliminating the need to make external copies of it and then restoring it after the update is done (although regular external backups are still advised, just in case things go south). Once iCloud launches later this year, devices running iOS 5 will be automatically back themselves up to the cloud and be able to update without the help of the computer as well.
How to Use it
In Mac OS X, starting with Lion in July this year, Apple started selling Mac OS X on the Mac App Store, which made the updating process even simpler than before. All you need to do to install the update is purchase a copy of the OS from the App Store and then launch the installer from the Dock or the applications folder once it is downloaded. For iOS-based devices, iTunes automatically informs you about available OS updates when they are launched. Clicking on the Update button on those prompts downloaded and installs the update in place.
11. Safety from Malware
 It has often been suggested that the only reason Mac OS X hasn’t been afflicted by malware is because of its minority status in the desktop OS market. However, the continuing absence of malware on Mac OS X despite its steadily climbing popularity as well as the complete lack of malware on iOS indicate that that may not be the only reason.
Apple’s OSes use sophisticated technologies like address space randomisation, a built-in firewall and sandboxing of applications to make them more resilient against spurious software and Apple actively fights against any that show up, such as the MacDefender virus that popped up earlier this year. Both iOS and Mac OS X continue to be two of the most secure operating systems in the business.
How to Use it
Most of the malware-defense mechanisms on Apple’s OSes are automated and require no user intervention. Mac OS X ships with its firewall disabled, however, and it should be turned on for additional safety. To do so, visit the Firewall tab under the Security & Privacy pane in System Preferences.
12. Encryption Everywhere
Apple builds encryption technologies into practically every part of its ecosystem. From its desktop and mobile operating systems to their backups, and its Web-based synchronisation offerings, everything can be encrypted. One of the great advantages of which, besides the fact that it makes the data much less vulnerable to malicious attacks, is that if the device gets stolen and the user is forced to wipe it remotely, it can be done within a matter of seconds (thus making the data less prone to theft).
How to Use it
In Mac OS X, Apple’s encryption technology is called FileVault and it can be turned on from the FileVault tab in the Security & Privacy pane in System Preferences. Make sure you keep the recovery key in a safe place, just in case you ever lose your encryption password. For iOS-based devices, system-level encryption is already in place by default, but backups can also be encrypted by enabling the preference in the Summary section of the device in iTunes.
13. MobileMe/iCloud Synchronisation
 Apple is transitioning its MobileMe offering to iCloud later this year and is in the process making it free. Once it is launched, users will be able to synchronise their bookmarks, calendars, contacts and email (in addition to apps, documents, music, photos and a whole host of other content) hosted on iCloud over the air across their Macs and iOS devices. This will mean that most of their sensitive data will be backed up in the cloud and will be at considerably less likely to be lost in case of the theft or failure or one of more of their devices.
How to Use it
iCloud is yet to be launched, but we will have more information for you when it’s out.
[Image courtesy of waynehowes / Shutterstock.com.]
Get the TNW newsletter
Get the most important tech news in your inbox each week.


