
Talking to the internet with Python sounds scary, right? Fortunately, the internet has been in good hands for a long time. Our methods for talking to the internet are well established and surprisingly easy.
Let’s get straight to it. This article will cover everything you need to communicate over the web effectively — this includes:
– Application Program Interfaces (APIs)
– JavaScript Object Notation (JSON)
– Requests with Python
– Real world use-cases
Application program interfaces
An API is like a magic box. We send data in a specific format. We then get data back in a specific format.
This magical box is simply a script kept on a server. It acts as a gatekeeper — we tell the gatekeeper that we would like to know, change, or delete something, and the gatekeeper will (hopefully) perform the action we request and let us know how it went.
Fortunately, APIs are generally very well documented and follow the same usage patterns. The vast majority of Web APIs use the representational state transfer (REST) structure — which sounds far more complicated than it is.
REST
RESTful API architecture applies six key constraints:
- All requests are handled via a single outward-facing interface.
- Client-server independence — development and functional changes on one side should not affect the other (client refers to us, and server refers to API).
- Statelessness — the server does not retain any information about our session; every request is treated as new.
- Caching — the API should specify whether it’s responses can be cached by the user (if a response is valid until a specific time, the API can tell us
Expires Wed, 17 May 2020 07:12:27 UTC). - Use of layered systems — meaning the API is comprised of layers, where each layer connects to another, creating a modular structure.
- If applicable, the API should be able to provide the user with executable code on request.
What all of this means to us is that we will communicate with a single location and expect specific behaviors — this is further standardized using a set of HTTP methods.
Methods
When communicating with an API, we tend to use four methods:
- GET — Used to retrieve information from the API.
- POST — Creates a new resource (e.g., a GitHub repo).
- PUT — Updates an existing resource.
- DELETE — Deletes an existing resource.
The most commonly used of these is the GET protocol. As in most cases, with data, we are more interested in downloading it.
If we would like to get the latitude and longitude coordinates for an address using the Google Maps API, we would send a GET request — as we are literally getting data from the API.
POST, PUT, and DELETE are all used when modifying information. Using the example of a GitHub repo, we can create it with POST, update it with PUT, and delete it with DELETE.
You might also see PATCH — this is used for partial updates, similar to PUT. I’ve never used this before, and it seems to be less common but it is worth knowing.
HTTP Codes
When using GET, POST, PUT, and DELETE, we will usually receive one of the following codes:
2xx – Success Codes 200 OK – success (most common with GET)
201 Created – request fulfilled and new resource created (POST/PUT)
204 No Content – success but no content is returned in response
4xx – Client Error Codes
400 Bad Request – request could not be understood due to bad syntax
401 Unauthorized – most likely we missed the auth key
403 Forbidden – we’re trying to go places we’re not allowed
404 Not Found – what we’re trying to access doesn’t exist
Honorable Mentions
418 I’m a teapot – stop asking a teapot to brew coffee
420 Enhance Your Calm – sending to many requests to Twitter
Take note of the final two — they’re incredibly important. Never forget them.
JavaScript object notation
When communicating with APIs, we need a standardized template for sending and receiving data so both the API and ourselves can process the data correctly. This format is JavaScript Object Notation (JSON).
JSON implements the same hierarchical structure with key-value pairs that we find in Python dictionaries.
Clicking here will send a request to the Pokemon API (there are APIs for everything) using our browsers, what then loads is the JSON response from the API:
With Python, we use dictionaries alongside the json library to build our JSON strings to include in requests, which typically looks like this:

Requests in Python
Okay, so we get how it all works. But how do we do any of this stuff?
We use requests — an incredibly easy-to-use library. For example, if we need to send a GET request, we simply write:

http is the web address of the API, including the parameters specifying the information we want.
Let’s take the Pokémon API for example — it’s incredibly simple to use.
The API includes a method for finding all of the Pokemon added in each new generation — I specifically remember there being 151 Pokemon, now there’s more than 896. So let’s see how many they added with generation II.
1. Calling the API
First, we simply ask for the data using a GET request, specifying that we are interested in generation data, specifically generation-ii:
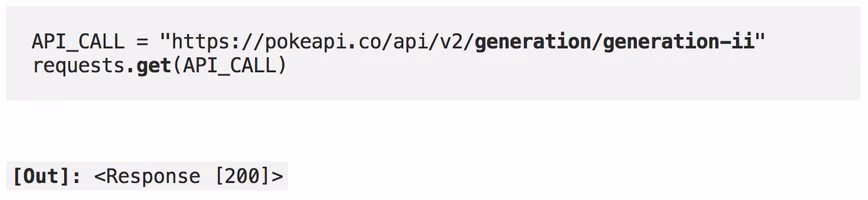
Okay, what does <Response [200]> mean? Well, this is the HTTP 200 OK status code. It means our request succeeded! But where is the data we wanted?
2. Extracting Data
What we returned is a requests.Response Object — which contains lots of useful methods, the one we want to retrieve the actual JSON response is:
RES = requests.get(API_CALL)
RES.json()  # returns a dictionary
Now, we have an insanely detailed response containing everything added in generation II. To count the number of new Pokemon, we access the pokemon_species list:
DATA = RES.json()
DATA['pokemon_species']
Finally, we can type len(DATA['pokemon_species']) to find the number of new Pokemon (it’s 100).
Now we can find everything we need to know about Pokemon. That’s great, but maybe not that useful.
Real world use-cases
Let’s write some more relevant code, using real APIs and use-cases.
Visualizing addresses with Google Maps API
The first code I ever got paid to write relied heavily on the Google Maps Geocoding API. Looking at it now makes me feel queasy — so we’ll rewrite it.
Our objective is to plot a directory of addresses onto a map. To do this, we need their relative x-y coordinates (for Matplotlib), which requires us to find their latitude and longitude coordinates.
I’m currently living in Rome — so I’ve put together a small list of famous landmarks here; we will use this data in our example — so feel free to download and follow along.
Authorization
First, we need an authorization key to use the Google Maps Geocoding API (~40,000 requests/month are free). The majority of APIs will always need us to include an authorization key with our calls; otherwise, our request will be rejected:
The Geocoding API documentation contains instructions on getting an API key.
API Parameters
If we want to find the coordinates of the Colosseum in Rome, we pass the street address to the API from within the HTTP address.
The API expects two variables, address and key. We access the Geolocation API at http://maps.googleapis.com/maps/api/geocode.
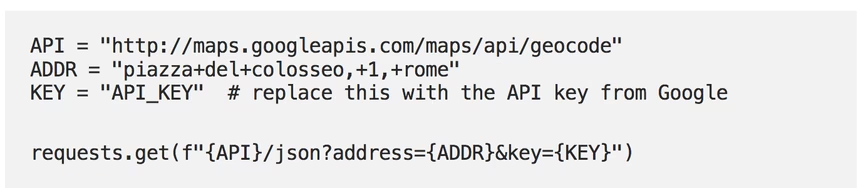
This code will send a GET request to:

If you type this into your browser with your AUTH_KEY, we will see the JSON response from the API:
Requesting the data
We can find the coordinates for every item in our list of addresses by looping through the list and sending the GET request for each item:
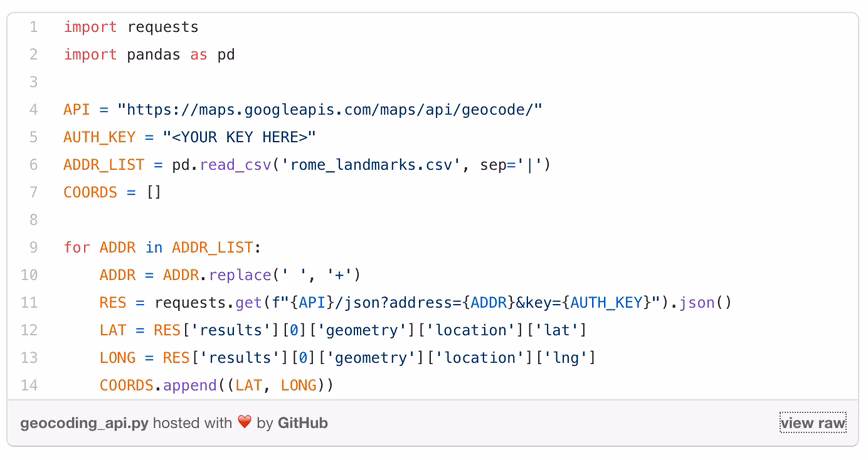
Results
After receiving our response RES, we use the json method to convert it to a Python dictionary, allowing us to access the values for latitude LAT and longitude LONG. We append our coordinates to the COORDS list — which can now be used for plotting locations on a map.
We won’t cover the plotting code, but if this is something you want to do, I would suggest using Matplotlib’s Basemap extension — although there may be better tools available now (I did this a long time ago).
Interacting with GitHub
We can use APIs to interact with GitHub too. Keeping it simple, we’ll use the POST request to create a new repo called api_test.
Authorization
First, as always, we need an authorization token. Fortunately, we can get this set up much faster than we did with the Google Maps API — you can find a step-by-step guide here.
Note that on step seven, it is entirely up to you which permissions you select — but all we will need is repo:
Now, we can authenticate ourselves by adding headers={'Authorization': f'token {TOKEN}'} to our requests.
Create a repo
To create a repo, we simply send a POST request to https://api.github.com/ user/repos. The only required field here is the name value, which specifies the new repo name. We also set public to true which simply sets the repo privacy settings to public — rather than private (the default).
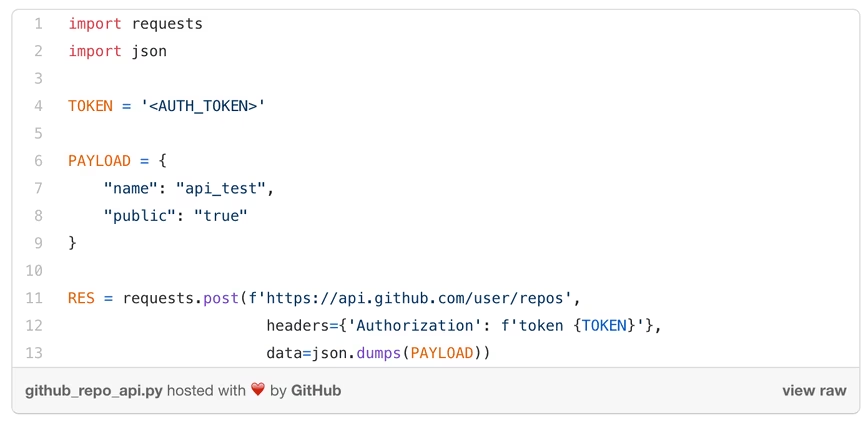
Note that we use PAYLOAD to contain our instructions for the API, which we pass to the data argument within requests.post. We also include our authorization key/token using the headers argument.
Results
If we succeed in creating the repo, we will receive code 201 Created — indicating that the request has succeeded, and we have created a new resource.
We can also check on GitHub, and sure enough the api_test repo is right there:
The GitHub API is very cool, there’s a lot we can do with it, and because of that, it’s great for learning — I would recommend taking a look at the docs if you’d like to learn more (feel free to ask me questions too!).
Final notes
That is everything you need to know to start working with APIs in Python. Of course, there are many more, and likely more relevant use-cases out there too.
For myself, I now use APIs almost exclusively within a corporate setting — mostly for a data transfer and manipulation, alongside model setup and training.
Pulling data from the internet is also a frequent task and therefore, an incredibly important skill to have. Understanding and getting some practice with APIs is super useful.
This article was originally published on Towards Data Science by James Briggs, an AI Consultant based in London. He is fascinated by the phenomenal advances that are being made within the tech eco-system daily and loves writing about AI, Python, and programming in general. Follow him on Twitter.
Get the TNW newsletter
Get the most important tech news in your inbox each week.