
Hooks were introduced in React 16.8 in late 2018. They are functions that hook into a functional component and allow us to use state and component features like componentDidUpdate, componentDidMount, and more. This was not possible before.
Also, hooks allow us to reuse component and state logic across different components. This was tricky to do before. Therefore, hooks have been a game-changer.
In this article, we will explore how to test React Hooks. We will pick a sufficiently complex hook and work on testing it.
We expect that you are an avid React developer already familiar with React Hooks. In case you want to brush up your knowledge, you should check out our tutorial, and here’s the link to the official documentation.
[Read: 7 debugging techniques for developers to speed up troubleshooting in production]
The hook we will use for testing
For this article, we will use a hook that I wrote in my previous article, Stale-while-revalidate Data Fetching with React Hooks. The hook is called useStaleRefresh. If you haven’t read the article, don’t worry as I will recap that part here.
This is the hook we will be testing:
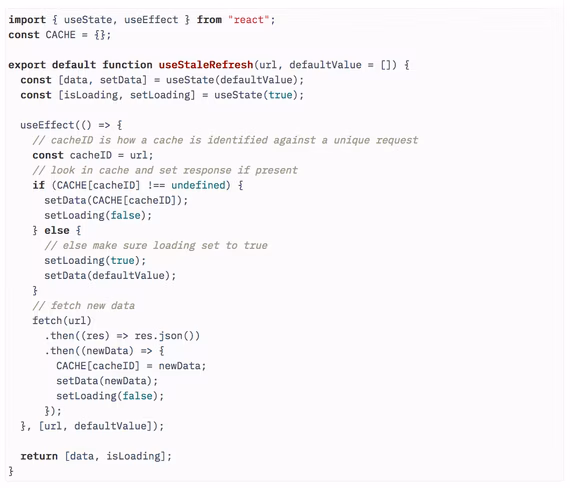
As you can see, useStaleRefresh is a hook that helps fetch data from a URL while returning a cached version of the data, if it exists. It uses a simple in-memory store to hold the cache.
It also returns an isLoading value that is true if no data or cache is available yet. The client can use it to show a loading indicator. The isLoading value is set to false when cache or fresh response is available.
At this point, I will suggest you spend some time reading the above hook to get a complete understanding of what it does.
In this article, we will see how we can test this hook, first using no test libraries (only React Test Utilities and Jest) and then by using react-hooks-testing-library.
The motivation behind using no test libraries, i.e., only a test runner Jest, is to demonstrate how testing a hook works. With that knowledge, you will be able to debug any issues that may arise when using a library that provides testing abstraction.
Defining the test cases
Before we begin testing this hook, let’s come up with a plan of what we want to test. Since we know what the hook is supposed to do, here’s my eight-step plan for testing it:
- When the hook is mounted with URL
url1,isLoadingistrueand data isdefaultValue. - After an asynchronous fetch request, the hook is updated with data
data1andisLoadingisfalse. - When the URL is changed to
url2,isLoadingbecomes true again and data isdefaultValue. - After an asynchronous fetch request, the hook is updated with new data
data2. - Then, we change the URL back to
url1. The datadata1is instantly received since it is cached.isLoadingis false. - After an asynchronous fetch request, when a fresh response is received, the data is updated to
data3. - Then, we change the URL back to
url2. The datadata2is instantly received since it is cached.isLoadingis false. - After an asynchronous fetch request, when a fresh response is received, the data is updated to
data4.
The test flow mentioned above clearly defines the trajectory of how the hook will function. Therefore, if we can ensure this test works, we are good.
Testing hooks without a library
In this section, we will see how to test hooks without using any libraries. This will provide us with an in-depth understanding of how to test React Hooks.
To begin this test, first, we would like to mock fetch. This is so we can have control over what the API returns. Here is the mocked fetch.
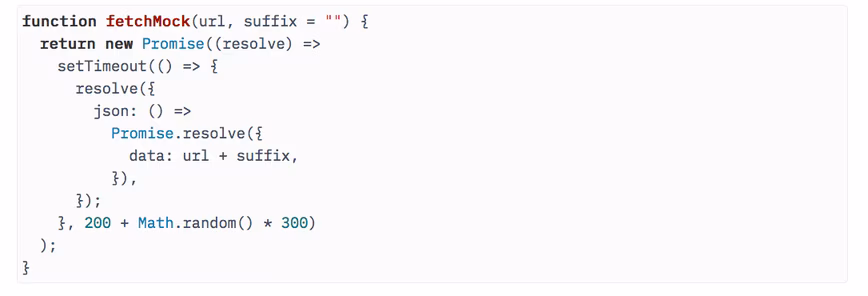
This modified fetch assumes that the response type is always JSON and it, by default, returns the parameter url as the data value. It also adds a random delay of between 200ms and 500ms to the response.
If we want to change the response, we simply set the second argument suffix to a non-empty string value.
At this point, you might ask, why the delay? Why don’t we just return the response instantly? This is because we want to replicate the real world as much as possible. We can’t test the hook correctly if we return it instantly. Sure, we can reduce the delay to 50-100ms for faster tests, but let’s not worry about that in this article.
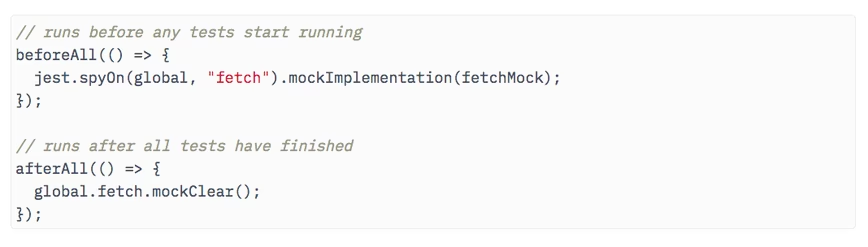
With our fetch mock ready, we can set it to the fetch function. We use beforeAll and afterAll for doing so because this function is stateless so we don’t need to reset it after an individual test.
Then, we need to mount the hook in a component. Why? Because hooks are just functions on their own. Only when used in components can they respond to useState, useEffect, etc.
So, we need to create a TestComponent that helps us mount our hook.
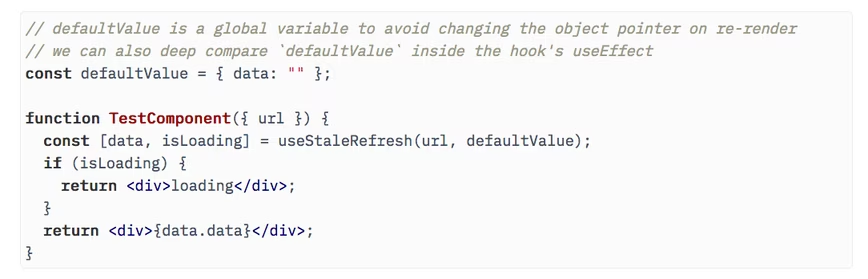
This is a simple component that either renders the data or renders a “Loading” text prompt if data is loading (being fetched).
Once we have the test component, we need to mount it on the DOM. We use beforeEach and afterEach to mount and unmount our component for each test because we want to start with a fresh DOM before each test.
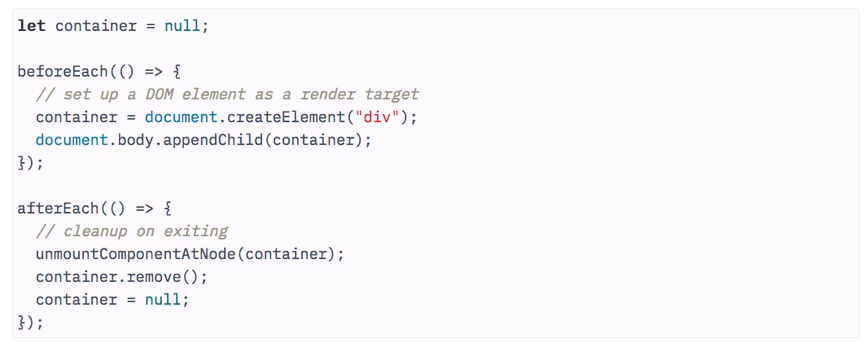
Notice that container has to be a global variable since we want to have access to it for test assertions.
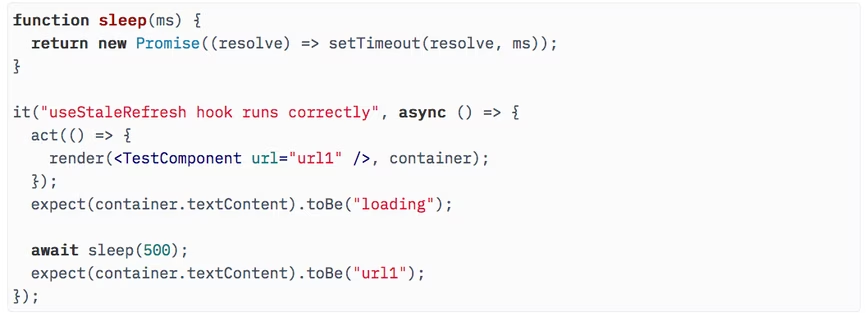
With that set, let’s do our first test where we render a URL url1, and since fetching the URL will take some time (see fetchMock), it should render “loading” text initially.

Run the test using yarn test, and it works as expected. Here’s the complete code on GitHub.
Now, let’s test when this loading text changes to the fetched response data, url1.
How do we do that? If you look at fetchMock, you see we wait for 200-500 milliseconds. What if we put a sleep in the test that waits for 500 milliseconds? It will cover all possible wait times. Let’s try that.
The test passes, but we see an error as well (code).
 This is because the state update in
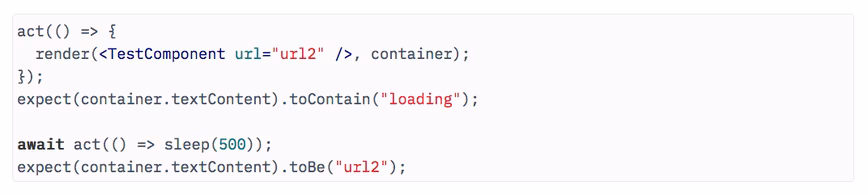
 useStaleRefresh hook happens outside act(). To make sure DOM updates are processed timely, React recommends you use act() around every time a re-render or UI update might happen. So, we need to wrap our sleep with act as this is the time the state update happens. After doing so, the error goes away.

Now, run it again (code on GitHub). As expected, it passes without errors.
Let’s test the next situation where we first change the URL to url2, then check the loading screen, then wait for fetch response, and finally check the url2 text. Since we now know how to correctly wait for async changes, this should be easy.
Run this test, and it passes as well. Now, we can also test the case where response data changes and the cache comes into play.
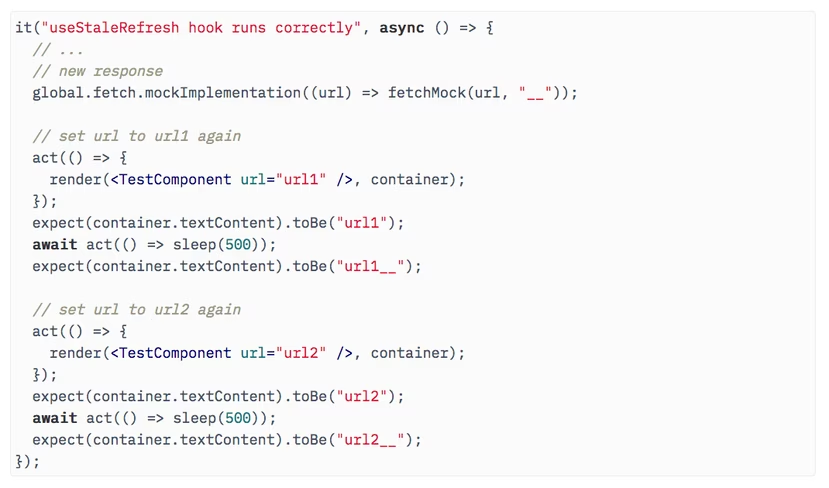
You will notice that we have an additional argument suffix in our fetchMock function. This is for changing the response data. So we update our fetch mock to use the suffix.

Now, we can test the case where the URL is set to url1 again. It first loads url1 and then url1__. We can do the same for url2, and there should be no surprises.
This entire test gives us the confidence that the hook does indeed work as expected (code). Hurray! Now, let’s take a quick look at optimization using helper methods.
Optimizing testing by using helper methods
So far, we have seen how to completely test our hook. The approach is not perfect but it works. And yet, can we do better?
Yes. Notice that we are waiting for a fixed 500ms for each fetch to be completed, but each request takes anything from 200 to 500ms. So, we are clearly wasting time here. We can handle this better by just waiting for the time each request takes.
How do we do that? A simple technique is executing the assertion until it passes or a timeout is reached. Let’s create a waitFor function that does that.
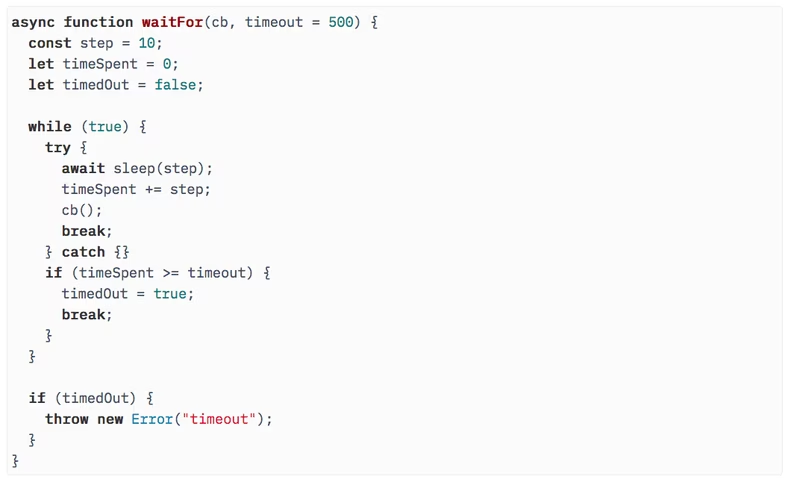
This function simply runs a callback (cb) inside a try...catch block every 10ms, and if the timeout is reached, it throws an error. This allows us to run an assertion until it passes in a safe manner (i.e., no infinite loops).
We can use it in our test as follows: Instead of sleeping for 500ms and then asserting, we use our waitFor function.
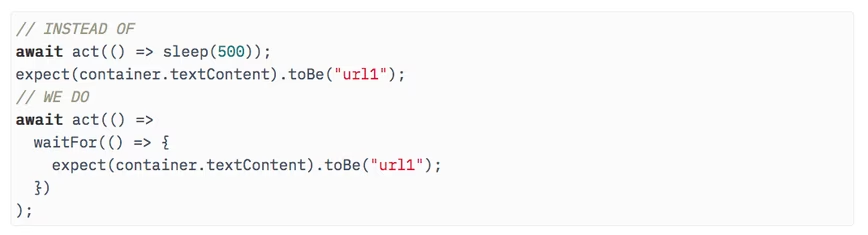
Do it in all such assertions, and we can see a considerable difference in how fast our test runs (code).
Now, all this is great, but maybe we don’t want to test the hook via UI. Maybe we want to test a hook using its return values. How do we do that?
It won’t be difficult because we already have access to our hook’s return values. They are just inside the component. If we can take those variables out to the global scope, it will work. So let’s do that.
Since we will be testing our hook via its return value and not rendered DOM, we can remove the HTML render from our component and make it render null. We should also remove the destructuring in hook’s return to make it more generic. Thus, we have this updated test component.
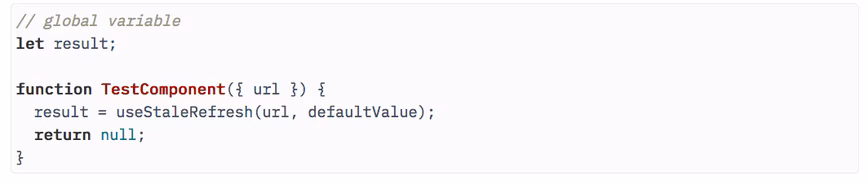
Now the hook’s return value is stored in result, a global variable. We can query it for our assertions.
After we change it everywhere, we can see our tests are passing (code).
At this point, we get the gist of testing React Hooks. There are a few improvements we can still make, such as:
- Moving
resultvariable to a local scope - Removing the need to create a component for every hook we want to test
We can do it by creating a factory function that has a test component inside it. It should also render the hook in the test component and give us access to the result variable. Let’s see how we can do that.
First, we move TestComponent and result inside the function. We will also need to pass Hook and the Hook arguments as function’s arguments so that they can be used in our test component. Using that, here’s what we have. We are calling this function renderHook.
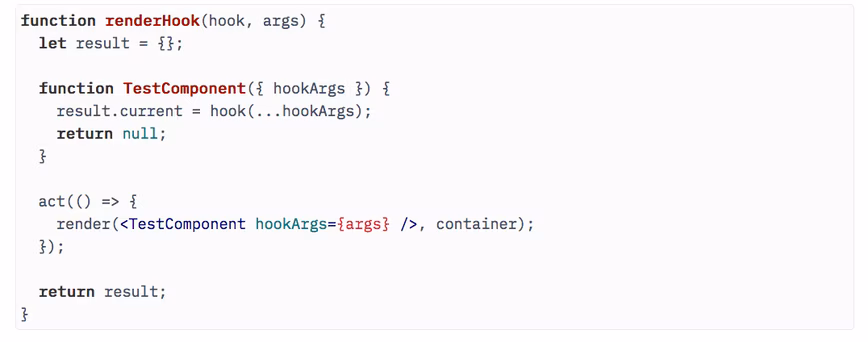
The reason we have result as an object that stores data in result.current is because we want the return values to be updated as the test runs. The return value of our hook is an array, so it would have been copied by value if we returned it directly. By storing it in an object, we return a reference to that object so the return values can be updated by updating result.current.
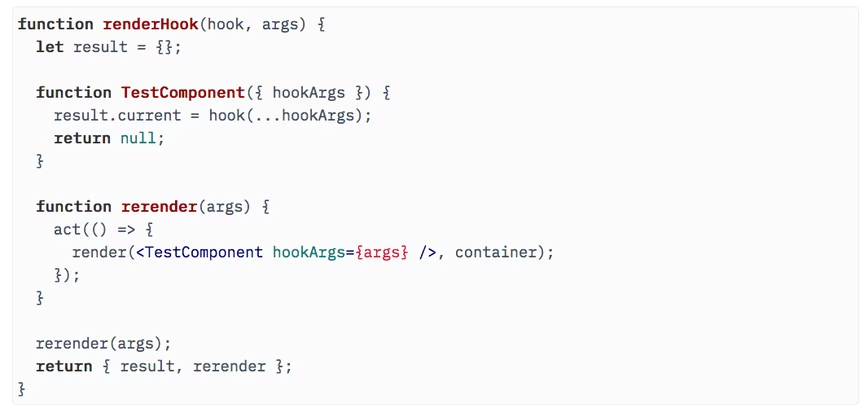
Now, how do we go about updating the hook? Since we are already using a closure, let’s enclose another function rerender that can do that.
The final renderHook function looks like this:
Now, we can use it in our test. Instead of using act and render, we do the following:

Then, we can assert using result.current and update the hook using rerender. Here’s a simple example:

Once you change it in all places, you will see it works without any problems (code).
Brilliant! Now we have a much cleaner abstraction to test hooks. We can still do better – for example, defaultValue needs to be passed every time to rerender even though it doesn’t change. We can fix that.
But let’s not beat around the bush too much as we already have a library that improves this experience significantly.
Enter react-hooks-testing-library.
Testing using React-hooks-testing-library
React-hooks-testing-library does everything we have talked about before and then some. For example, it handles container mounting and unmounting so you don’t have to do that in your test file. This allows us to focus on testing our hooks without getting distracted.
It comes with a renderHook function that returns rerender and result. It also returns wait, which is similar to waitFor, so you don’t have to implement it yourself.
Here is how we render a hook in React-hooks-testing-library. Notice the hook is passed in the form of a callback. This callback is run every time the test component re-renders.
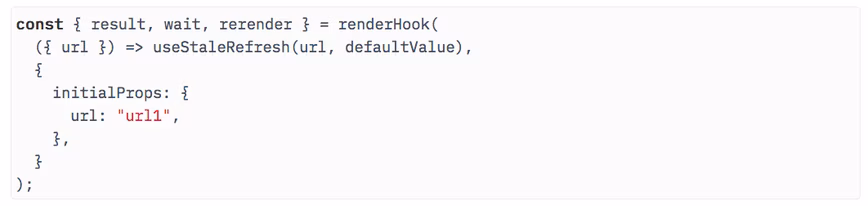
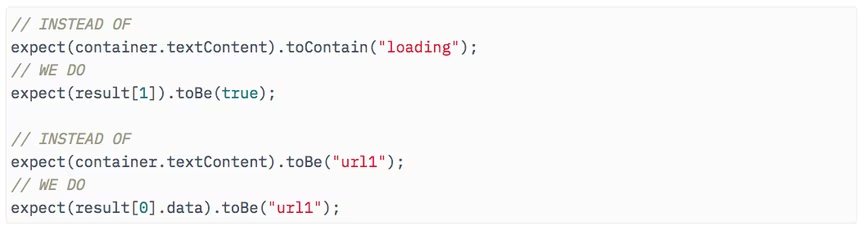
Then, we can test if the first render resulted in isLoading as true and return value as defaultValue by doing this. Exactly similar to what we implemented above.

To test for async updates, we can use the wait method that renderHook returned. It comes wrapped with act() so we don’t need to wrap act() around it.

Then, we can use rerender to update it with new props. Notice we don’t need to pass defaultValue here.
![]()
Finally, the rest of the test will proceed similarly (code).
Wrapping up
My aim was to show you how to test React Hooks by taking an example of an async hook. I hope this helps you confidently tackle the testing of any kind of hook, as the same approach should apply to most of them.
I would recommend you use React-hooks-testing-library since it’s complete, and I haven’t run into significant problems with it thus far. In case you do encounter a problem, you now know how to approach it using the intricacies of testing hooks described in this article.
The Toptal Engineering Blog is a hub for in-depth development tutorials and new technology announcements created by professional software engineers in the Toptal network. You can read the original piece written by Avi Aryan here. Follow the Toptal Engineering Blog on Twitter and LinkedIn.
Get the TNW newsletter
Get the most important tech news in your inbox each week.