I’m not an enormous fan of filtering every photo I take. Most are shot with a camera app like Camera+ or Snapseed and edited for clarity and color. Then, a select few are sent through Instagram to share and some are filtered (most are not these days).
However, there is an undeniable allure to filtration for cell phone photos. There are half a dozen models with incredible cameras on the market now, but most people’s phones have terrible sensors and worse lenses in them. This makes filtering them a good proposition for a lot of people who don’t really care about fidelity, they just want photos to look pleasing.
Instagram does a great job of this (though the absence of Gotham still makes me frown) and offers a nice suite of filters that make cell phone photos look pretty darn decent, if not even better.
Today, for a variety of reasons we discussed in our coverage, Twitter announced its very own photo filters feature. This feature is available to every user of its Android and iOS apps, and offers its own set of filters. We took the feature for a run to see exactly how it worked and stacked up against Instagram’s.
Never another not filtered
An incredibly key thing to note about the way that Twitter’s filter feature works is that every user, no matter whether they’re a filter fan or not, will see Twitter’s new editor. The editor appears immediately after you choose to share a photo from the app (via the camera) or from your library. This will drive adoption like crazy, as anyone who sees it will likely take a poke around and come across the filters.
Expect pretty much every photo you see posted from Twitter’s apps get some sort of tweaking.
Once you’ve launched the editor, you’re presented with an enhance icon, a filter option and the crop tool. This editor is powered by the Aviary SDK, which is a cross-platform option that allows developers to enable editing components in their apps with ‘a few lines of code’.
It’s interesting to me that Twitter didn’t completely roll its own editing tool for this very major feature. Not that I don’t think Aviary is good, because it’s very cool, but it seems that they’d want to make sure they got this right on the first outing. The only thing I can come up with is a compressed timeline.

Twitter needed these filters out quickly in order to compete with Instagram, which likely saw this coming and shut off Twitter’s Cards integration. It didn’t want to roll into the holidays without a way to share these edited photos which display so well in the new profile galleries on the service.
At the very least, Aviary says that it has been working with Twitter for ‘several months’ to implement the feature, so this wasn’t a ‘find something that works last week’ situation. Perhaps the Aviary solution is just ‘that good’, and Twitter felt it couldn’t come up with something that works as well on its own. I wouldn’t be surprised to see this replaced by an in-house system at some point.
I know my profile pic stream would begin to look fairly dated (and still might) very quickly if you shut off its ability to share photos from Instagram. This is Twitter ensuring that it will have a pipeline for beautifully displayed images open at all times.
The Filters
The auto-enhance feature works fine, for the most part. Nothing crazy to talk about there. Once you’ve picked your filters though, you have a completely new set of color-shifting tweaks to work with here than you do in Instagram.
The images for this test were all shot with a Nexus 10 tablet. I’m sure the fidelity would be better with an iPhone or Nexus 4, but fidelity really isn’t the point here is it.

Let’s set the tone, so to speak, with the unfiltered image above. It’s one of my favorite test subjects because it’s got a good range of color and contrast.
The first filter up is Vignette. A vignette is a darkening that happens when the corners of an image are obscured by the edge of a filter or hood. It’s also a printing trick that’s used to draw the eye towards the center of an image and away from a distracting edge merger or bright area. There’s also a bit of contrast boosting going on here, if my eyes aren’t lying. This will likely be a popular one, as it still is with many photographers. I often apply a vignette to my portraits to help direct attention to the eyes.
Next up is the cleverly titled Black & White. It’s a warm-tone black and white image with decent contrast but somewhat flattened highlights. Because the tone is warm, this will look more ‘brown’ than black to most folks.
Then we have Warm. This applies a vignette and warms up the color tone significantly. It’s still not nearly as intense as Instagram’s Earlybird filter. If you’re an Instagram user, this is like Rise with a vignette, basically.
Then we have Cool (because reasons). This is a cool-toned filter that looks like an image shot on daylight white balance in the shade. Most people find warm tones more pleasant to the eye (and the soul) so I don’t think that this will be a very popular one. It could work well for neon or night shots or perhaps concert photos, but I think this will be one of the least used in the end.
Then we have Vintage, which is Warm, but with a more mustardy tone than amber. The shadows are also kicked out here, with a significant amount of mid-tone fill contributing to much flatter contrast than the original image. This is going to lighten very dark areas and fill in contrasty situations, similar to the way that Instagram’s Earlybird does. This will likely be a go to for cameras that are poor low light shooters, but the coloration is easily the worst of the bunch. Unpleasant and sickly.
Cinematic is the most unique of the bunch, with boosted contrast and deeper, clipped blacks. It also reduces saturation significantly across the board, I’d say roughly 40% or so. Enough to leave color behind in decent amounts, but with a more muted, dramatic feel. I like it a lot, but it’s not for everyone, and the boosted contrast blows out highlights much easier, which is already a problem for many phone cameras. This also amps up the grain significantly, which is also not really needed in a smartphone photo.
Happy is up next, and it taps into that ‘warm=good’ thing that affects the way that most people look at images. It’s significantly boosted dark tones will fill in all but the darkest shadows, removing most blacks altogether unless they’re clipped. Highlights, by comparison, are blown and clipped significantly.
Last up is Gritty, which also has Cinematic’s grainer and lower saturation look. It combines this with what appears to be a bit of texture as well, but I can’t be sure. Where Cinematic is neutral to cool, however, Gritty is warm and bright. Of all of the new effects, Gritty is probably my favorite. The blacks are more open than Cinematic and the warm tone is more pleasant than cool.
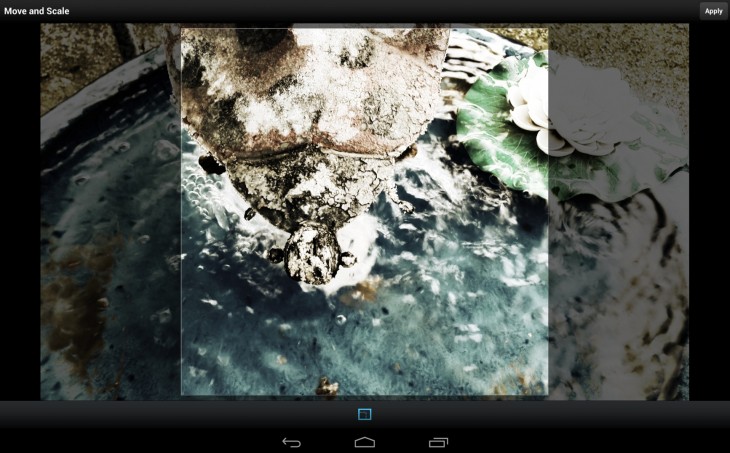
Here’s the new crop tool which lets you do the faux-vintage square thing or the normal full-frame thing.
Overall, the experience is quick and painless, though very visible. While it means an extra tap for your photos, the crop and quick enhance features are very welcome when shooting an image out via the app. The filters are varied and decent, if not as mature in scope or execution as Instagram’s. As with any of these filtration apps, it’s largely up to the beholder to decide.
Now, it’s just a matter of seeing whether adding a filter feature to Twitter will provide the kind of frisson that it has with Instagram. My bet is no, because it’s the focused community and feedback of that service that have driven its growth. But it does provide an avenue for Twitter users to continue supplying the service with photos that look great in its galleries and in its expanded-tweet Cards. And that’s what is most important to Twitter right now.
Get the TNW newsletter
Get the most important tech news in your inbox each week.
