Ah the digital camera. It’s so nice to be rid of film, but sometimes I think the fact that we don’t have to worry about running out of film at a party has made us lazy photographers. Given the how awesome our digital cameras are now, and how much of the hard work is done for us, we really should be taking better pictures, shouldn’t we?
Yeah, sure, but you know there are a few tips that are going to help you out regardless of whether you’re using a point-n-shoot, DSLR or even your iPhone to take pictures.
- Watch your background. Really people don’t need strange things sticking out of their heads (or anywhere else for that matter). So just before you take the shot, just pause and make sure what’s in the background doesn’t make your shot more “interesting” that you had intended.Don’t worry if you goof now that then, even us pros do too. You get caught up in what you’re focusing on and forget to look around the shot to make sure it’s really right.
- Backlight will wreck a great shot. If you’re in a dark room and your subject is in front of a sunny window, you can pretty much be assured that the room will be dark and the window bright.It’s really, really hard for cameras to get that exposure right. A lot of DSLRs, and even my iPhone, allow you to pick a point for focus and exposure, but don’t count on that saving your bacon all the time. Your best option is to try to keep bright light behind you so your subjects are better illuminated.
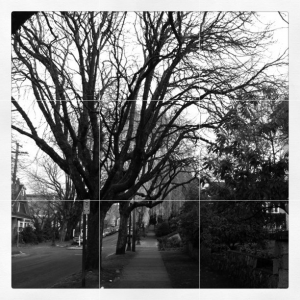
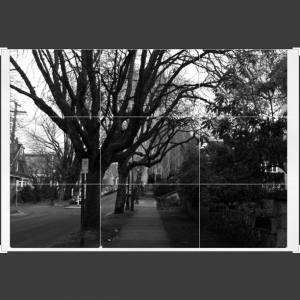
- The rule of thirds rocks. You know when a picture just looks right and by the same token when it looks wrong and you can’t put your finger on why? Chances are that it’s the Rule of Thirds. If you divide your view finder (or image) into thirds vertically and horizontally, you get a simple grid. The subject of your image should be along one of the lines or where they cross. Why? Because it just looks right when you do.Some digital cameras give you the grid in the viewfinder as a guide, but after a while it becomes second nature. Essentially the top third is where the person’s head should be and aligned in the centre or off to one side or another. Let me show you how this works with a picture I took on my iPhone.


The original picture, with the handy grid overlay for reference, it isn’t bad, like I said after a while it becomes second nature, but a little cropping changes the image.
See cropped with the sidewalk at one of the nexus points gives the picture a different feel. If you frame a picture well you get that just right look. Practice you’ll get it.
- Just say no to flash glare. Although I try to shoot with natural light as much as possible, sometimes you have to shoot with a flash. The problem is that most of the time a flash will put a lot of glare into the shot that you don’t want. Don’t worry there is an amazingly simple trick to fix this: tape. Yep, just put a piece of semi-transparent tape across the flash and the flash will be defused very nicely. In a pinch you can also use a paper napkin or a tissue. The result, well you won’t believe how much of a different it makes until you try it. It’s really amazing.
Believe it or not, these four tips will make a big difference in how your holiday shots turn out. Sure there are a ton more I can share, but really these are four of the easiest that give you the most bang for your buck.
Get the TNW newsletter
Get the most important tech news in your inbox each week.


