
You can tweet or update your blog. You can upload images or video to your favorite online photo storage or sharing app. You can post to your Facebook account or whatever social network you’re into.
But unless you have Apple’s iPhoto for iOS (iPhone or iPad), you cannot create a Web Journal. Web Journals are unique among Apple’s photo sharing utilities—even iPhoto for OS X doesn’t have one.
And that’s kind of sad because Web Journals are cool.

What’s a Web Journal? You might say it’s a hybrid scrapbook, photo album, and slideshow. The scrapbook element is derived from the arrangement of photos and the mixture of non-photo widgets you can integrate into the presentation. Elements like notes, maps, symbols, and weather modules can satisfy the urge for a simple storytelling narrative—one that might even contain some documentary flair—without getting obsessive.
Flexible presentation
Web Journals are designed to be versatile and dynamic. You can post a Web Journal documenting each day of a trip, for example. Or you can use it to highlight the most important parts of a single event. You can update journal contents anytime, so material is always up to the minute.
The ability to craft the presentation offers more flexibility than a slideshow, and is more dynamic than a photo album. You can add captions and notes to a Web Journal. And finally, it’s designed to be synced with your iCloud account for viewing in the browser or on a mobile device by whomever you like.
I generally like to restrict Web Journals to between 12 and 20 shots — just enough to offer variety, but not too much. A Web Journal is not a photo album—it’s a curated selection of photos that look good together and can accommodate other artistic elements.
Like most operations in mobile iPhoto, creating a Web Journal is easy; here’s the basic walkthrough.
How to construct a Web Journal
1. Under the Share menu, locate Web Journal under Create a Project.
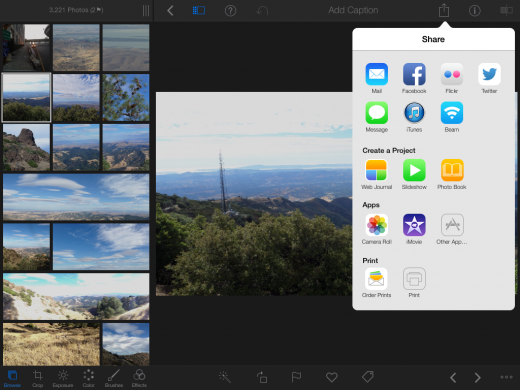
2. Go to the bottom of the menu where it says Choose Photos. You can select up to 200 photos. You might want to choose all the photos in an album, but more likely you’ll select each photo individually. Drag to expand up to four rows of photos to the left of the main image, and tap the ones you want to include. Tap again to deselect, if you change your mind. When you’re done, tap the Next button at the upper right and then tap New Web Journal.
3. Name your new journal, select a background, and then create. Nothing is carved in stone here. You can always change your mind. It would be nice if Apple added some new background elements to the selection—but there’s something to be said for keeping the choices simple.

4. Go back to the main menu using the arrow key on the upper left. You’ll find the new journal under the Projects tab.
And that’s it. You can leave the web journal just like that and be done. But of course you can do more.
Formatting tips
You can go back and change the background and the grid pattern or size.
Even when your images are all lined up in the grid, you can still edit them individually by tapping to bring up iPhoto’s edit module—meaning you can still crop, adjust exposure, sharpen, or add special effects to individual pictures. You don’t have to worry about setting everything up beforehand.
You can change the size of individual photos in the grid by using zoom and pinch or click and drag gestures, and drag and drop images into different locations until you’re pleased with the composition.

Add captions to each photo and choose from three different fonts. The keyboard automatically appears so you can type in your text.
When you edit one photo, you have the option of applying the same edits to other photos in the series. This is convenient if you’ve taken a number of shots at the same time of day.
When viewing the Web Journal on a mobile device, tapping any image automatically lets you view each photo in sequence via swipe.
Share your journal
When you’re done tweaking your Web Journal, you will want to put it on display. For that you have a few choices.

The most popular one will be to use your free iCloud account to share a link to your journal via email. You can also use iTunes or AirDrop to sync the images you used, or simply beam your journal (connect via the same Wi-Fi network or Bluetooth) to someone else running iPhoto for iOS.
Image Credit: Shutterstock
Get the TNW newsletter
Get the most important tech news in your inbox each week.


