
Some time ago I visited my parents, and as these things tend to go, they had a list of things that bothered them about their computers, iPhones and iPads and the Internet connection. I like helping them, so tried optimizing their Wi-Fi network first. That was frustrating at first because I didn’t really know what tools to use. I Googled around a bit and found some very expensive tools, but I also uncovered a great and useful one hidden away in Mac OS X itself.
In the past it would suffice to look at the AirPort symbol in the menu bar top right. If it would show a full signal (all bars black) it would work, and if it didn’t, it wouldn’t. But it seems that the AirPort symbol now always displays a full signal, even when the signal is bad. Fortunately, there is an easy way to check signal-strength, and it is just a few clicks away.
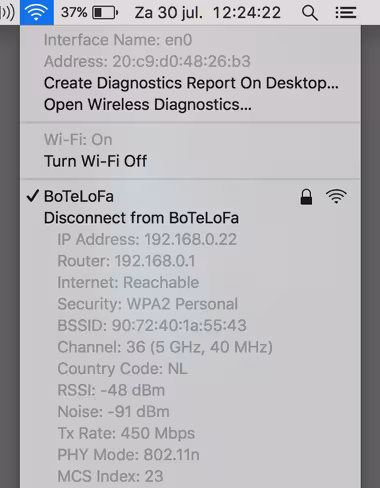
Step 1: Press the ‘alt’ key on your keyboard and mouse-click on the AirPort icon in the menu bar, like this:

The 💜 of EU tech
The latest rumblings from the EU tech scene, a story from our wise ol' founder Boris, and some questionable AI art. It's free, every week, in your inbox. Sign up now!
The network you have selected will display some extra info. This is what each option means:
PHY Mode: protocol being used to connect.
BSSID: The unique identifier for your airport hardware, also known as the MAC address.
Channel: Wi-Fi signals are transmitting on certain channels. A channel might conflict with other transmitters.
Security: The kind of encryption used. WPA and WPA2 are safe options. WEP isn’t anymore.
RSSI: The ‘Received Signal Strength Indication’ shows the strength of your signal. Closer to 0 is better.
Transmit Rate: The actual speed at which data is being transmitted between your access point and your computer.
MCS Index: This is a number that corresponds to protocols used to encode the radio signal.
This is already useful. Especially the RSSI and Transmit Rate, which give you an indication of how well your network is performing. But we don’t stop there.
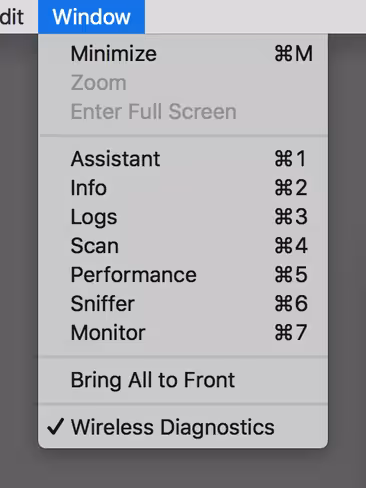 Step 2: At the bottom of that menu is an option called ‘Open Wireless Diagnostics’. Select it to open an app with the same name, after you’ve authenticated yourself. It opens with an introduction screen which we will ignore for now. Instead, we will press the command key + 7. Or go to the ‘Window’ menu and select the ‘Monitor’ option, as shown on the right here.
That is what we are looking at now:
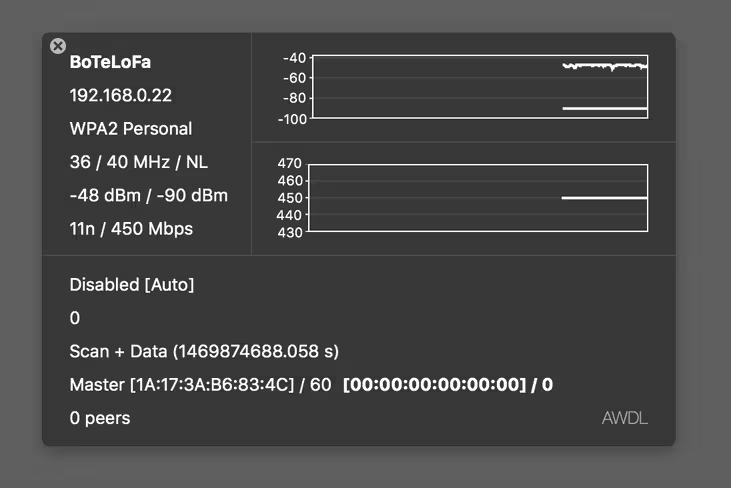
This is the window that will really help you optimize things. Move your computer around the house to see the different parameters change. Keep an eye on the ‘RSSI’ versus ‘Noise’ indicators, shown in the top right graph. Less noise is better.
I ended up disconnecting the wireless phone system and moving it around to minimize noise and I rotated the AirPort base station 180 degrees, which turned my parents signal from ‘Good’ to ‘Excellent’.
At my own house I experimented with an old metal tray placed behind my AirPort directing the signal inwards instead of outwards towards the neighbors. There might be other computers, old Wi-Fi networks or microwaves interfering with your network. Try different things and keep a close eye on your network performance, and let us know how much you improved your signal.
Get the TNW newsletter
Get the most important tech news in your inbox each week.