
It’s useful to know how to record screencasts. These videos of what’s displayed on your computer screen, with an audio commentary if you choose, are a good way of easily sharing a problem you’re having or something you’re working on – or helping others by showing them how to do something with their computer in an easy-to-follow-way.
Although there are plenty of apps available to record videos, the most recent version of Mac OSX, Snow Leopard, has everything you need to get recording without paying a penny more. In case this option’s passed you by, here’s how to record video on Mac:
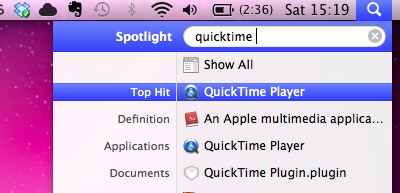
First, open QuickTime Player. This app comes bundled with OSX Snow Leopard and the fastest way to find it is via a Spotlight search.
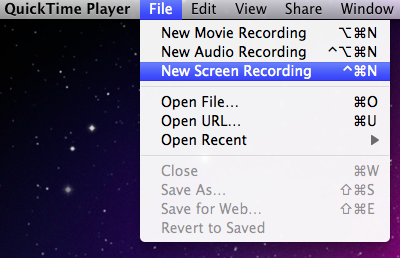
Once QuickTime Player is open, click ‘File’ and select ‘New Screen Recording’.
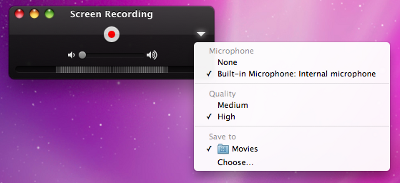
This black Screen Recording window will open. Click the small arrow on the right-hand side of the window to select what microphone you want to use. If you’d prefer a silent video, select ‘None’.
You can also choose between ‘High’ and ‘Medium’ quality (strangely, there’s no ‘Low’ option). If you’re recording a long piece, Medium will give you a more manageable file size. However, High is a better option, especially if it’s only a short video, as you’ll capture the details of the screen more clearly.
Finally, you get to decide where your finished video will be saved.
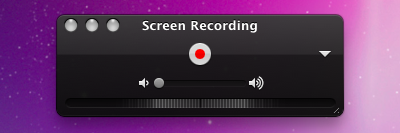
If you’re going to be recording your voice, speak and you’ll see the volume level meter rise and fall. It’s best to keep the volume slider fully to the left unless you want to be distracted by audio feedback as you record.
When you’re ready to start recording, click the red record button.
At this point, the Screen Recording window will disappear and you can start doing whatever you want share. Everything you do on-screen is recorded, including mouse pointer movements.
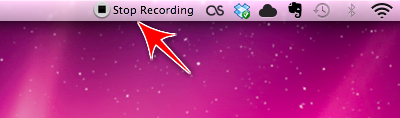
When you’re ready to end the recording, you have two options. Either click the ‘Stop’ button that you’ll find in the OSX Menu bar at the top of the screen. Alternatively, you can press the Cmd, Ctrl and Esc keys together.
Once you stop recording, your screencast will open up in new window, allowing you to watch back and check all is well.
Assuming that you’re happy, the video, recorded in .mov format, is ready to be uploaded to the Internet, edited in iMovie or whatever you choose.
Pro-tip: zooming in
While sceencasting is quick and easy with QuickTime, it doesn’t offer any advanced features such as highlight effects and multiple recording formats which more advanced solutions like ScreenFlow do. However, one things it’s easy to do is zoom into your screen to highlight particular elements of the screen thanks to an accessibility feature built right into OSX.
Just zoom in to your screen using by pressing ‘Ctrl’ on your keyboard while dragging two fingers over your trackpad or Magic Mouse, or by scrolling up and down with the ball on top of other mice. If that doesn’t work, make sure ‘Zoom’ is activated by selecting ‘System Preferences’ from the Apple menu and selecting ‘Universal Access’.
Happy screencasting! Here’s the kind of result you can expect.
Get the TNW newsletter
Get the most important tech news in your inbox each week.