When I got my MacBook Pro, I got it used. I was told that the hard drive would need to be replaced, so I decided to lay down a chunk of cash and grab a solid-state drive (SSD) from Intel. The performance gain of an SSD is amazing, and I’ve never once regretted the space for speed tradeoff that I had to make in order to get the most performance out of my Pro.
What’s started to bug me, lately, is that my iTunes library is getting bigger. I’ve been ripping in my DVD’s to stream to my Apple TV and that takes up a considerable chunk of space. I had moved my iTunes directory to a USB drive and everything worked fine, but it bothered me to not have everything on my machine natively. I knew that I had to make a change, but I didn’t want to give up the speed of my SSD in order to get that space back.
The options that I had were few, but they did exist. I could do everything over a network drive, and make that drive available from outside of my network as well. Honestly though, I wanted simplicity. I just wanted the files back on my computer. So to do that, I found that I could replace my never-really-used Superdrive with a kit that would allow me to place a 2.5-inch laptop drive in its spot.
I’m not certain who came up with the idea for this first, but I have to give credit to a company called MCE for doing it best. I had snagged a couple of cheap kits from eBay in order to test them and they were plagued with problems. From connectors that didn’t work to pieces that broke off, you can find talk about them all over the Internet.
MCE’s OptiBay system comes at a price premium (starting at $99, versus around $15 from different eBay sellers) but there are some pretty solid reasons for that. First off, the build quality is top notch. The OptiBay is made of lightweight aluminum, but it fits perfectly and the connectors worked as they were supposed to. After a couple of tries with other drive bays, that’s a huge advantage. Oh, and there is a model for just about every portable Mac on the market.

The other huge advantage of the OptiBay system is that it ships with an enclosure for your Superdrive that turns it into an external USB device. The enclosure isn’t terribly impressive from a build standpoint, but it’s functional and works as advertised. More on that in a bit.
First off, it has to be said, doing this modification will void your warranty so proceed at your own risk. MCE has a number of service centers that they recommend to install the drive for you, but an OptiBay kit comes with everything you’ll need and it will only take about 20 minutes if you’re moving slowly.
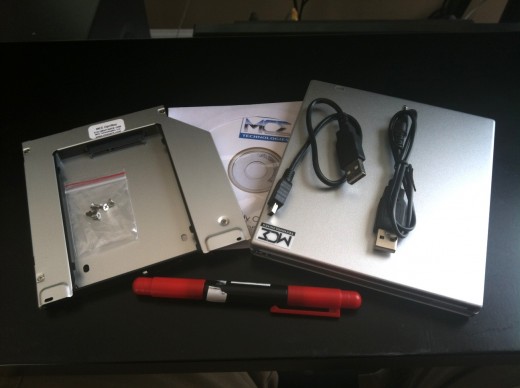
From left to right, above, you’ll see the parts that are included: The OptiBay itself, a 2-sided screwdriver that will fit the screws in the bottom of your MacBook, then the portable USB 2.0 enclosure for your Superdrive. That enclosure comes with 2 cables, 1 for USB and a 2nd for power if you find yourself needing it. There’s even a DVD included which runs you through the installation.
Taking off the bottom cover of my MacBook Pro (mid-2010, Core 2 Duo variety) you’ll see exactly what it takes to remove the Superdrive. You can see the 5 screw locations, plus a connection strip that is secured to the Superdrive via some detachable adhesive. Unscrew the 5 screws, pull up on the adhesive strip gently and you’ll have a blank bay.
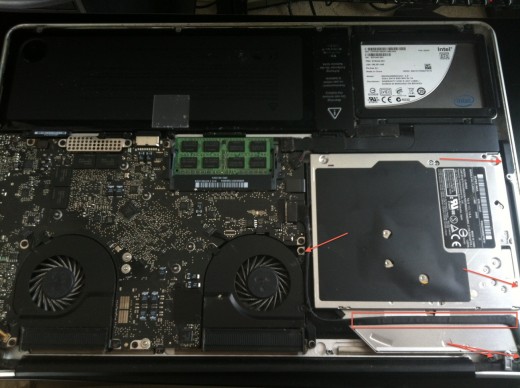
Once your blank bay is exposed, you might want to take this opportunity to clean up any lint and other junk that has gotten into your computer. Be careful, don’t ruin things. use an air duster and proceed with caution.
Mounting your new hard drive into the OptiBay is a snap. Just slide it into place on the SATA connector, then use the included screws to secure the drive to the bay itself. Once you’ve done that, carefully slide the OptiBay into place, being extra cautious to not damage the internal SATA connector on your MacBook. After you have everything in place, I’d suggest placing your backplate onto your Mac, securing with a screw or two, then firing up your computer to make sure everything works as intended.
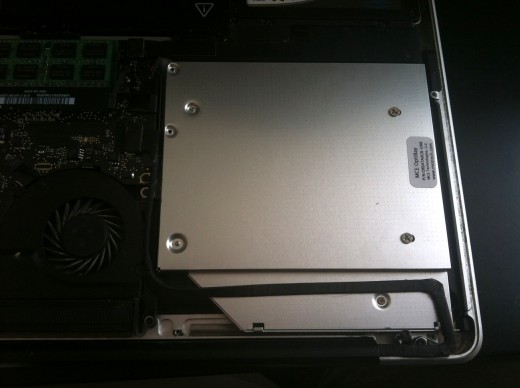
If everything is working as it’s supposed to, just add the remaining screws to the bottom plate of your Mac and you should be the proud owner of a lot more space. OS X doesn’t seem to care all that much as to what you connect to that SATA port and firing up an unformatted drive will simply ask you to format it so that it’s usable.
Now, let’s talk about that external USB 2.0 enclosure. It’s an incredibly simple device, made of plastic, that contains a plug which will let you convert your SATA drive to a USB 2.0 one.

Just slide the top of the unit back and you’ll see the connection and board. Plug the connection into your Superdrive, set the unit in place inside the enclosure, then slide the top back on. There are two screw holes in the back, and included screws keep everything secure.
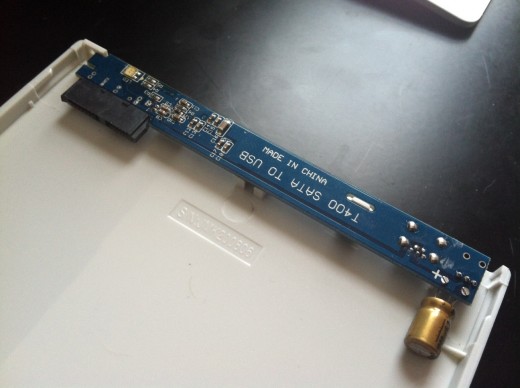
My only gripe about the enclosure has to do with the build quality. Given that the OptiBay is a $100 product, I’d have really liked to have seen this made out of aluminum rather than an (admittedly nicely metallic) plastic. It’s functional, it even looks good. It’s not, however, what I’d like to see at this price point.
All in all, the OptiBay is a great product. It works as advertised, it’s nearly foolproof and the bay itself is built better than any other option I’ve seen. I picked up a 500 GB, 7200 RPM drive for about $40 and now space is no longer a concern. For that, I couldn’t be happier. MCE has some other drive options that are well worth investigating so browse around and find out what combination is right for what you’re wanting to do.
Get the TNW newsletter
Get the most important tech news in your inbox each week.


