
People are brilliant and amazing.
I’ll often run across an incredibly cool social media strategy or format or tool or link and think to myself, “Whoa, how’d they do that?”
There are things like shortened custom URLs, evergreen queues, personalized recommendations, and more. And I’m so inspired by the cleverness and resourcefulness—not to mention the great value and utility—of these methods.
So I’ve gone about trying to figure them all out.
Check out my DIY tips below for putting together each of these strategies. It’s felt great to do a few video tutorials for these steps also! I’m excited to hear what you think.

1. How to have your very own custom short URL

Notice the shortened URL in the above tweet from Moz?
They’re using a custom short URL: mz.cm.
Cool!
This can be a really great opportunity to extend some branding into the shortened links you share on social media. And at the very least, it could make for a fun experiment to see if it helps up the engagement on your updates (I’ve heard some folks fare better with custom short URLs, some do better with full URLs, and some do better with buff.ly or bit.ly URLs.)
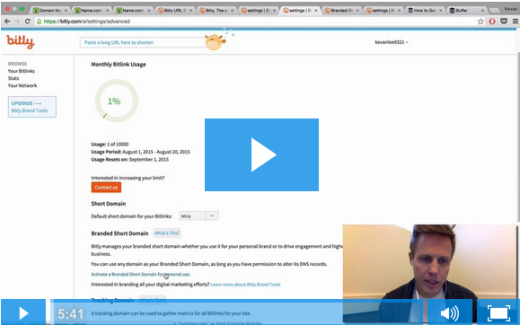
I put together this quick video on how to set up a custom short domain. The specific instructions are below also.
Step 1: Choose a custom short URL
One of the most fun parts! Choose any custom short URL you’d like, something that aligns closely with your brand name.
Some tips for shortening include removing the vowels from the name (e.g., bffr for Buffer), focusing on a stressed syllable in the name (e.g., buff for Buffer), or using an acronym (e.g., sbn for SB Nation).
The best practice seems to be aiming for no more than six letters total, including the domain extension.
Here are a few great places to look for inspiration and ideas, as well as to purchase the domain:
And here’s a quick look at some top-level domain extensions for different countries. These make for great domain choices as the suffixes here are all two letters in length.

And for further inspiration, here are some of my favorites:
- joel.is – Joel Gascoigne
- buff.ly – Buffer
- candc.ly – Convince & Convert blog
- mz.cm – Moz
- sbn.to – SB Nation
I went through this process for myself and thought about grabbing kevan.ly ($100), kev.us (on backorder), kev.pub ($25), kev.re ($18), kev.uno ($18), kvn.win ($35), kvn.mx ($45), kvn.gy
I ended up choosing kev.uno. (It’s one of my favorite card games.) 
Step 2: Add your domain to Bitly.
Sign in or register for a free Bitly account, and once logged in, click on your username in the upper right corner and choose “Settings” from the dropdown list. Then click over to the “Advanced” tab on the next page.
Under “Branded Short Domain,” you can select to activate your short domain. Enter your new short domain at the next screen.
(It might be helpful to keep this screen open in a tab also. We’ll be coming right back to it.)
Step 3: Create a DNS record for your domain name.
A DNS is what makes a browser (Chrome, Internet Explorer, etc.) point to a website, so this is where you’re telling your custom short domain to point to Bitly. To update your DNS information, you’ll need to go to the website where you registered your domain name.
Updating your DNS is typically pretty simple and should be very similar to the instructions below, even if you don’t use name.com.
For name.com customers, you’ll login to your name.com, click on your short URL, and then click on “Update DNS records.”
You’ll now need to edit the A record for your site. You do this by changing the IP address to 69.58.188.49. Here’s what it looked like when I changed mine at Name.com.

Step 4: Verifying your domain ownership.
Now that your A record has been added to your domain name you need to go back to the “Branding Domains Settings” on Bitly and click on the verify button. When you do this, your domain is now connected to your Bitly account and your new domain is the default domain for the links you create using Bitly.
Nice! You’re now able to make your custom short URLs work on bitly.
Bonus: Connect your custom short URL to your Buffer account.
Head on over to Buffer, press the “Settings” button in the top navigation, and then click on “Link Shortening” from the drop-down menu.
Press the “Connect Bit.ly” button, and you’ll be asked to authorize Buffer to connect to your Bitly account. Once you’ve successfully connected your Bitly account to your Buffer account, you’ll be taken back to the “Link Shortening” page where you’ll see your custom URL displayed as selected.
And you’re done! Test and enjoy!

2. How to build an evergreen queue of all-time great tweets and updates
Here’s an incredibly useful luxury: Having a stockpile of your greatest tweets and updates that you can pull from whenever you’re in need of something to share on social media.
There are some neat tools out there that automate this process (MeetEdgar is one, and we’re exploring the idea of working this functionality into Buffer as well).
For the time being, I’ve discovered and been loving this neat little workaround to build an evergreen queue inside Buffer.
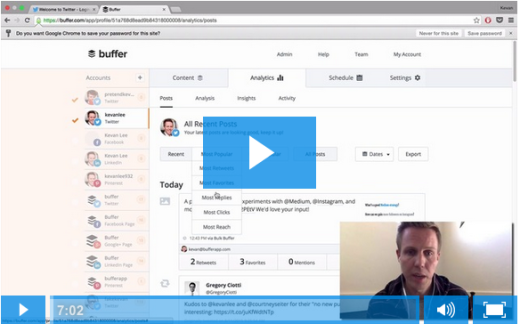
Here’s a quick video I put together:
Step 1: Create test accounts on Twitter and/or Facebook.
On Twitter, the method I like to use for creating test accounts is to sign up for a fresh account with a variation of my Gmail address.
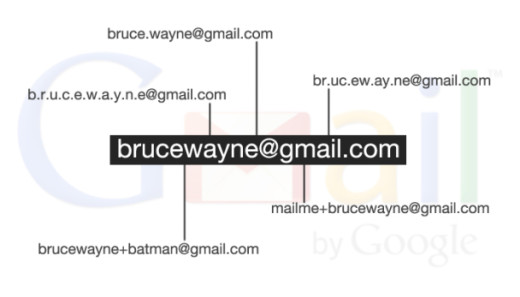
Gmail lets you build a huge variety of multiples and variations of a single email address such that services like Twitter will recognize it as a unique address and Gmail will still collect all the email into the main inbox. Simply add “+” or “.” with annotations to your primary email.
This graphic from TechVerse helps explain it:
On Facebook, I like to create a new page, and I’ve heard of others who set up test profiles as well, using the email method I mentioned above.
Step 2: Connect your test accounts to Buffer.
Once the test accounts are set up, you can log into Buffer to connect these to your Buffer account.
Step 3: Find your posts that have done the best.
As often as you like (I aim for once per week), you can head into your Buffer analytics for your primary Buffer Twitter and Facebook profiles to see which posts performed the best.
I like to set benchmarks for our posts at Buffer—in our case, it’d be 200 or more clicks on Twitter and a Facebook post that reached 1,000 or more people.
Step 3: Add the best-performing posts to your test accounts in Buffer.
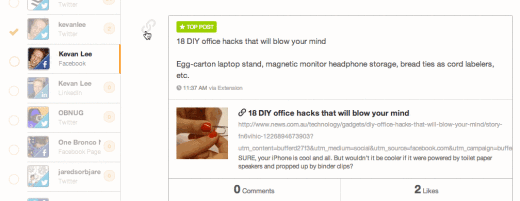
When I find one of these posts in analytics, I’ll drag-and-drop it into the test account.
Step 4: Use this evergreen queue to fill your main queue
Then later on when you need to fill the queue for a primary account, you can head into these evergreen queues and drag the post from the test account back over to the main account. Edit the update text a smidge, and you’re good to go!
Note: On the test accounts, once I’ve added them to Buffer I turn off the posting schedule so that none of the updates ever actually post. This keeps everything I save in the main queue. I can also then shuffle all these updates to get fresh ideas on which greatest hits to reshare.
3. How to get personalized recommendations from your closest friends
There are so many great tools out there for content discovery—Swayy,News.me, Prismatic, Nuzzel.
What so many of these services do so well is to highlight content that is being highly shared by your social networks: your friends on Facebook and those you follow on Twitter.
The one catch I’ve found for me personally with these services is that I follow a lot of people with a lot of varied backgrounds and interests. Sometimes, I’d love to know just the content that particular circles of friends are into.
Here’s one solution I’ve found.
Step 1: Create a test account on Twitter and/or Facebook.
Same as the first step in the above tip (and you can use the same test account as before, if you’d like).
Step 2: Follow people on Twitter. Send friend requests on Facebook.
The key here is to only follow the people from one specific circle. I could see this working well for following your coworkers, family, friends, work peers, or influencers. (Or most any other group, too; I’m sure you’ve got some great ideas here.)
I’ve found this to work quite well for a group size of anywhere from 10 to 50.
Step 3: Join a recommendation service.
While logged into your test account (that’s an important note!), sign up for a recommendation service. I’ve found this works really great with Nuzzel, for instance.
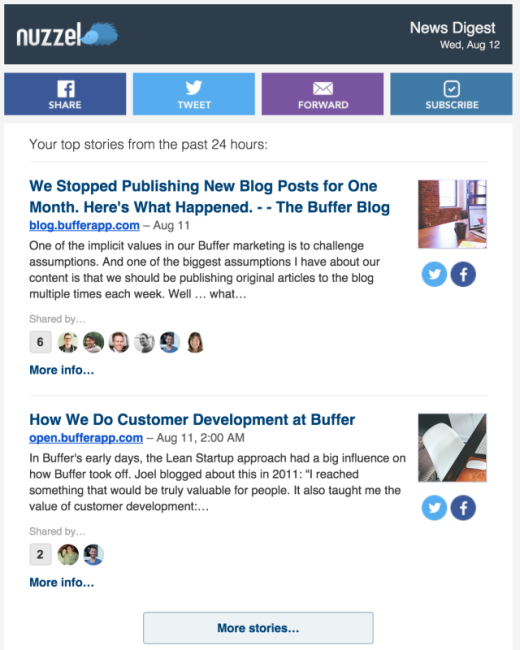
Then what happens is that Nuzzel will go out every day and check only those friends/follows that you’ve got through your test account. Nuzzel will find the links they’ve shared, and organize them all into a highly, highly personalized daily email digest, with the specific links that are being loved by your small circle.
Here’s what my Nuzzel digest looks like for my group of Buffer coworkers.
4. How to take a gorgeous product picture
I know very little about taking gorgeous photos, so I’m grateful for the amazing tips and tutorials online of how to get this done.
And I love this simple, inexpensive DIY tip for building a light box from Anne Weil of Flax & Twine.
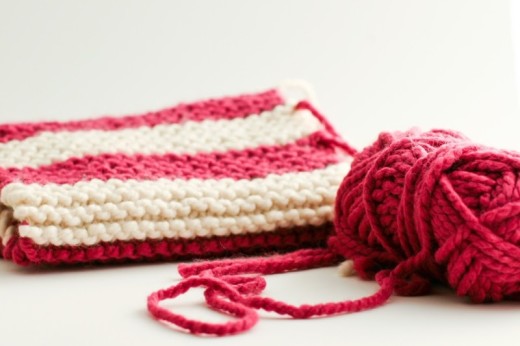
Taking photos inside a box that diffuses natural light from all sides, you can remove shadows and give a white, magazine-like finish to your photos.
Yes!
Translation: If you’d enjoy getting your product pictures to look fantastic on Pinterest, Instagram, and others—just like the pics from major brands—this is the tip for you.
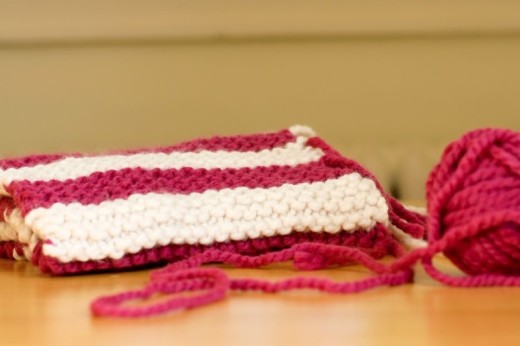
Here’s a before-and-after example from Anne.
Before:
After:
The materials you’d need for this quick project include:
- 1 cardboard box
- Tissue paper
- Craft knife
- Packing tape
- White posterboard (should be at least 30 percent longer than the box length)

Here are the instructions for the DIY light box. Anne has full photos of each step on her website, which was super helpful for us to reference as we went along.
- Cut off the tops of the box.
- Cut out a rectangle one inch shy of the sides on three of the four sides of the box.
- Pop out the side
- Box should look like this after all three sides are cut.
- Piece together tissue paper with packing tape to a size large enough to cover one side of the box.
- Attach tissue paper to each open side of the box with packing tape.
- It should look like this after you cover all three sides.
- Cut white poster board the width of the box.
- Place the poster board in the box such that it curves inside the box.
- Place object inside the box at the flat part of cardboard. Place the box in as much light as possible. Take photos, yes!
Then for the finished product, you can crop the image and add a little brightening until it’s just how you like it.
(Here’s a cool alternate version of a light box also, if this one seems more your style.)
5. Schedule to Instagram with push notifications
One of the most buzz-worthy bits of news in the social media space lately has been the Instagram API and the potential for scheduling images to Instagram. Some services are starting to roll this out to users, with the solution typically working like this:
- Create the Instagram post you’d like to schedule and set a posting time
- When that time comes, you’ll receive a push notification on your phone
- Click the notification to be taken to the service’s app. Review your Instagram post and then click to be taken to Instagram. (The text for your IG post is placed on your clipboard at this step.)
- Once on Instagram, paste in your update text, add any filters to the image, and publish.
It’s not quite a seamless experience just yet, though there’s definitely some great strides here in automating parts of the Instagram marketing process.
Here’s one way I’ve found to duplicate this in a DIY way with Buffer.
Step 1: Download the IFTTT app and activate the iOS or Android notifications channel.
The IFTTT app is a free one from the App Store, and it’ll help wire up all the different automation aspects of this workflow.
- Here’s a link to the iOS notifications channel
- And one for the Android notifications channel
Step 2: Grab this IFTTT recipe.
What this recipe does is send you a push notification any time you send a photo to your Buffer profile. I have mine set up to notify me when I publish a photo tweet via Buffer. You could do similar for a photo sent to any Buffer-connected profile.
The recipe will send you the text of your update as well as a link to the photo you’ve used.
Step 3: Open the notification on your phone
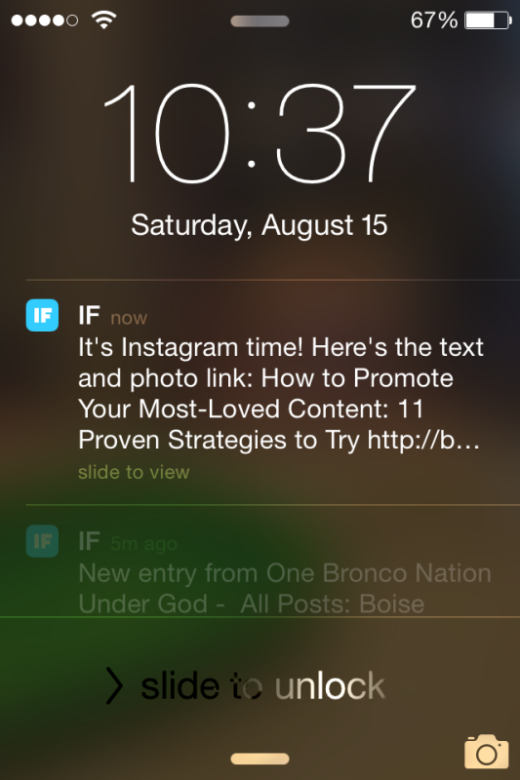
The notification will send you to the IFTTT app where you can view the photo and the update text you shared.

IFTTT makes it easy to open the image link in Safari.
Step 4: Tap to open the image in Safari, then tap Save Image to save to your Camera Roll.
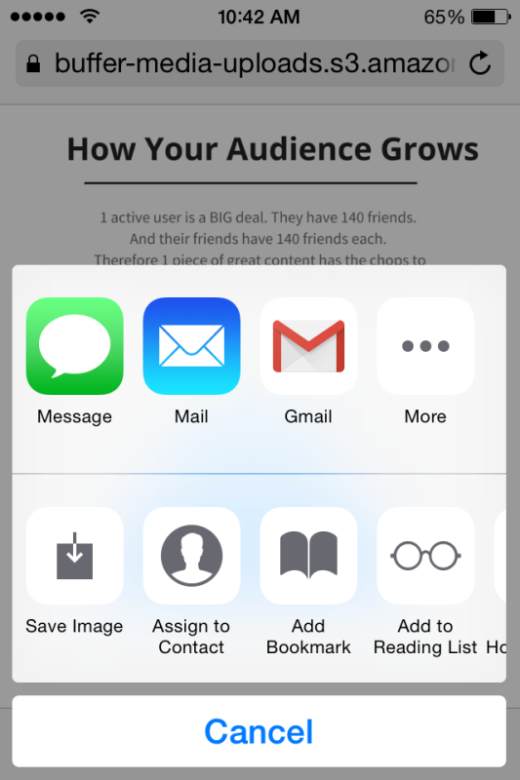
Step 5: Open Instagram and share your pic!
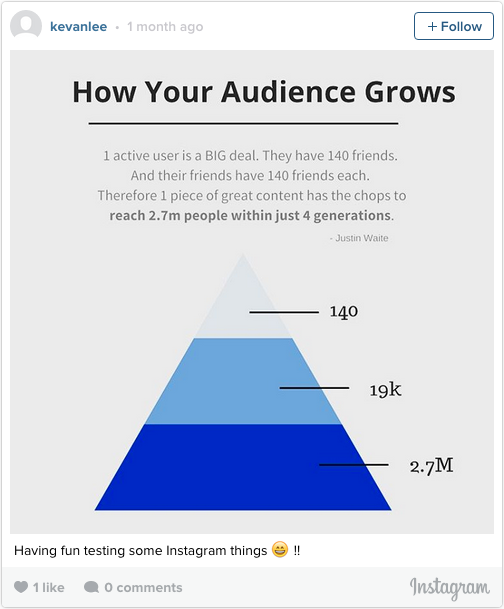
Hop into the Instagram app, and you can choose this picture from your camera roll to share on Instagram and type in whatever text, hashtags, and emoji you’d like.
6. Build a listening/monitoring dashboard inside Buffer
Social listening and monitoring—the area of social media that includes tracking and noticing when you’re mentioned online—is one that we’re keen to explore further as an official part of the Buffer app.
Unofficially, here’s a cool little workaround for the time being.
Say you’d like to have a spot in your Buffer dashboard to check in for any mentions. I’ve hacked together a little something, using Mention.com andBuffer Feeds.
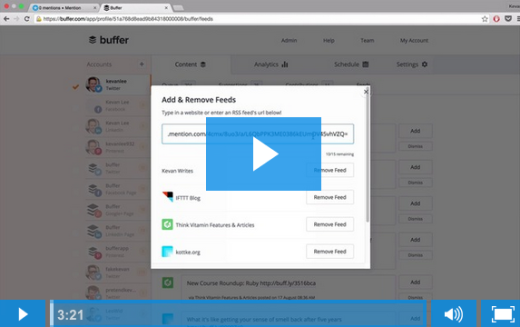
(Inspiration for this tip came from a blog post on the Buffer blog by Caerley Hill where she explained how to build a Mention + Feedly dashboard.)
Step one: Sign up for Mention
The free site tracks mentions of any terms you give it (I’ve got alerts set up for “Kevan Lee” and “kevanlee”), and it will collect everything it finds on social media, blogs, and more.
Step two: Click to view your settings on Mention
Click on your profile picture in the upper right-hand corner, and choose “My profile” from the drop-down list.
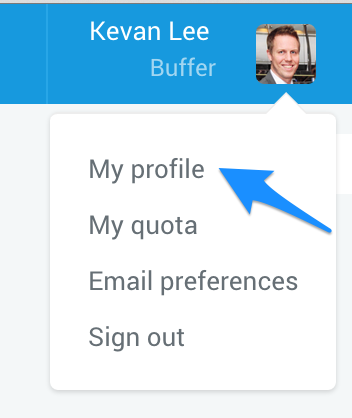
At the next screen, click on the section for “Manage my alerts,” which can be found in the vertical menu to the left of your profile info.
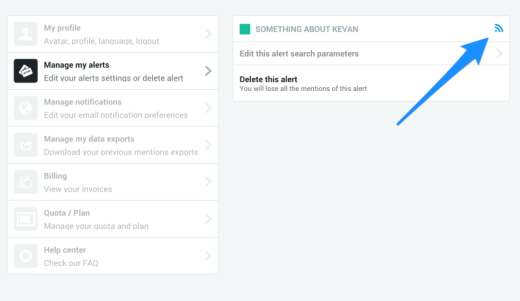
Step three: Grab your mention RSS feed URL
In the Manage My Alerts section, there’s a small RSS icon that appears. Click on the RSS icon, and you’ll see a popup with three options for grabbing a URL:
- All mentions
- Favorite mentions – Mentions that you’ve marked as favorite
- Priority mentions – Mentions that Mention has identified as particularly valuable or important (you can tell Mention what you think, and it’ll learn to identify these even better)
Step four: Enter the RSS feed URL in Buffer Feeds
Log in at Buffer, and go to the Feeds section within the Content tab.
Next to the blue Feeds button, click the “Add & Remove Feeds” button.
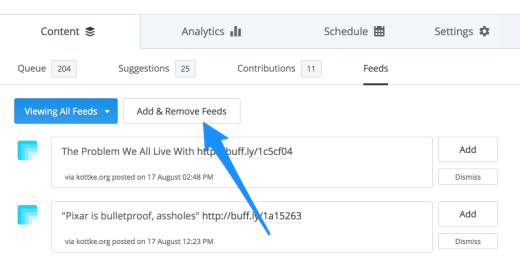
Paste your Mention feed URL into the Add Feeds box.
Finished!
Now, each time you’d like to do a little social listening for your business or brand, you can come into your Buffer dashboard and see the latest list of every mention. You can further customize these mentions by adjusting your settings on Mention.com.
7. Create a weekly social media report

We take a lot of inspiration from the amazing reporting tools out there that can help with analyzing and optimizing our social media efforts. SumAll is a favorite of the team here (and it’s free, if you’re keen to give it a go). And I’ve always been personally excited to see what insights I can piece together for myself.
One way that I’ve found to do this is with a simple spreadsheet for a social media report card.
Download the Social Media Report Template for free –>
The report is built in Google Sheets, and it works off of a data export from Buffer. You can likely rig it to work with exports from other social media analytics tools as well.
Here’s how to use it:
- Go to your Buffer for Business dashboard and export your analytics for the past 30 days.
- In the Social Media Report Google spreadsheet, on the “export” sheet, click on cell A:1.
- Go to File > Import. Upload your export file, and choose “Replace data starting at selected cell.”
- The “Report Card” sheet should automatically be filled in with data from the “export” sheet.
- Edit any of the headings or titles (e.g. Retweets for Twitter, Reshares for Facebook).
- You’re all set! There’s a Report Card view for online editing/viewing, and there’s a Print-Ready view that’s been formatted for creating pdfs and printouts.
We first shared this report card tip in a big huge post we wrote about social media reports here on the blog. It includes a lot more info on reports and specifics, if you’re interested in learning more!
Bonus: Eye-catching formatting of your social media posts
I was browsing through my Twitter timeline the other day when this cool tweet popped out at me!

So fun!
Tweets and posts like these do such a great job of standing out in a feed, similar to the effect of a photo. If you don’t have an image to share, sometimes an emoji, emoticon, ASCII art, symbols, or even a simple line break or two can add the same effect.
Here’re some of the best and quickest ways I’ve found to include these in your updates.
Line breaks in tweets and updates

I quite like this tweet format from Bridget Willard (and many others). When you’re typing out a tweet, you can space things out in the text by adding line breaks.
To add a line break, simply press enter one or two times for single- or double-spaced text.
Add an emoji, emoticons, and symbols to your updates
A couple years back we wrote on the Buffer blog all about this cool formatting for your tweets and updates, and these neat tips have proven to be quite evergreen. Emoji, emoticons, and symbols remain hugely popular on social media updates.
A couple favorite spots we like to turn for handling these techniques in our posts include the apps themselves—Facebook and Twitter have some great options for including emoji and more in the posts really easily, especially from mobile devices.
Here are some other favorite sites also:
- Panmetal.de/symbols – A super simple and basic site for adding symbols. Click to pick a symbol then select and copy the symbol. You can paste directly into your update.
- Twitter art tips – A fascinating instruction list of how to make Twitter art. I copied a sample below.

- FSymbols & FSymbols Emoticons – An amazing site full of all the symbols and emoticons you might want or need. I made the following tweet by copying and pasting a fun symbol right into the tweet text.

- Get Emoji – A full resource of emoji that you can copy and paste into your updates.
These symbols and emoji will look great across most all devices and browsers. If there’s ever a problem with display, a blank square will often appear in its place (we’ve written lots more about the full appearance of these also.)
Over to you
What have you enjoyed finding and trying on social media?
Any formats or strategies you’ve noticed that I can help brainstorm with you?
It’d be amazing to hear any input from you! I’m excited to chat more about the strategies above—or anything else!—here in the comments.
Read Next: 10 of the latest surprising and revealing studies on social media
Image credit: Shutterstock, Pablo, Pexels, IconFinder
This post first appeared on Buffer.
Get the TNW newsletter
Get the most important tech news in your inbox each week.


