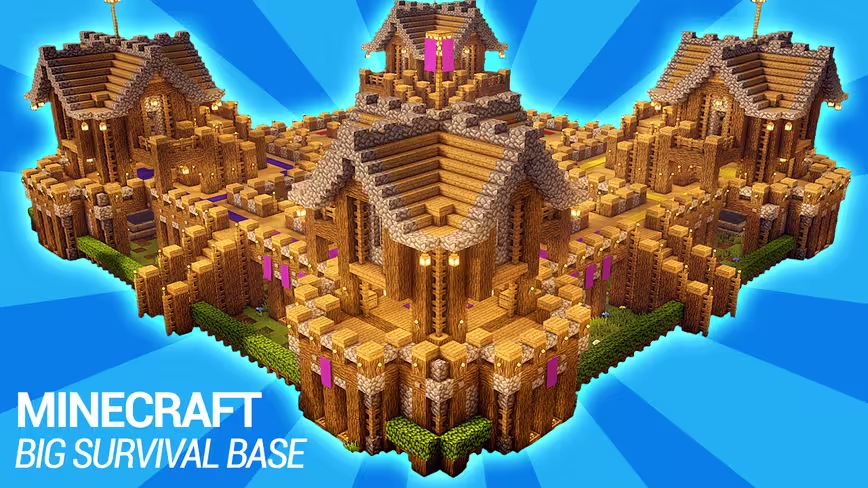
I spend a lot of time trawling the ever-growing world of Minecraft looking for cool things to build and today I found this very cool survival base in Minecraft tutorial and it is a big one!
This build tutorial has been created with teamplay in mind. Each section is color-coded. This helps players to claim a corner as their own or use the colors to represent a specific function, eg; the red corner could be for food storage and the purple corner is for magic and enchanting.
Enough chat let’s get building. Try and follow along with the video, it really helps.
Minecraft Base Build – Preparations
As you can see this is a pretty big build project, we are going to need a lot of materials. Fortunately, the guys that made this video have included a required items list:
In addition to the video tutorial, you can also grab the template that can be downloaded as an MC world directly from the original Minecraft survival base tutorial.
Most importantly, you will need a positive attitude before we start this monstrous base. Upon first inspection, the template can look daunting. There is colored wool everywhere, but furthermore, it is only constructed from a single corner repeated four times which is very simple. As such you are really only learning to build a quarter of this base, rather than the whole thing.
Step 1 – Lay the foundations of your survival base
Use the wool color code below to aid you in placing the oak log pillars:
Watch the video closely and see just how easy this step is. Once you have completed this step, the whole build feels much less daunting and everything starts to take shape.
Step 2 – Adding walls, floors, and stairs
It wouldn’t be a very good base if it didn’t have some walls or floors. Creepers could just wander in and blow up all of your stuff. Time to add them.
Again, this step is actually very simple. Follow along with the video and use the image below to help you:
Step 3 – Building a tower
The base feels a little empty right now. It would be nice to have somewhere to keep your bed and your chests that are full of diamonds, it is Minecraft after all. As a solution, we are going to build a tower or house on the second level, nice and far away from any mobs that might be lurking.
Utilizing the images below and the video you should be able to complete this step without any issues:
After that, the tower should look a little something like this:
Your base should be looking pretty cool by now.
Step 4 – Adding tower access
With step 3 completed, you may have noticed that the tower has raised doorways, it would be really nice if we had easy access – perhaps a double staircase. The staircase pictured below is built on the side of the tower and connects to the two raised doorways:
With that completed, your tower will look like this:
Step 5 – Adding the fine details to your survival base
By this point you are your friends should have a base that looks ready for battle. However, it is the final details that really make this Minecraft survival base look epic. With that in mind, it is time to add torches, carpet, banners and anything else you think would make your base truly amazing:
Final Words
There you have it, an amazing survival base to build with your friends.
Above all, I encourage you to get creative with your friends. You could try to build a massive Nether portal right in the middle of your survival base. Maybe fill the bottom level with farms or stables. Additionally, you could even turn the bottom level into a villager breeder. Regardless of what you decide to build this base has all the space you will need – have fun!
Finally, I would like to say a special thank you to the guys over at NoobForce. They gave me permission to use their materials.
Get the TNW newsletter
Get the most important tech news in your inbox each week.