“I’ll put you on my schedule.”
“I have you marked in my calendar to start next week.”
“My schedule is full right now.”
Have you ever told a client or potential client any of the above? I have many times. When I started working for myself and taking on client work, I never really “scheduled” client projects. I just did them as time allowed. I would tell a client when I would have something done, then I made sure I had it done by that date. I never really scheduled out an entire project.
It wasn’t until after my second year of freelancing that things really started picking up, and I was constantly juggling several client projects all the time (not to mention I was also a full-time college student at the same time). I started telling my clients the lines above, but the dirty truth was, I never really was keeping a schedule. Well, what I mean is, I wasn’t keeping a schedule like a doctor’s office would, or like a construction crew would.
When my life became crazier and I needed to start getting things done at set times, I started looking into how to schedule client projects. You would be surprised how little practical information is out there about how to schedule client work that takes more than a day to complete. Information becomes even more scarce when you start talking about projects that are multiple weeks or even multiple months in duration.
Over the years I’ve read tons of articles about tips and tricks on how to schedule client work, but they all seemed to operate on theory, or this idea that things will always go smoothly. We all know that things never run smoothly when you run your own business. For whatever reason, we either don’t get things done on time, something comes up, or a client puts a kink into our system.
Let’s start thinking of our schedule from a more practical and realistic standpoint and start accurately scheduling our client projects. Not only will we now be able to keep a schedule, we will be able to better estimate our time involved for a project, and plan it on our schedule knowing that things could change from day to day. Below is a system I have developed that helps me better schedule client projects with the idea in mind that things change.
Throughout this article, I am going to use an example to help clarify the steps as we go along. At the end of most steps, you will be able to see how we came up with the numbers and how we worked our calendar out.
First, understand your current work day.
Before we can do any real scheduling, we have to know what we have to do every single day that takes up time. We already know we have client work that eats up significant chunks of our time, but there are other things we do as well: email, general admin work, answering phone calls, meetings, sending invoices, estimating projects, self-education, etc. We have to come to terms with how much time we spend doing these things on the daily basis and how much time we have left for client work.
The best way to do this is to take a couple of weeks and track how much time you spend doing things in your business. This could be as simple as writing down start and stop times for your activities or even using a time tracker application such as one of the ones listed here. Below is a list of the things you should keep track of no matter which method you choose:
- Time you officially start working in the morning, as well as the time you call it quits for the day.
- How much time you spend checking your email and replying to email messages.
- The time it takes you to do administration work such as invoicing and record keeping.
- When and how long you take for lunch and other breaks throughout the day.
- How long you spend actually working on client projects.
- Time you spend doing other activities in your business, such as updating your website, checking social media networks, writing for your blog, dealing with taxes and other requirements, etc.
Take a couple of weeks and do this every day. While it will be a pain to write down what you did for every moment of your work day, you will be able to draw some conclusions from the information you have written down. For our example that we will use throughout this article, below is an example outline of the time our freelancer friend uses on these tasks.
- Start work at 9 am, stop work at 5 pm.
- Lunch for 30 minutes at 12 pm.
- Email from 9-9:30 am, then again at 12:30-1 pm.
- Invoicing, recordkeeping, and other administrative tasks from 9:30-10:00 am.
- Average working on projects from 10:00 am-12 pm, then again at 1 pm to 5 pm, for a total of six hours a day.
Be realistic when estimating client projects
I’m not talking about money here. I’m talking about the time you estimated it would take you to complete the project from start to finish. When we sit down to figure out the estimate on how much to charge our client to work on the project, we have to figure out a rough estimate of how long it is going to take us to complete the project (even if we don’t share this information with the client). No matter what your method of estimating projects is, estimating your time involved and how long you think it will take you will help you better schedule work on that project (not to mention help you determine your profitability and other aspects of your business).
For example, let’s use a web design project. Our freelancer friend believes it will take them 30 hours to complete a web design project, and has been kind enough to break it down in the following manner for us:
- 12 hours to design a concept.
- Send design concept to client for review and approval.
- 12 hours to develop the concept.
- Send developed site to client for review and approval.
- 6 hours to test site, iron out bugs, and finish site.
When you estimate the time it will take you to complete a project, you have to also calculate the time it will take to manage that project, time discussing the project with your client, and the time involved to tie up loose ends along the way. In the website design example above, this time could include the initial consultation with the client about their project, time involved preparing the contract and handling a deposit, scheduling the project, discussing design options and decisions with the client, setting up hosting and a domain name, setting up their site, and time required to educate the client on what work was done and how they can update their website.
In keeping with our example, the estimate of these items will add an extra 10 hours to the project, so now our project has an estimated 40 hours of time involved. To make it easier for us later, this is broken down into the following (bold items have been added since the above breakdown).
- 2 hours initial client consultation.
- 1 hour developing estimate, contract.
- 1 hour to handle deposit and schedule project on calendar.
- 12 hours to design a concept.
- Send design concept to client for review and approval.
- 1 hour meeting with client to discuss design concept.
- 12 hours to develop the concept.
- Send developed site to client for review and approval.
- 1 hour meeting with client to discuss developed site.
- 6 hours to test site, iron out bugs, and finish site.
- 1 hour to upload to server and test site.
- 2 hours for client education on the completed site.
- 1 hour final wrap-up on project, including final invoicing.
Any time you spend specifically on the client project should be included in your estimate. No matter if this time has an impact on how much you charge your client, being realistic in the time you spend on a project doing everything required to complete it should be scheduled. The next time you work on an estimate for a client, add time for managing the project and the other bits of time required to complete it.
Add padding to your estimate to cover for Murphy’s Law
Things happen. For one reason or another, something in a client project will inevitably go haywire. We could get sick and have to take a sick day, the website’s server goes down, your power goes out in your office, the client takes too long to respond to your design comps, you run into issues with your coding; whatever could go wrong, will go wrong (good old Murphy’s Law). When it all hits the fan, you have to take time to clean it up. This is where adding some extra time in your estimate when you go to scheduling your project will come in handy.
Using our web design project as an example (remember, so far we estimated 30 project hours and 10 admin hours, giving us a total of 40 hours so far), we have to determine a fair and accurate estimate of how much time would be required to clean up the mess when things go wrong. Based on your experience and your gut, determine how many extra hours you should build into your estimate to cover for Murphy’s Law.
For me this is roughly 10% of the project time, or an hour for every 10 hours I estimated. Using that as a guide for our example, 10% would give us a new estimate of 44 hours, or four extra hours for Murphy’s Law. How much of a percentage (or flat rate number) you do is up to you, but over time you should be able to slap a percentage/number to your estimates that you feel comfortable with based on your experience.
Making room for feedback time from your client
One more thing we have to take into consideration is the time we aren’t actually spending on the project. For instance, once we complete a milestone of the project, we may find ourselves needing to get feedback from our client. Depending on our client and the type of project, this could be as fast as a few hours after requesting feedback to as slow as a couple of weeks. This feedback time can put a real kink into your schedule if you didn’t allot for this time (or enough of this time).
A couple of ways of determining how much feedback time you need for each milestone include asking your client how much time they need before you can expect feedback or giving your client a deadline on when they should send you feedback. You could also use a combination of both: ask your client how much time they need before sending you feedback, then use that as a deadline for when your client should get back to you.
This feedback time (and other gaps in time during the project where you aren’t actually working on the project) should be added in a special way to your calendar. Since it isn’t time you are spending on the project, you can’t add it to your estimated hours (in our example, you can’t add it to the 44 hours). This time should be accounted for separately and marked on your calendar in a different way.
Keeping with our example, our freelancer friend has broken down the project in the following way to account for feedback time (new items are in bold).
- 2 hours initial client consultation.
- 1 hour developing estimate, contract.
- 1 hour to handle deposit and schedule project on calendar.
- 12 hours to design a concept.
- Send design concept to client for review and approval.
- 1 hour meeting with client to discuss design concept.
- Wait up to one week for feedback.
- 12 hours to develop the concept.
- Send developed site to client for review and approval.
- 1 hour meeting with client to discuss developed site.
- Wait up to one week for feedback.
- 6 hours to test site, iron out bugs, and finish site.
- 1 hour to upload to server and test site.
- 2 hours for client education on the completed site.
- Wait up to one week for final approval from client to finish project.
- 1 hour final wrap-up on project, including final invoicing.
Start building your schedule using “blocks” of time
Now that we have done all of the prep work in determining how much time we should account for not only in our daily work life but also for our projects, it’s time to put two and two together. I find it easiest to plan out chunks of my time in “blocks,” so for this scheduling method, we are going to think of the different tasks we do as blocks. Remember when you spent two weeks writing down everything you did, and determined how much time you spent on average doing certain tasks? We are going to use this information first in our calendar, then follow with scheduling client work around that. However you like to use a calendar for planning, use that method for the following two steps.
Start with blocking out time spent on everything but client work.
Since you have to spend a certain amount of time doing tasks required to actually run your business (email, invoicing, taxes, etc.), we are going to schedule these blocks of time first. Start with marking down the time you start working and the time you stop working, or your work hours. Everything you schedule from here on out will be within these working hours (unless you do work on nights and weekends, in which case it’s up to you if you want to schedule work time during these hours or use it as bonus time to play catchup or even get ahead).
After you have set your work hours, start blocking out time you typically spend on email, time you take for lunch, and time you spend doing other activities and the time you do them. You will find when doing this you will have blocks of time scattered throughout your day, with empty spots in between. This is ok if you do, but it also doesn’t hurt to see if there is anything you can group together so that you have larger chunks of time open for our next step.
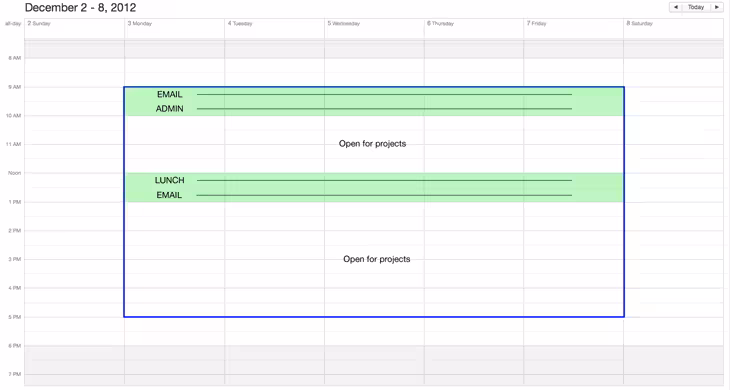
Below is an example of how our freelancer friend spends their time during the week taking care of the necessary tasks involved in running their business. The blue outline indicates working hours while the solid green blocks are blocks of time consumed by a certain activity.
Follow with blocking out time for client projects around the existing blocks.
With the open blocks of time you have after scheduling your general business tasks, this is where you can schedule in your client work based off of the estimate you came up with. Using some math and our website design project, we can split our 44-hour project over 7.33 days, or make it 8 days to make it easier (44 hours divided by 6 hours max a day). It would be pretty awesome to just block out 6 hours for the next 8 working days and call it a day, but in reality we can’t. There are some factors we are failing to include when doing this. Remember our discussion on feedback time and other chunks of time that should be recognized but not necessarily blocked out on our schedules? We will have to take these into account as well.
Keeping the feedback times in mind, we can schedule roughly the first part of the project over the next several days. While the consultation, estimate, contract, and deposit is often already handled by the time you start scheduling the project, that means we have to schedule 12 hours. So this can go on the schedule over two days (12 hours/6 hours a day = 2 days). Then after those two days, we can come back a week later (as described in our feedback) and schedule the next batch of work. We can continue this process until the entire project has been planned out.
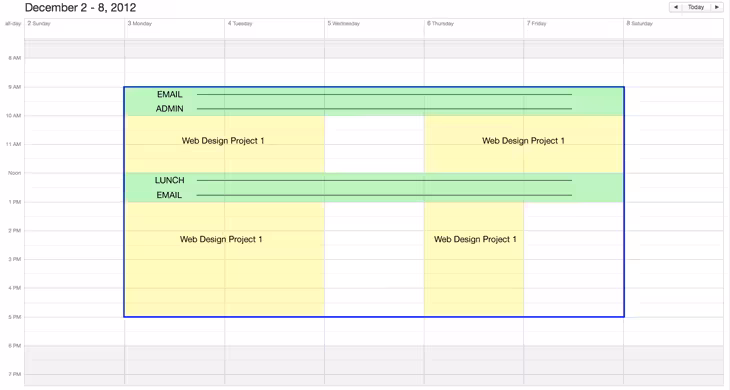
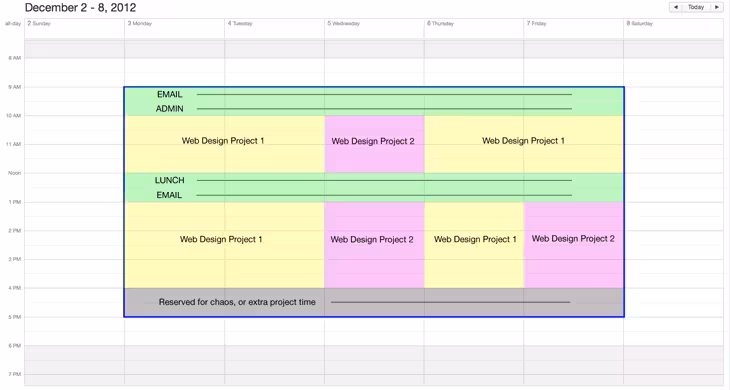
Below is a sample week using the method above. The yellow blocks now indicate time spent on the web design project. Also, just for example, we didn’t schedule anything on Wednesday and used that as a feedback day for the project, pretending that it only took 24 hours to receive feedback before working on the next step of the project.
What about handling multiple projects?
Glad you asked. Handling multiple projects can work the same way, only modified slightly given the fact that you are now working on two (or more) projects. I treat all of my projects as first come, first serve with a slight reservation for other things. If I only have one project going on, I schedule work on that project to consume most of my time for the day on client projects, or said another way, I would use four out of the six hours I have planned for project work to work on that project. Doing it this way allows me to take on another project in the other two hours I have available.
To keep the math easy, you can always take your available hours and divide by the number of projects you have. For instance, if you have three projects, you can then schedule work for each project to take up two hours a day. This won’t always work out perfectly though, for instance, you may have a project that is currently in a feedback state. If that is the case, then during that feedback period your existing projects can then fill in and take up three hours a piece for those six hours (as an example).
Between using a first come, first serve scheduling tactic along with divvying up your day based on the number of projects, you will find that you can work on multiple projects at a time and still be able to accomodate incoming projects. Since your projects often are at different stages and may require shorter (or longer) periods of time on any given day, you will find that your schedule will start to vary, but in a way that gives you wiggle room for things such as a sick day or an unexpected event, or room to take on additional projects or even rush projects that could bring you in more money.
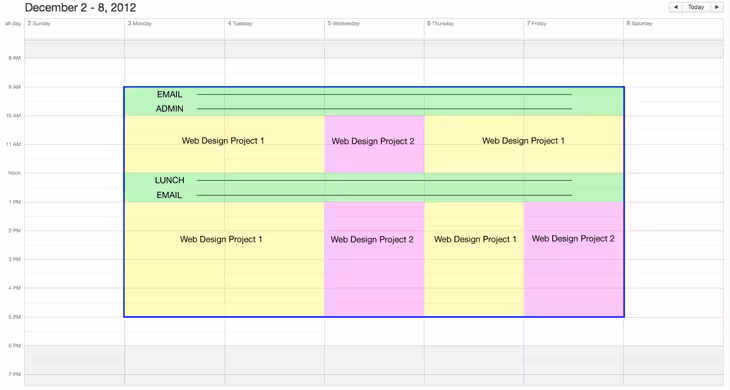
I’ve gone ahead and scheduled an additional project using our example from our freelancer friend. You can see now how our schedule has changed with a second project planned (in the pink blocks).
Keeping chaos scheduled at all times.
You could take your scheduling a bit further and always add one hour (or more or less time) every day to your schedule to cover the unexpected and the chaos. This is something I have recently been doing because it seems like hell breaks lo0se every single day and it eats up a lot of my time. If you are in a similar situation where something always seems to happen (working from home and dealing with family, being on call for your children, etc.), then this may be a wise tactic for you to use as well.
Our freelancer friend has decided to add some chaos time to their schedule, in which you can see below in the gray box.
If you are thinking “adding more and more time to my schedule just as a precaution will cause me to get less and less done,” it will actually allow you to get more done. When you schedule this time into your schedule, and nothing bad happens to use that time up, then you just use that time to work on client work or other aspects of your business. However, if chaos breaks lo0se, then you won’t be stressed because you have already accounted for that time, and your project(s) will remain on schedule.
Keep track of your time involved on the project for future comparisons
Scheduling your projects isn’t the end of it. What if you really blew up an estimate for a particular project? Or you really misjudged how long something would take? To better estimate for future projects, you have to keep a record of how you performed in the past to use for comparison. For our web design example, we estimated it would take roughly 40 hours (30 hours project time plus 10 hours admin time), but let’s say it really took us close to 60 hours to complete the project. What went wrong? If nothing went wrong, could we end up spending the same amount of hours on a similar project in the future? Are all of our web design projects requiring more time than we estimated for?
Keeping records and averages of how long it took you to do certain tasks will not only allow you to better estimate projects for clients, but it will allow you to better manage your schedule for these projects. It is a bit of extra work to keep track of, but it often proves a lot more accurate than your memory could.
One final note: practice and experience will make for better scheduling
With any system you put in place such as this, you will find that over time you will have to make some changes. The same will happen for your scheduling as well. With experience and practice comes knowledge, and you can use this knowledge to modify your scheduling. Just keep in mind to always estimate for extra time required and for chaos!
Image Credit: Matt Cardy/Getty Images
Get the TNW newsletter
Get the most important tech news in your inbox each week.