
Here’s a fun tutorial to get you started with app icon design (and perspective) inspired by Andrew Reifman’s “Bodyboss Icon 1“. If you’re new to designing app icons, this should give you a few tips on how and where to start. App icons can range from the simplistic (Facebook, Yammer & iTunes) to highly detailed and realistic (view the incredible work of Konstantin Datz). So for this tutorial we’ll be designing just past the simplistic mark.
Getting started: We’ll be using Photoshop CS6 (on Mac) and keeping nearly every layer as a Custom Shape with additional work with the Pen Tool (so it can be resized with no loss in quality later on). First, let’s set up all the base shapes.
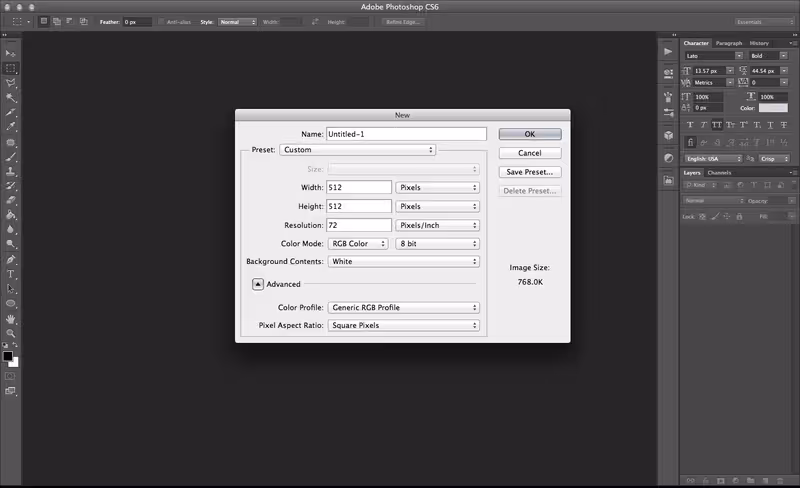
Open Photoshop and create a new document (512px x 512px):
Select the Rounded Rectangle tool (U) and double-click on the canvas, creating a new (512px x 512px with 80px Radius) rounded rectangle for the base layer. You will have to switch back to the Move tool (V) to center the shape. Once moved, switch back to the Ellipse tool (U).

The 💜 of EU tech
The latest rumblings from the EU tech scene, a story from our wise ol' founder Boris, and some questionable AI art. It's free, every week, in your inbox. Sign up now!
Add another Rounded Rectangle (double-click on the canvas) at 512px x 470px with 80px Radius. Double click on the shape in the Layers tab to change the colour to a lighter grey (mainly so it’s visible) and center with the Move tool.
Select the Ellipse tool (Shift+U to cycle between different custom shapes), double-click on the canvas and create a 400px x 390px ellipse (and change the colour to make it visible). We’ve shortened the height of the circle slightly to help with the perspective.
Change to the Move tool, duplicate the Ellipse layer (CMD+J on Mac), change its colour (to aqua) and make it slightly bigger than the first ellipse by clicking and holding Shift+Alt, then dragging it from the corner. Then move that layer below the first ellipse.
TIP: Holding Shift while resizing will keep a shape in proportion. Holding SHIFT+ALT while resizing will keep the proportion and also resize from center.
Save The Next Web logo to your desktop and open it in Photoshop. For this tutorial we’ll only be using the ribbon section of the logo so copy that across to the app icon document and resize to fit.
Now we have the base shapes in place, lets start adding some textures and lighting effects.
Now for this next part you will need to download and install the free pattern file (.pat) from Subtle Patterns. You can download all of Subtle Patterns via Github (click the ZIP button on this page) and then unzip it to find the “.pat”file. Back in Photoshop, right-click on the top rounded rectangle layer and left click on Blending Options. Then select Pattern Overlay. In this tutorial, I’m using Tactile Noise. See the screenshot to see how to load your new patterns.
Right click on the top rounded rectangle layer and Copy Layer Style, then right-click on the bottom rounded rectangle and Paste Layer Style. Change the pattern opacity to 60%.
Right click on the top ellipse layer and Paste Layer Style. Right click again on the top ellipse layer and select Blending Options and add Bevel & Emboss.
Right click on the bottom ellipse layer, select Blending Options and add a Gradient Overlay, Inner Shadow & Drop Shadow as per the screenshots.
Select the TNW Logo layer and duplicate it (CMD+J on Mac), then hide the second Logo layer. Select the top Logo layer and bring up the Levels (CMD+L) as per the screenshot.
Right click on the top Logo layer and select Blending Options, then add a Colour Overlay with an aqua hue.
Turn on visibility of the bottom logo layer and right-click, select Blending Options then apply Bevel & Emboss and Outer Glow.
Right-click on the top Ellipse layer, select Blending Options and add a Drop Shadow.
Right-click on the bottom Ellipse layer, select Blending Options and add an Outer Glow.
Right-click on the top Rounded Rectangle layer, select Blending Options and add a Bevel & Emboss.
Now lets add some lighting effects to the front edge. Hold CMD and left click the bottom Rounded Rectangle layer (it should select the exact shape). While selected, create a new layer and draw two vertical white blurry lines with the brush tool as per the screenshot.
Keeping the new layer selected, Hold CMD and click the top Rounded Rectangle layer, then press delete to remove the top of the white blurry lines. Fade the new layer to about 15% to achieve the effect. It may take a few tries to get this lighting right.
You should have something like this:
Now we’ll add some subtle gradient lighting to the top Rounded Rectangle and the top Ellipse. Duplicate both of those layers, right-click and select Blending Options and add a Gradient Overlay to each. Each Gradient Overlay should be fading from white 0% to black 100%. Then drop both of those layers to 10% Opacity.
Now we’ll add the Marker Lines by using the Type tool. Left click the top Ellipse layer, then select the Type tool (T) and click on the Ellipse shape. Type a lot of vertical bars (“|||||||”) until it wraps around the Ellipse as per the screenshot. You will have to change the Character settings to get the desired effect.
Drag the Type layer underneath the top Ellipses to hide the overflow. Right click on the Type layer and choose Blending Options, then add Inner Shadow and Drop Shadow. Finally, drop the Fill of the Type layer to 0%.
If all the above tutorial went well, you should have something that looks like the below screenshots. Here is another version with The Next Web original colours. If you want to play around with it or take the design further, download the PSD.
Get the TNW newsletter
Get the most important tech news in your inbox each week.