
Recently, we took a look at five apps to augment your Android experience with the help of a little artificial intelligence and automation.
All of those apps were nifty little utilities that targeted a particular area of smartphone usage and added some heuristics to it to make your phone smarter still. But when it comes to automation on Android, very few apps can claim to be in the same league as the grandaddy of them all — Tasker. Grab the free 7-day trial from the developer’s website before you proceed.
Tasker can detect when you’re at home, for instance, and enable or disable certain settings on your phone to make it function better in that environment. It can launch apps automatically and perform actions based on apps being launched by you. The uses of Tasker are plenty, and we’ll take a look at some examples in this article.
Tasker is essentially a programming tool that allows you to create mini applications on your phone for your own usage. It has a steep learning curve and is only for the more advanced smartphone users among us. But for those who enjoy a challenge, Tasker is (really, really) fun to play with and a genuinely useful tool to have in your arsenal.

The 💜 of EU tech
The latest rumblings from the EU tech scene, a story from our wise ol' founder Boris, and some questionable AI art. It's free, every week, in your inbox. Sign up now!
An introduction to the interface
By default, Tasker has three tabs along the top—Profiles, Tasks and Scenes—and a Home tab at the bottom. A profile in Tasker is a group of contexts organised with the ‘AND’ logic. You can, for instance, create a profile that is only active on Sundays, when your phone is plugged in and the screen is turned on. This profile will only work when all three contexts are true.
A task is what a profile will do once it triggers. So, for example, you can set your journal app to be launched when the profile above is true. If you set it up that way, Tasker will launch your journal app every Sunday when you plug the phone into a power outlet, thus making it much more likely that you’ll stick to that journaling routine you’ve been trying to get into.
As part of a task, you can set Tasker to throw up a custom-made window with buttons and text fields of your choosing—to take some input from the user, for example, or to give them some options—and that is called a scene. For the purposes of this article, however, we won’t be looking into the scenes aspect of Tasker.
There is a fourth tab on the top that is only visible if you turn off beginner mode in the app’s preferences, and it’s called “Vars”, which is short for “variables”. A variable can be any word preceded by a percentage [%] sign and can hold any value you assign to it. For example, you may want to assign the values “off” or “on” to a variable %BATT_SAVE_MODE, which will indicate whether the phone is in a low power state or not.
The Home tab at the bottom denotes the default project in Tasker. Any profiles, tasks and variables you create will go in the default project. In this article, we’ll stick to just that one project, but as you start to get comfortable with the app, you can always go back and reorganise things in whichever way you want.
 When you create your first profile in Tasker, you will notice that it can have application, day, event, location, state and time contexts. Let’s go through each one in order:
- Application: You can set a profile to be active when an app is running or not running. You can select multiple apps for a single profile, so it’ll fire when either of those apps is active.
- Day: Selecting a day of the week or month will make that profile active on that particular day every week/month.
- Event: An event in Tasker terminology is any action that your phone can perform. The screen turning on, the alarm clock firing and the wallpaper being changed are all events. An event context triggers the task only once, as soon as the event occurs.
- Location: Tasker allows you to use your phone’s location features to create profiles that will only be active in certain locations, or ones that won’t be active in specific spots.
- State: The state context is the most used one in the app. It refers to various modes the phone may be in that may activate a profile. The phone being connected to a WiFi network, paired with a Bluetooth device or connected to an external power source are all examples of states. A state differs from an event in that a state profile is active throughout the time that the device is in that state.
- Time: The time context will let you define profiles that will only be activated at a certain time or between certain hours on any given day.
Next, let’s dig into creating a profile…
Creating our first profile
To start with, let’s create a profile that will maximise your phone’s ringtone volume whenever a call comes in. This will put an end to the annoying issue of your phone’s ringer volume accidentally getting lowered while the phone is in your pocket. It’ll also give you a chance to figure out how Tasker works.
While in the Profiles tab, tap on the Add [+] button to create a new Tasker profile. Tap on ‘Event » Phone » Phone Ringing’ to select that context. Tap on the Back arrow on the top left corner to move on to adding a task for this profile. Tap on New Task and then on the return key on your keyboard to proceed without naming your task.
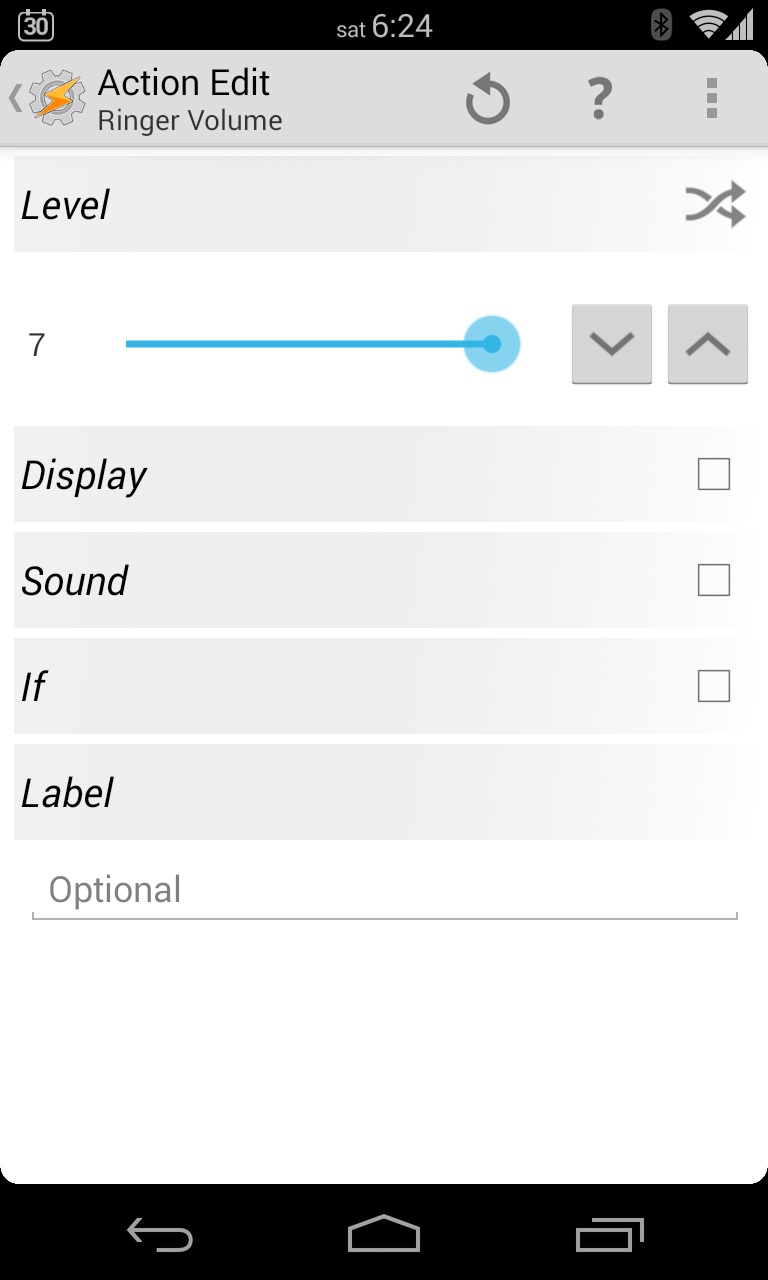
Tap on the Add button on the Task Edit screen and then tap on ‘Audio » Ringer Volume’. Drag the slider to level 7 to make sure the sound is maximised. Again, tap on the Back button to save the action and go back to the Task Edit screen. You can now add more actions to the same task to perform them in order. For now, hit the Back button again.
That’s it. You’ve now created a profile that’ll ensure that your phone will always ring at full volume whenever a call comes in.

Getting up to speed with Variables
Wait a second, what about those times when you have intentionally set your phone to silent mode? Unless we inform Tasker to not run the action when the phone is in silent mode, it’ll increase the volume nonetheless and take you out of your silent profile. The way to achieve that is with variables.
Go back into the task you created for your profile and tap on the ringer volume action. Enable the ‘If’ field by tapping on the checkbox next to it and two new text fields will appear below it. In the field on the left, you need to enter the name of the variable and its value in the one on the right.
Tap on the small tags icon next to the checkbox to bring up all the built-in variables that ship with Tasker. Scroll down the list and select “Silent Mode”; this should add the variable “%SILENT” in the field on the left. In future, you can just type that in manually, if you remember the variable names.
Tap on the button in the middle and it’ll allow you to select a condition operator. The one we want is “Matches”, which will check if the value stored in the variable is equal to the one we are about to enter in the field on the right. Take a look at the rest of the options on this list; you may want to use them in more complex profiles later.
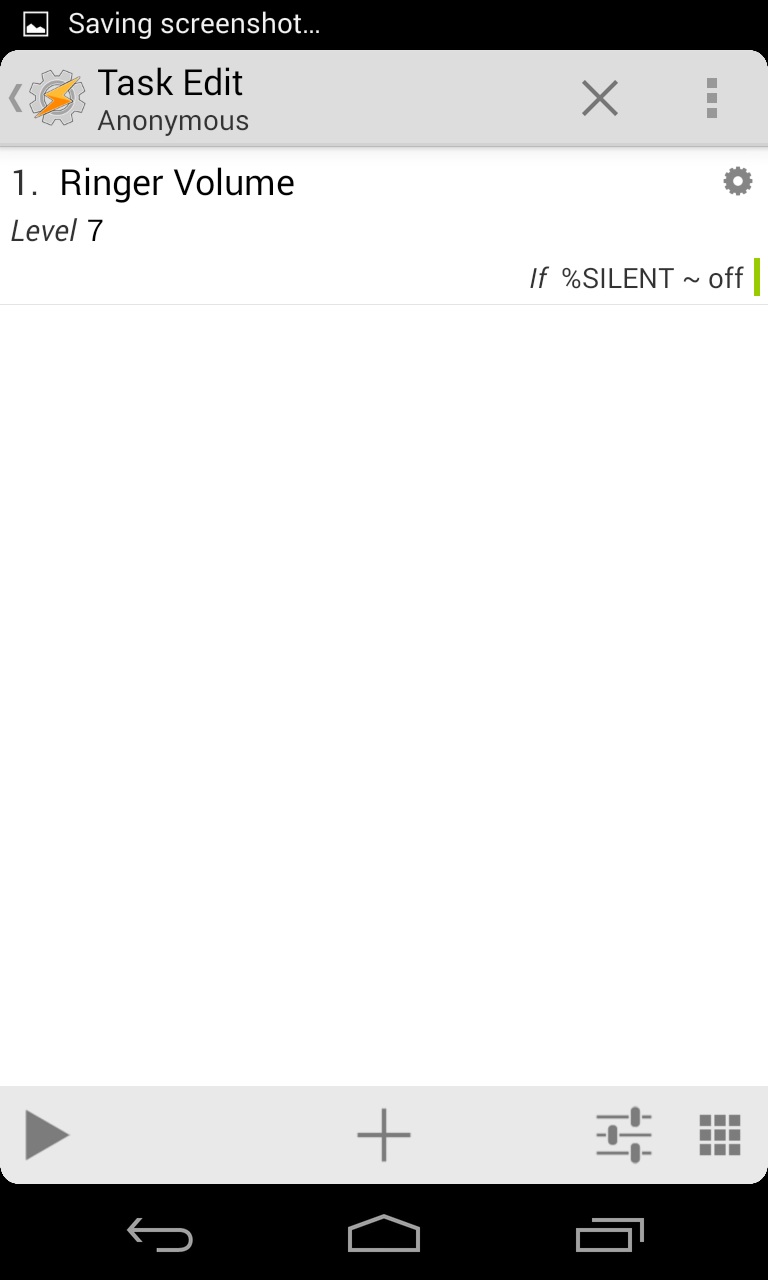
In the field on the right, type “off”, and then back out of the Action Edit screen. As you can see in the action summary on the Task Edit screen, you have now created an action that will maximise the ringer volume when a call comes in, but only if the variable “%SILENT” matches the value “off”—i.e., when silent mode is disabled.

Creating complex profiles
With that out of the way, let’s move on to a profile with multiple contexts and see how that works. We’ll be creating a profile that triggers when we’re driving and receive a text message. How about we send an auto-reply informing the sender that’ll we’ll get back to them once we’re off the wheel? Hey, it’s just good manners!
Add a new profile with the event trigger ‘Phone » Received Text’ and add a task with the action ‘Phone » Send SMS’. The first thing it wants is the number the text needs to be sent to. How do we give it the number of the last texter? Through the magic of variables, of course!
Tap on the tag button next to the Number field and select the “Text Sender” option. This will insert the variable “%SMSRF” into the appropriate field. In the message field, type in whatever you want to send as a reply. Try this: “(Auto Reply) Hi, I’m driving right now. I’ll get back to you later.”
If you go ahead and save this profile, you’ll find that it’s more annoying than useful, because so far, we’ve only set it to respond to every single text message you get with the response above. To take it a step further, you’ll need to add another context to your profile.
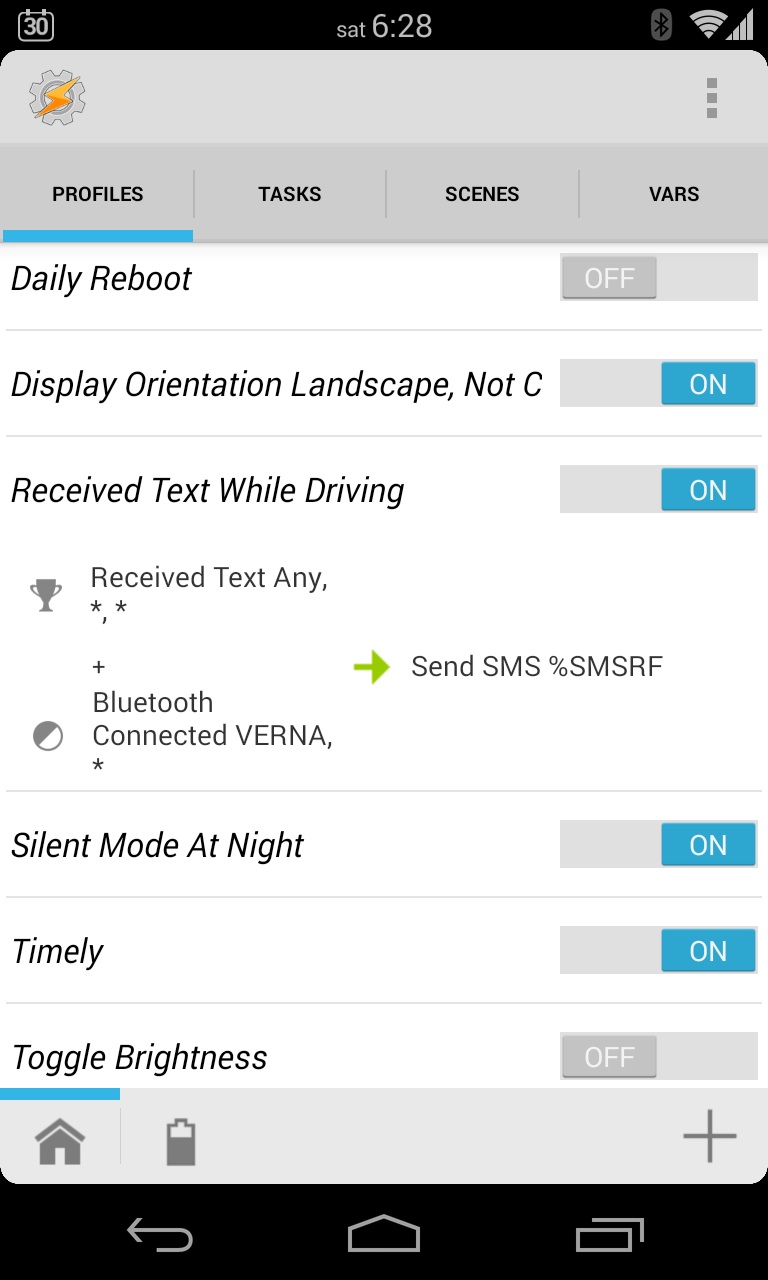
Go back to the profiles screen and tap on your newest one. Tap and hold on the event context you’ve already added and add a state context as well. Select the ‘Net » Bluetooth Connected’ state and enter your car’s Bluetooth name in the Name field. Enter it as it is, without any quotation marks and in the correct case, and then back out of the State Edit screen.
Assuming that your car has a Bluetooth feature that your phone is paired with, it’ll now automatically respond to any text you receive while driving with our pithy reply. Are we living in the future yet? You bet we are!

Creating Complex Tasks
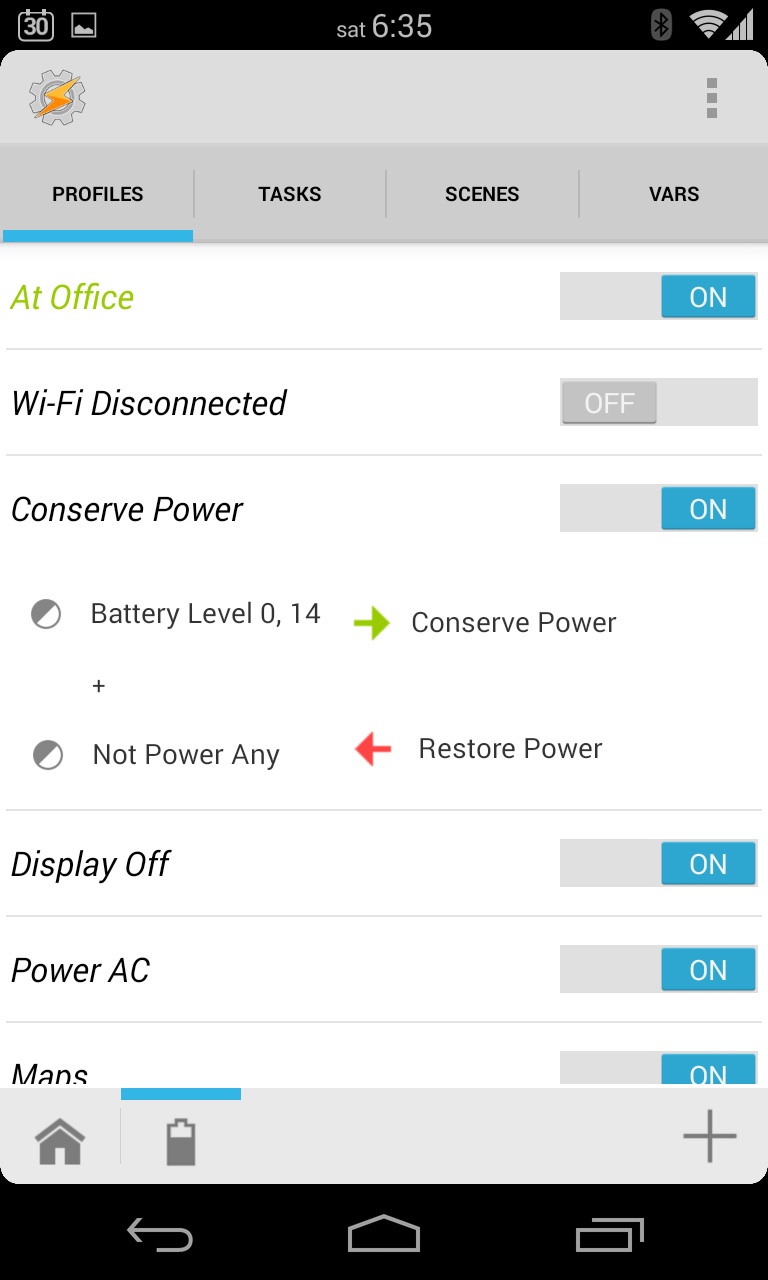
Let us now turn our attention to tasks that do multiple things by creating a battery preservation profile. Create a new profile with the state context ‘Power » Battery Level’ and drag the ‘To’ slider to 14 (while leaving ‘From’ at 0). This will create a context that fires when your battery level falls below 15 percent. When you get to the part where you have to name the task, call it something like “Conserve Power”.
Naming tasks is useful in two ways: 1) it allows you to get to them quicker, through the Tasks tab; and 2) it makes them reusable, so you can have the same task linked to multiple profiles.
Now add the following actions to your task (in any order):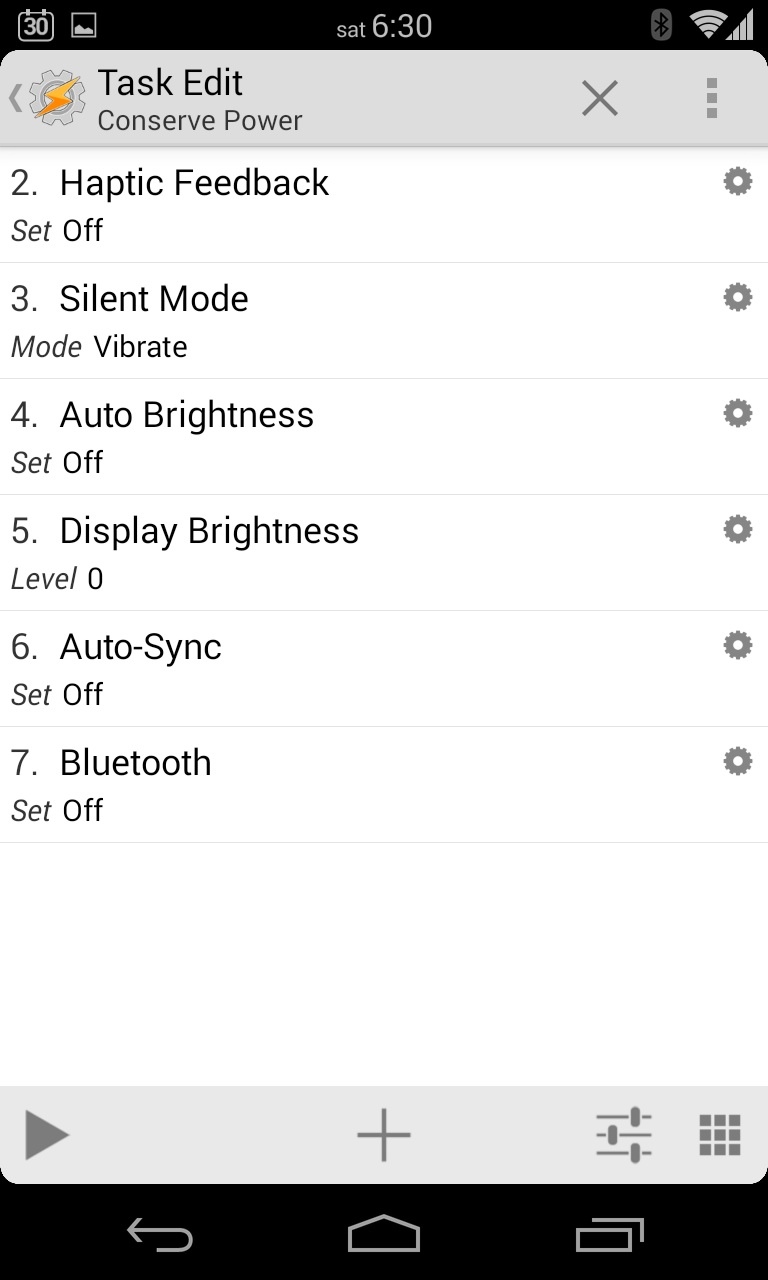
- Audio » Haptic Feedback » Set ‘Off’
- Audio » Silent Mode » Mode ‘Vibrate’
- Display » Auto Brightness » Set ‘Off’
- Display » Display Brightness » Level ‘0’ (or whichever is the lowest usable level on your phone)
- Net » Auto-Sync » Set ‘Off’
- Net » Bluetooth » Set ‘Off’
Exit out of the Task Edit screen. You now have a relatively complex task that will automatically turn off some battery consuming features of your phone when it starts running low.
But we can kick things up a notch by disabling GPS, mobile data and Wi-Fi, and also turn them back on when you plug your phone in for charging. Tasker natively does not provide actions to turn off GPS and mobile data, so you need to install a third-party plugin to make it work.
Let’s take a deeper look at Tasker plugins…
Working with Plugins
There are plenty of apps on the Play Store that provide Tasker plugins for you to automate interaction with them, and I’ll leave you to experiment with them on your own time. For the purposes of this article, we’ll take a look at the most versatile and powerful Tasker plugin of all, Secure Settings.
(Note that the Secure Settings plugin requires root access for some of its features, but the parts we will use in this article do not need that privilege.)
Once you have Secure Settings installed, go back into our “Conserve Power” task and add the ‘Plugin » Secure Settings’ action to it. Tap on the Edit button next to Configuration. Select “Mobile Data” from the list and select the ‘Off’ option. Hit the Save icon (the one shaped like a floppy disk on the bottom left).
That done, follow the same steps as above but select “GPS” instead of “Mobile Data” this time. You now have a task that will turn off both GPS and mobile data along with all the other features mentioned above.


Linking profiles together
If we just wanted to turn off Wi-Fi when the battery was low, it would be a simple matter of adding another action to the task above. However, we want to do something a little more intelligent! How about we set Tasker to check you’re connected to any Wi-Fi network and only turn it off if not? That makes much more sense.
Create a new profile with the name “Wi-Fi Disconnected” and with the state ‘Net » Wifi Connected’ and simply enable the ‘Invert’ option at the bottom of the State Edit screen. This will make the context trigger when you are not connected to any Wi-Fi network. The invert feature does the opposite of whatever you set up a context to do.
In the task, add a ‘Net » WiFi » Set ‘Off’’ action. You now have a simple profile that will turn off Wi-Fi when it is not connected to any network. Go back to the Profiles tab and tap on the on/off toggle next to your newly created “Wi-Fi Disconnected” profile to turn it off.
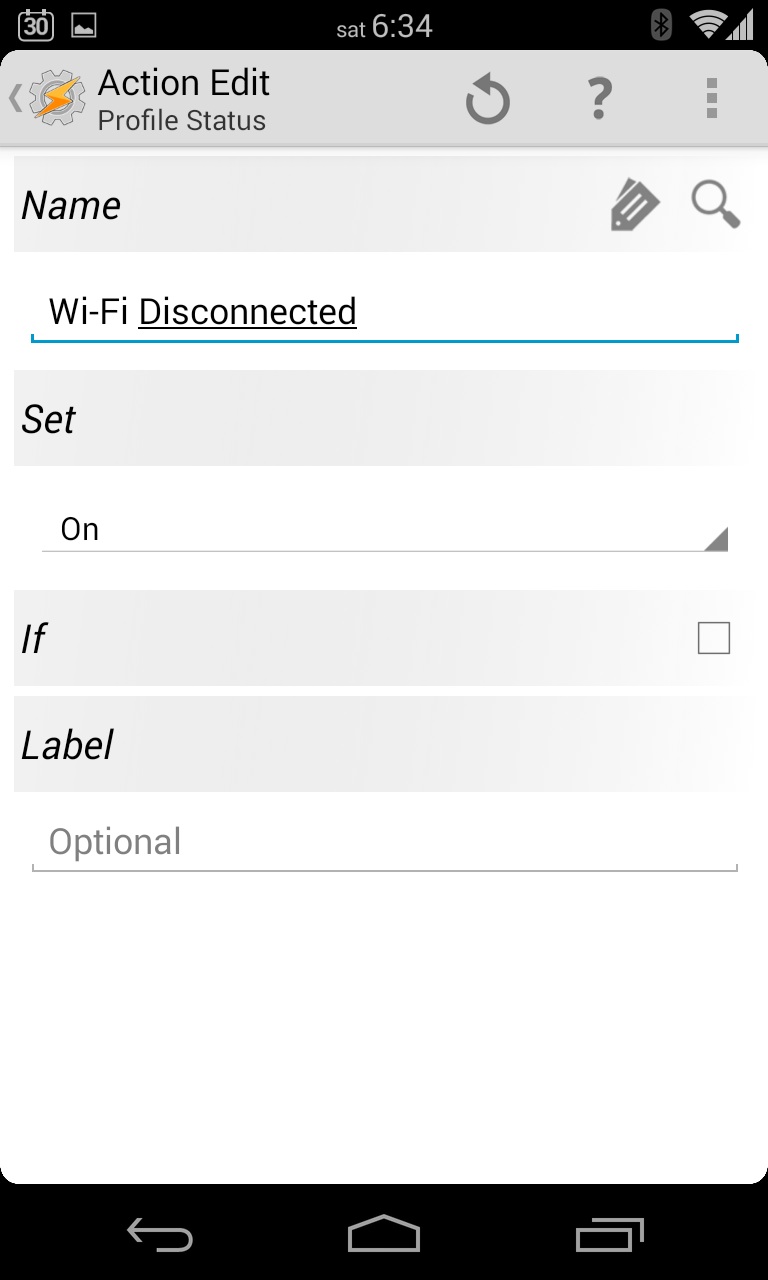

Now go back into the “Conserve Power” task in your Tasks tab and add another action to it. Select ‘Tasker » Profile Status’ from the list and then type “Wi-Fi Disconnected” in the Name field. Choose ‘On’ from the Set drop-down menu. Back out of the Action Edit screen.
You now have an action that will turn on the “Wi-Fi Disconnected” profile you’d created and manually turned off a moment ago. That profile, in turn, will not turn off your phone’s Wi-Fi until you disconnect from active wireless networks.
Creating exit tasks
When you create state-based contexts in Tasker, you can also create exit tasks that’ll be performed when your phone goes out of those states. For example, we’ve just created a profile that is activated when your phone’s battery level goes south of 15%. If we add an exit task to this profile, it’ll fire when the battery level climbs back to 15% or more.
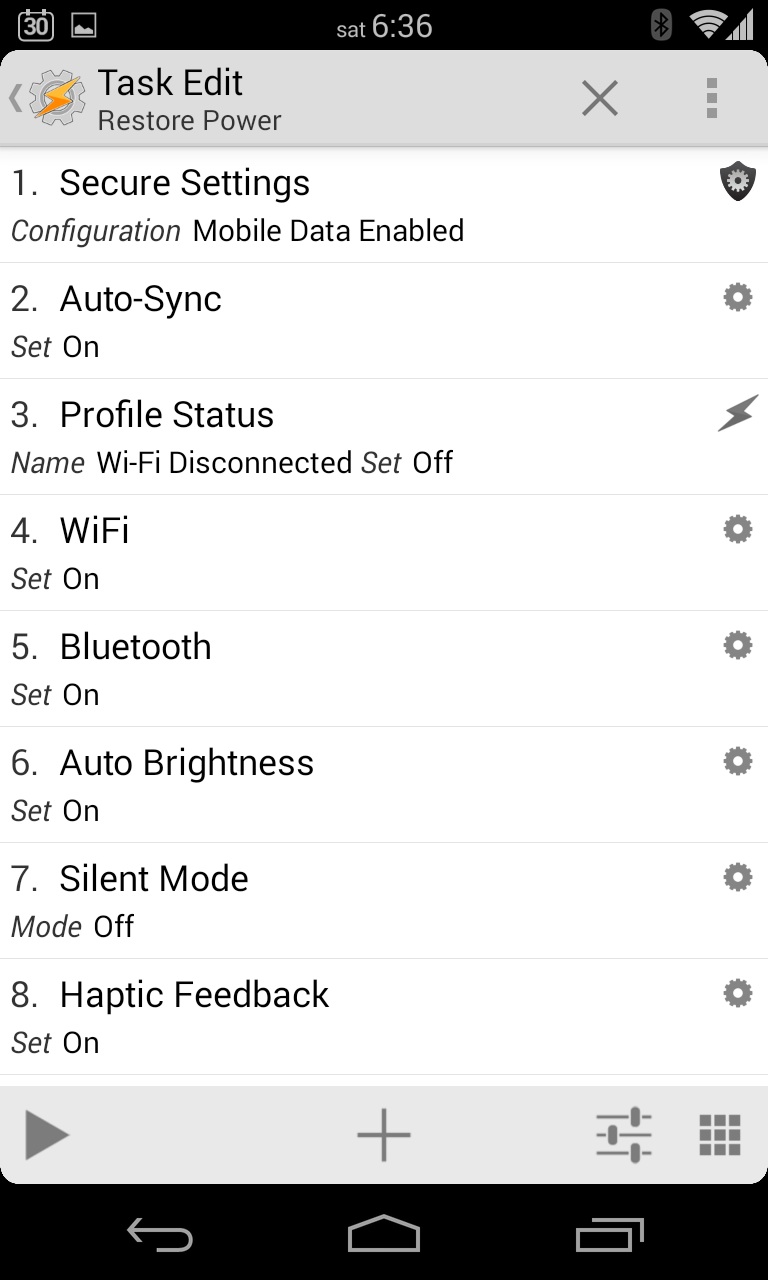
Tap on your battery conservation profile on the Profiles tab and tap and hold the task you created for it. In the menu that appears, select “Add Exit Task”. From here on, it’s as simple as adding any other task. Create one with the name “Restore Power” that has actions that reverse all the changes we made above. Don’t forget to add an action that turns off your “Wi-Fi Disconnected” profile and turns Wi-Fi back on. You should have eight actions in your task when you’re done (as in the screenshot to the right).
Now we only have one thing left to do in our profile. If your battery level falls to 8% before you plug the device in, do you really want to wait for it to get back up to 15% before all those essential features are turned back on? Of course you don’t.
Go back to the Profiles tab and tap on our profile, and then tap and hold on the battery level state context you added in the first step. Tap on ‘Add » State » Power » Power’ and select “Any” from the Source drop-down menu (which it should be by default) and tap on the Invert checkbox.
This not only means that your profile will now trigger if your battery level falls below 15% and it is not plugged into any power source, but also that the exit task will fire when either of those conditions becomes false. So as soon as you plug your device in, no matter its current battery level, it’ll restore all those battery consuming features that make your phone useful.
Miscellaneous examples and ideas
The most common question people who are new to Tasker ask is why they need it. To be clear, you don’t… necessarily. Tasker, due to its complexity, is obviously something that will only appeal to the most skilled of Android users. However, even such users may not realise just what it’s capable of. To help you along, here are some specific things I use Tasker for. Feel free to use them to come up with your own ideas.
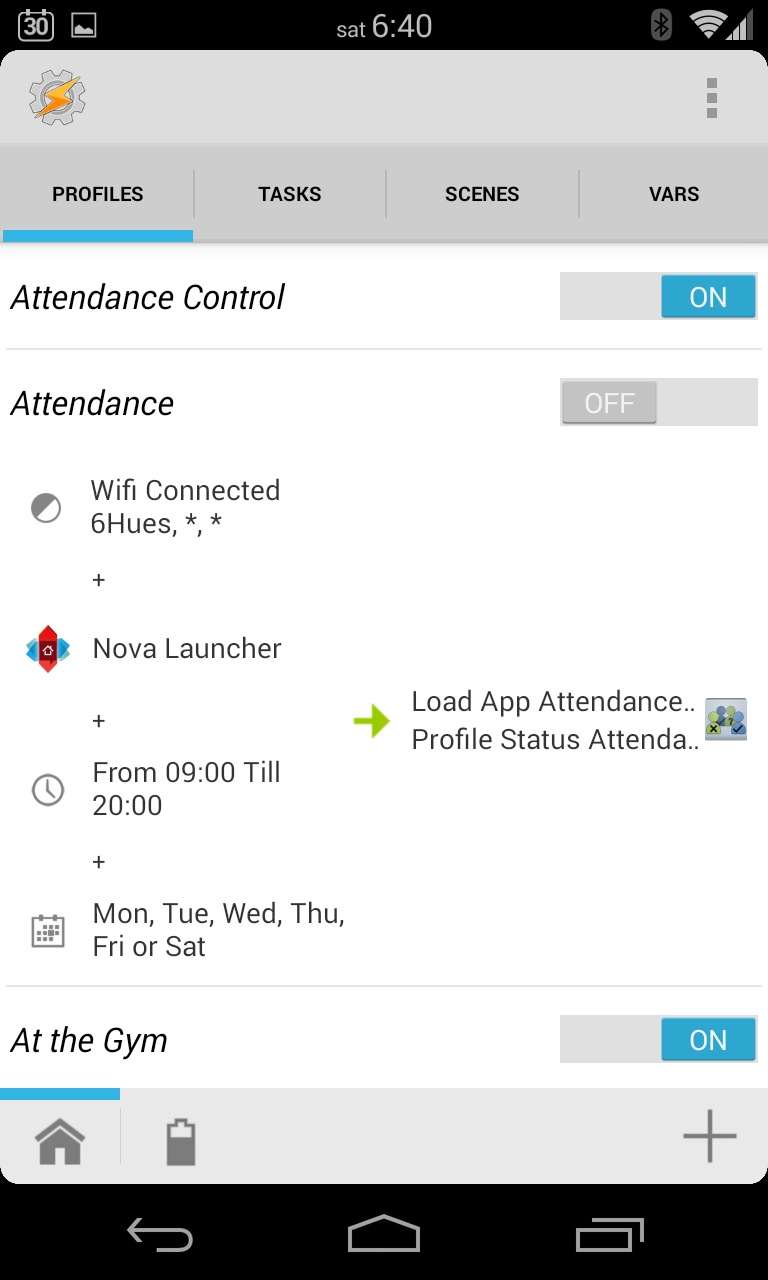 Daily attendance: When I get to the office every morning, I like to use an attendance register app to record my employees’ absences, but I tend to forget it once I am there.
I have a profile called “Attendance Control” that triggers on 9:00 AM on weekdays and simply activates another profile called “Attendance”. That profile then keeps checking to see if I’m connected to my office wireless network and if Nova Launcher is the active app (so it knows I’m using the device and am currently on the Home screen). When those conditions become true it launches Attendance Tracker and turns itself off. I never miss the daily attendance now (much to the consternation of my staff).
Increase brightness for some apps: I have a simple profile set up that checks if my clock, gallery, video player or YouTube app is launched and maximises the brightness of the screen instantly if so. It also restores it back to automatic brightness once those apps are quit (thanks to a strategically placed exit task).
Go home when display is off: Perhaps my one defining characteristic is that not only am I a lazy person, but I like to optimise my laziness. So instead of tapping the Home button when I’m done using my phone, I just turn off the display. A Tasker profile then waits for a minute to see if I turn it back on, and if not, goes to the Home screen automatically. (This is a little bit more advanced than anything we’ve talked about here, so feel free to ask me in the comments below if you cannot figure it out yourself.)
Bluetooth in the office: My office Mac is set to automatically unlock when my phone is in range, but I’d hate to keep Bluetooth turned on even outside my office. A simple Tasker profile enables Bluetooth on my phone when it connects to my office wireless network and turns it back off when it disconnects. You can do the reverse if you want to make your phone work with your car’s Bluetooth feature.
Charging confirmation: By default, Android makes no noise or vibration when you plug your phone in. It’s pretty crazy, to be sure, but a Tasker profile takes care of it for me. When it detects that the phone is plugged into any power source, it vibrates and makes a tiny beeping noise. No more plugging your phone in and checking in an hour later, only to find that you’d left the switch turned off.
Enable GPS for maps: On iOS, I always recommend leaving GPS turned on throughout the day, because it’s useful and the OS makes sure that no apps misuse it. On Android, however, random apps will wake up the phone and drain power if you leave it enabled, so I have a Tasker profile that only enables it when the Maps app is launched and quickly turns it off afterwards.
Summing up
Despite its length, this article only swims on the surface of what Tasker is capable of—perhaps it snorkels a bit, but that’s the extent of it! But it should it be enough to get you started with your own experiments with this very powerful automation tool. It really does allow you to take care of some of the issues with your phone rather than wait for some third-party developer to come up with a solution.
For those of you looking to learn more about this app, check out the very detailed wiki maintained by the app’s developer on its website. It should answer most of your questions; if not, try the forum. And whether you are a Tasker veteran or someone just getting started with it, if you come up with interesting profiles and tasks that can be of use to others, feel free to share them in the comments below.
Don’t miss: The 40 Must-Have Android Apps for the Power User
Get the TNW newsletter
Get the most important tech news in your inbox each week.