Time-lapse videos are becoming more popular, more creative, and are getting a ton of attention these days. A quick search on Vimeo for time lapse videos will turn up thousands of videos, some of which have racked up millions of views, for just the one video alone.
If you want to try putting together a time-lapse video of your own, we’ve put together a guideline of all the things you’ll need from start to finish to set up your shots, take them, and finally stitch them into an impressive video, set to the soundtrack of your choice.
Deciding what you’re going to shoot
The first step is obviously figuring out what kind of time-lapse you want to create. Maybe you’re at a vantage where you can take shots of a city skyline or a beautiful landscape as the sun sets and rises, or you’re attending an event and want to document a hall as it fills up and empties. Other ideas for time-lapse videos include taking one photo day of yourself for a year, taking photos of a plant as it grows, or wilts, or a public spot with a lot of movement and bustle like a city street, a subway station, there’s really no limit.
You can choose to make the video entirely of one scene, or like in some of the examples below, put together a compilation taken from different places and
If you’re in need of inspiration, it’s always a good idea to check out time-lapse videos on Vimeo and YouTube to get a sense for what’s out there, and we’ve also put together a list of our favourite time-lapse videos which you can find at the end of this post.
Setting your video up
To create a time-lapse video using your DSLR camera you’re going to need a few extras to get your camera to fire off shots at small intervals. We’ve put together a short list of must-haves when using your DSLR camera:
Depending on what you’ve decided to shoot, you might need to get a tripod in place so that you can get the exact angle or shot that you’re hoping for.
If you’re planning to shoot a time-lapse video from a high-rise building, you might want to use a Lens Skirt or something similar to avoid reflections in your night time shots.

Calculating your interval
Now that you know what you’re going to use to take the photos for your time-lapse video, you’ll need to determine how you want the video to look.
For a smooth looking video, we’ll need a short interval but to determine that exact figure, a little mathematical equation will do the trick.
Depending on your preference, you can either decide on a specific interval and then calculate how long your final video will be, or determine how long you want the final video to be and then calculate the interval.
For those of you who are less than mathematically inclined, you’ll be happy to know that there’s an online time-lapse calculator which makes the latter very easy.
All you have to know is the video format you want your time-lapse to emulate – with the standard being 24fps. Let’s say you want to shoot for a 24 hour period, with a 30 second interval, then your final video will be 2 minutes long.

If you know how long you want your video to be (say to set it to a certain piece of music) and how long you’ll be shooting, you can simply reverse this equation, but it will take a little bit of manual mathematics on your part. Let’s stick with 24fps for the sake of this example, for a 3 minute video.
First multiply the video format by the length of the video
So 24fps x 180 seconds = 4,320.
Then divide the total length of shooting (in seconds) by that figure.
24 hours is 86,400 seconds (thank you Google), so 86,400/4,320 = 20 seconds.
So now you know your interval is 20 seconds.
If your shooting a long term video – for example taking a photo of a flower as it wilts or the opposite, taking photos of a plant as it grows, you can use a much longer interval of several hours, or even just one a day.
Get your camera ready
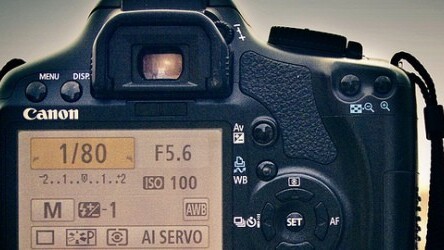
Now that you know your interval, you’ll want to get all the settings on your camera right, set the camera to take shots at the calculated interval, and take a few test shots. A few things to keep mind include:
- Turn off auto white balance – you can use either a custom setting or one of your camera’s presets.
- Make sure your battery is fully charged and that there’s enough space on your memory card.
- In order to deal with changing light conditions, aperture priority is the best option to ensure your photos come out looking good.
- Select a shutter speed that works well with movement – in other words make sure it isn’t too fast. This is an important setting to test before leaving your camera to do it’s thing.
There are several ways you can get your camera to take shots at specified intervals. Some Nikon users should be able to set their camera up natively without the need for any additional tools. Under the Shooting Menu, Nikon users will find a setting, ‘Interval Timer Shooting’ where you can determine how long the camera will wait between each shot.

If you don’t have that setting on your camera, and are taking the photos from an in-door location, you can hook your camera up to your laptop and use software.
There’s a variety of Windows and Mac software options including the following free options: Nikon users with a Mac can use Sofortbild, while those on Windows can opt for D-Software Cam Control. Canon users on Mac or Windows can download a fully functional free trial of DSL Remote Pro before buying it. Depending on the combination of your operating system and camera, you can find a variety of options, both paid and free.
For outdoor photographers, you can get yourself a handy little intervalometer which will allow you to set the interval manually, like this one, available at Amazon for about $35, with the Nikon version available for a little less. If you’re looking to make a serious investment, go with the official Canon and Nikon intervalometers instead.
If you don’t want to spring for a store-bought intervalometer,and if you have the know-how, you could always put one together yourself using the instructions here or you could turn a graphing calculator into one following these instructions.
iOS users can also turn their iPad or iPhone into an intervalometer using the $20 DSLR Camera Remote Professional Edition, but be sure to test your camera with the free version first to make sure the app recognizes your camera.
Stitch the photos together
Now you’ve got all your photos on your computer, and you’ve processed them to look exactly how you want, so how do you stitch them together into a video? Both Mac and Windows users can take advantage of native apps that ship with their computers. Windows users can opt for Windows Live Movie Maker, while Mac users can opt for iMovie, each of which give you the option to add music to your video, and give you all the control you’ll need for the purposes of a time-lapse video.
A final note
Sometimes it’s worth just throwing all of the rules out of the window and doing what feels right – after all – a time lapse is a work of art and there’s no reason you shouldn’t do it the way you want to. In some of the examples we have listed below, you’ll find that sometimes all you need is a little bit of inspiration, and a lot of patience!
Some examples of impressive time-lapse videos
One year walk/beard grow time lapse
Time Lapse View from Space
Burning Man Time Lapse
Manhattan in Motion
Ants in my Scanner
Get the TNW newsletter
Get the most important tech news in your inbox each week.