When Google first launched Google+ in June 2011, there was a fair amount of scepticism. Facebook and Twitter were still growing in popularity and questions were raised about what Google could offer to attract new users.
The answer appears to be photography. Much of Facebook’s initial success can be attributed to its photo sharing and storage features, but Google has always strived to take the concept one step further. Today, it offers built-in editing tools, automatic uploads, a lightbox mode and granular sharing options.
It’s an incredibly rich platform for managing all of your photos. With so many features on offer though, Google+ can be intimidating to newcomers. So whether you’re a pro photographer or a casual smartphone shutterbug, this all-inclusive guide will help you master every photo-centric feature in Google+.
Note: Given that you can access Google+ from the web or the native Android and iOS apps exclusively, we’ll explain how to use the same features on all three platforms.
Table of Contents

The <3 of EU tech
The latest rumblings from the EU tech scene, a story from our wise ol' founder Boris, and some questionable AI art. It's free, every week, in your inbox. Sign up now!
Home | Create a profile | Upload your photos | Auto-backup | Managing photos | In the lightbox | Basic editing | Auto-enhance | Advanced editing | Auto-awesome | Photo spheres | Circles and hashtags | Communities
Featured image credit: Scott Olson/Getty Images
Create a profile
Web
To get started on Google+, you’ll need a Google account. You might own one already for some of Google’s other services, such as Gmail or the Google Play store. If so, just log-in with your existing email address and password.
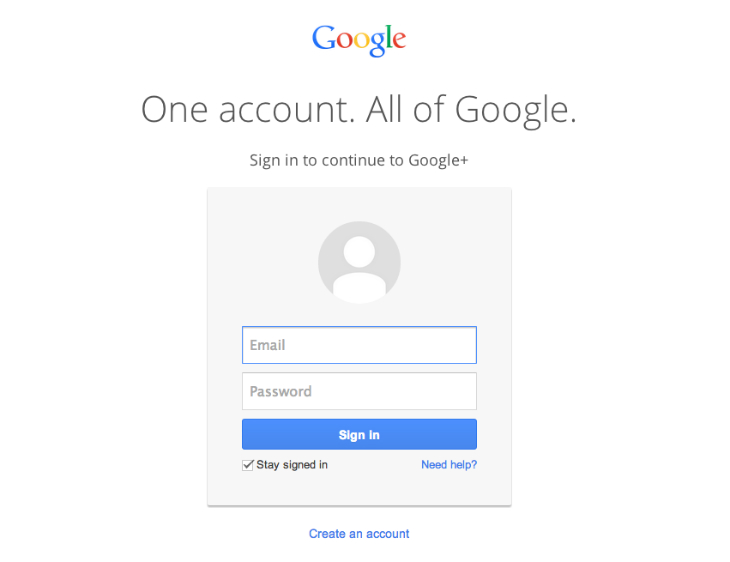
If you’re a complete newcomer though, that’s not a problem. Just hit the link to create a new account and fill out the registration form that appears in your browser. You’ll then hit the Get Started page. Most of this is fairly self-explanatory: just fill in some of your basic details (if you feel they’re appropriate) and select a new profile picture. It’s a square crop and will be displayed alongside all of your activity in Google+, so if you have the time it’s worth finding a snap that does justice both to your lovely mug and the quality of your photography.
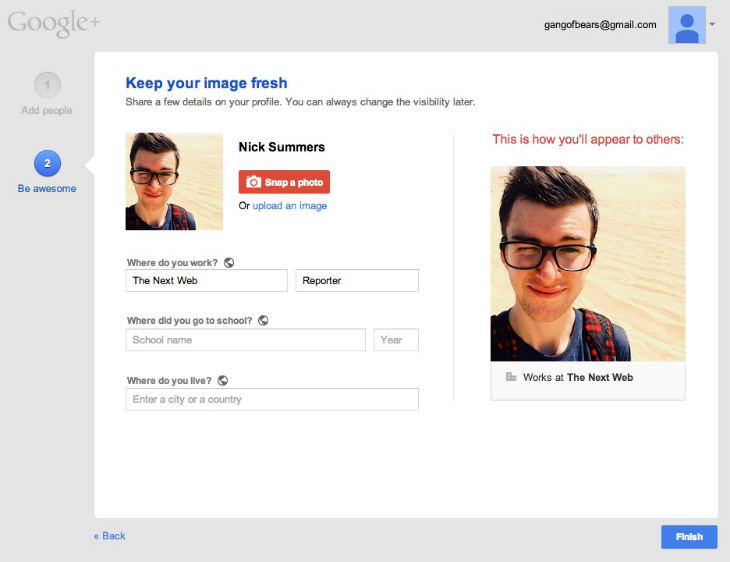
Google+ will then throw you into the news stream, but before you go any further it’s worth finishing up your profile. Roll over the Home button in the top left-hand corner of the page and click Profile from the menu that appears. Here, you’ll be able to add a cover photo – another chance to show off your skills – and add some additional information under the About tab.
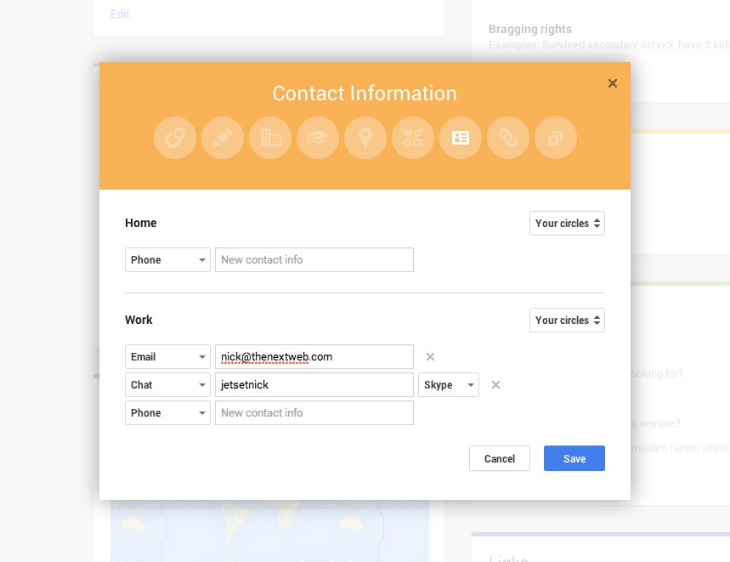
The latter is particularly important as it allows you to publicize your contact details for potential clients. You can store your email address, landline and mobile phone number, Google Talk ID and more here. If you’re worried about strangers calling you up in the middle of the night (that’s perfectly understandable) you can also tailor which Google+ circles this information will be visible to.
Android/iOS
If you would prefer to set up your account using an Android or iOS device, it’s a similar process. Download the Google+ app (iOS or Android) and tap on the icon that’ll appear on your home screen. As before, you can either log-in here with your existing Google Account (Android users should have one already) or create a new one.
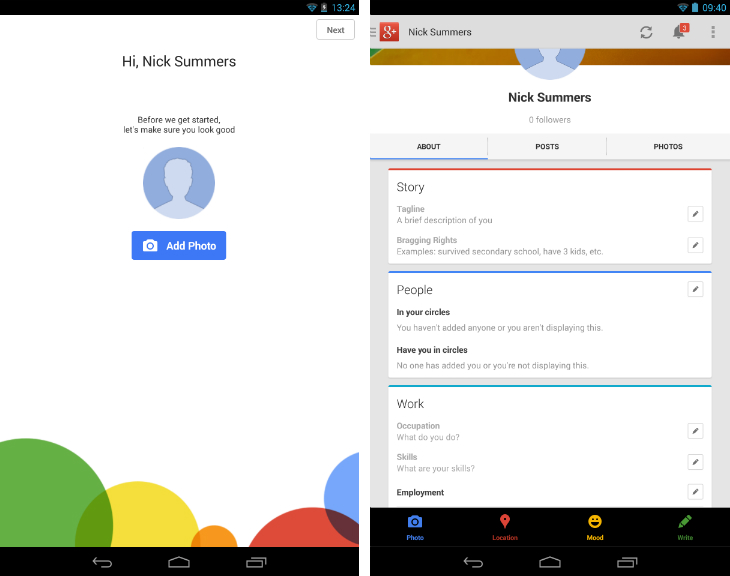
You’ll be asked to choose a photo for your Google+ profile – you can either choose an existing image from your gallery (Android) or camera roll (iOS), or take a new one if the device you’re currently using has an on-board camera.
Before you’re dropped into your primary news stream, you’ll also be asked whether you want Google+ to automatically back up the photos and videos that you shoot on your camera or tablet. We’ll go into this in greater depth later (you can change this setting at any time), but if you’re confident, feel free to opt-in to the feature right away.

Once the app has loaded up, you can edit your personal information by tapping on the Google+ logo in the top left-hand corner, followed by your display picture. Here you’ll find your public profile; tap the about tab, followed by the pencil icon to update your contact information, recent employment, educational achievements and more.
Table of Contents
Home | Create a profile | Upload your photos | Auto-backup | Managing photos | In the lightbox | Basic editing | Auto-enhance | Advanced editing | Auto-awesome | Photo spheres | Circles and hashtags | Communities
Featured image credit: Scott Olson/Getty Images
Upload your photos
Web
For any photo-sharing platform, it’s important to offer users a quick, stress-free upload experience. You will, after all, be doing this on a pretty regular basis in order to promote your latest work.
Google nails this process on both counts, offering a few different methods to get your most prized shots safely onto its social network.
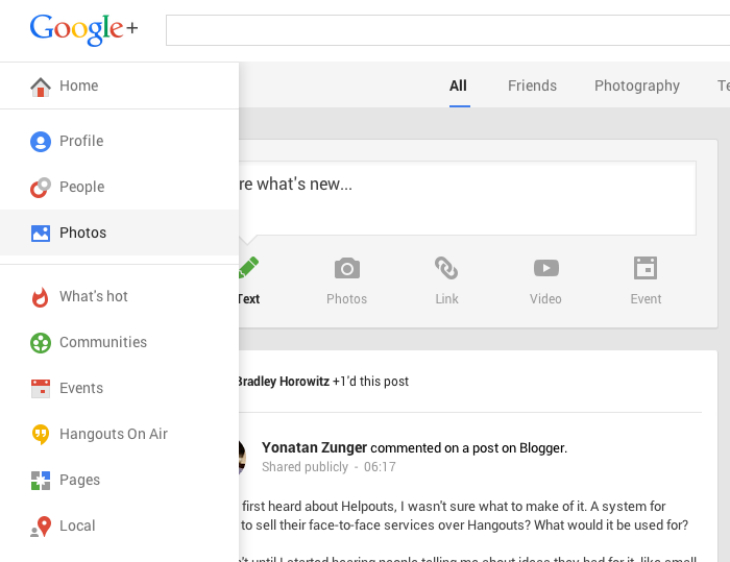
To begin, roll over the Home option in the top left-hand corner, followed by the Photos option in the navigation menu. Here you’ll find a master repository of all your uploaded files, although for now we just need to select the Upload Photos tab found in the toolbar at the top of the page.
You can then begin uploading all of the photos stored locally on your computer. Just drag a handful in from the desktop or a specific folder, or click the button underneath to select some photos using the file browser.
Google will then begin uploading your photos, so sit back and grab a cuppa while Google+ works its magic. The blue bar at the top of the page indicates the progress of your current batch – once completed, you can roll over each image and then either rotate or delete each file as necessary.
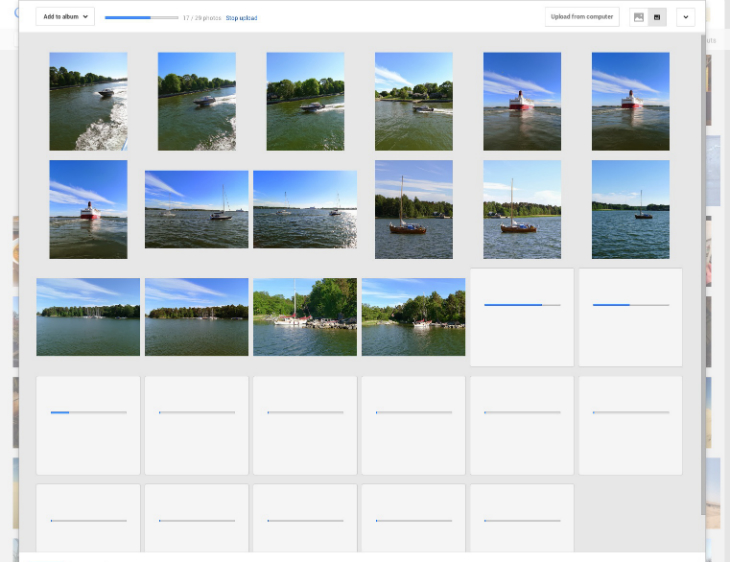
It’s also possible to rearrange your photos either by dragging them across the page, or ordering them by either date or name using the downward arrow button in the top right-hand corner of the page. Before you hit Done, it’s also worth clicking the Add to Album button to specify whether you’ll be adding the shots to an existing album, or creating a new one from scratch.
Google will then ask you whether you want to share the album immediately with some of your circles. We’ll come back to this later, so just hit the Skip button for now. Congratulations, you’re all done!
Android/iOS
At the moment, Google encourages you to upload all of your photos from a mobile device using its Auto-backup feature. The only way to manually upload shots is by sharing them to Google+ through the Android gallery.
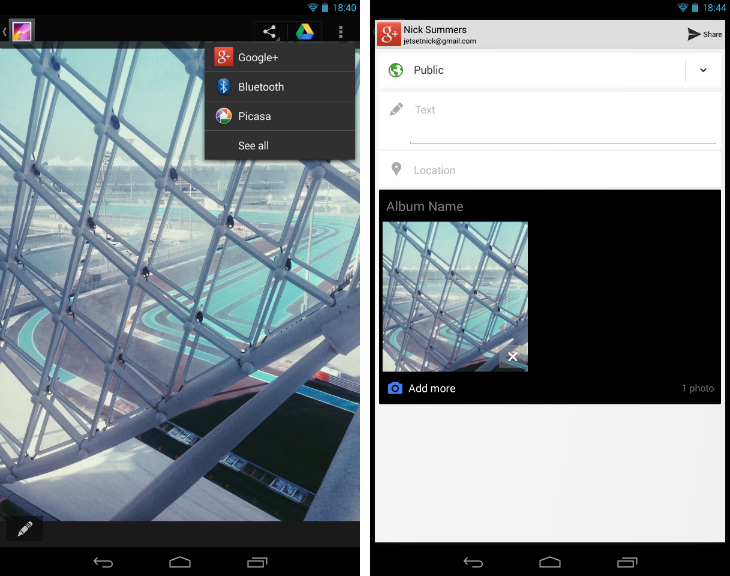
It will then be stored in your library, but for now there’s no way to make this action private – the act of sharing means that you have to pick a circle or contact to share the image with.
(Update: One of our commenters reports that it is possible to upload photos privately on an Android device, provided you share them to Picasa – rather than Google+ – in the gallery app.)
Table of Contents
Home | Create a profile | Upload your photos | Auto-backup | Managing photos | In the lightbox | Basic editing | Auto-enhance | Advanced editing | Auto-awesome | Photo spheres | Circles and hashtags | Communities
Featured image credit: Scott Olson/Getty Images
Auto-backup
Web
Currently, Auto-backup is not supported in the browser-based version of Google+. If you own a Chromebook, however, you can configure this feature with the Google+ Photos app. Just throw an SD card into your Chrome OS device and Google will handle the rest.
Android/iOS
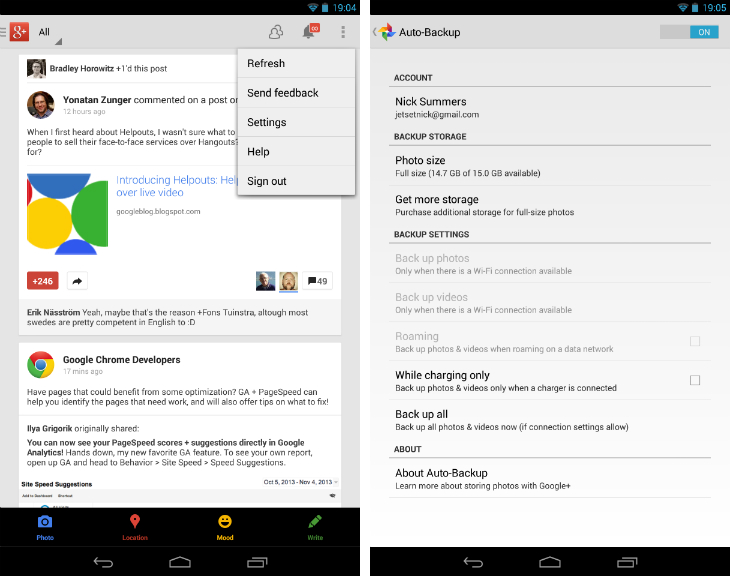
To set up Auto-Backup on an Android device, launch the app and hit the Menu button (it looks like three grey squares stacked one on top of the other), followed by Settings and Auto-backup. Switch the toggle at the top to On and then take a look at the various options listed underneath. In particular, if your contract only offers a small amount of data each month it’s worth specifying that you only want Google+ to upload photos over a Wi-Fi connection.
From an Android device, tap the Menu icon (displayed with three grey, horizontal rectangles), followed by the Settings option in the upper right corner of the sidebar. Select Cameras and Photos and make sure the Auto-backup selection is toggled on.
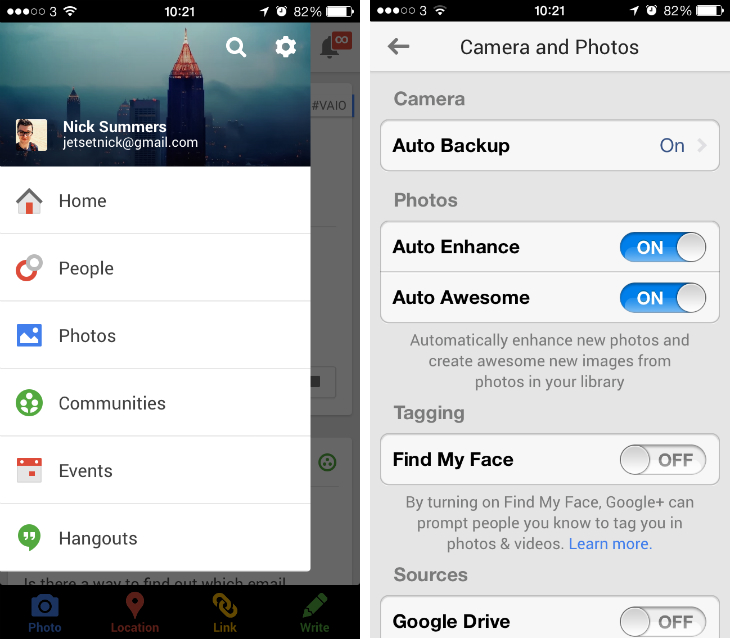
All of the photos and videos that you shoot from here on out will be uploaded in the background automatically to Google+. You can access the same setting in the iOS app by opening up the navigation menu and then tapping the settings icon (represented by a small cog). Select the Cameras and Photos option, followed by Auto Backup. Once toggled, you’ll have access to some granular settings and also be able to sync all of your existing photos and videos.
It’s worth noting that currently, Auto-Backup resizes the photos stored on your iOS device to 2048 pixels alongside the longest edge. The Android version, meanwhile, supports full-size automatic uploads. An imminent update to the Google+ for iOS app will introduce full-size photo uploads, however.
It’s worth noting that all photos uploaded with Auto-backup will be stored in a private album on Google+. You can share these publicly or to specific circles whenever you like, but it’s a good failsafe that ensures other users can only see your very best work.
Table of Contents
Home | Create a profile | Upload your photos | Auto-backup | Managing photos | In the lightbox | Basic editing | Auto-enhance | Advanced editing | Auto-awesome | Photo spheres | Circles and hashtags | Communities
Featured image credit: Scott Olson/Getty Images
Managing photos
Web
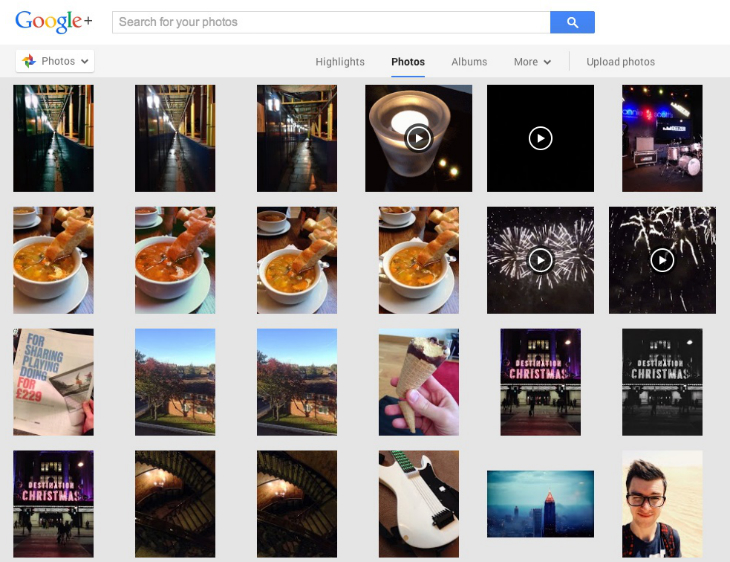
Earlier, we highlighted the Photos section of Google+ to guide you through the process of uploading new images. This area also serves as a private library and album manager where you can find, organize and edit everything stored on Google’s social network. By default, when you head to the Photos section (roll over the Home icon in the top right-hand corner, then select Photos from the navigation menu), Google+ will show you the Highlights viewing mode.
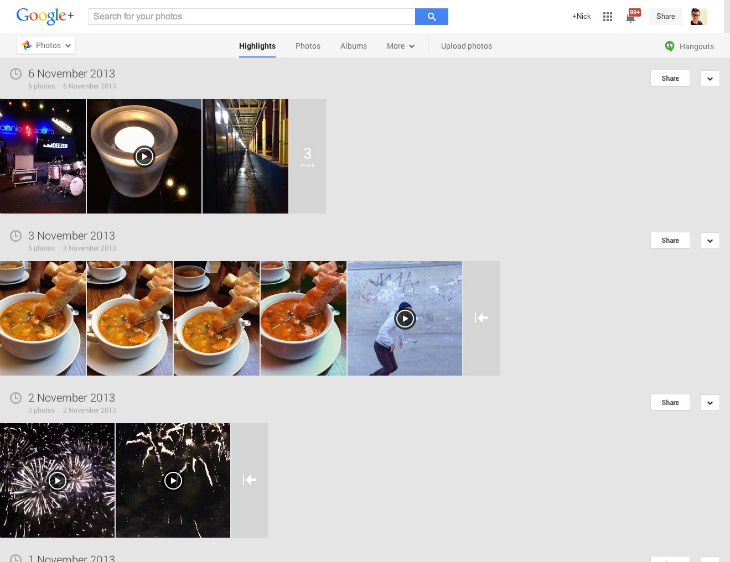
Google will essentially look through all of the photos that you’ve uploaded and pick the ones that it thinks are most suitable for sharing. The very best images that you’ve uploaded so far to Google+, in short. How Google does this is a mystery but it essentially hides any duplicates or blurry photos that you may have stored by mistake.
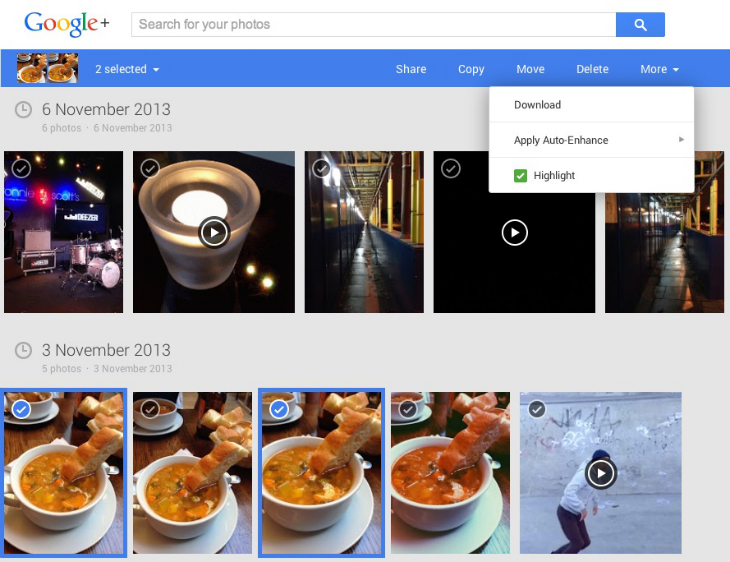
By default, you’ll only see a few images highlighted from each album, but you can see the remaining photos captured on the same day by clicking on the grey, vertical box that appears at the end of each row. If you want to add any of these photos to your Highlights, just select the image by rolling over the thumbnail and hitting the tick icon in the corner. (To select multiple images, continue this process or hover your cursor over the album name and hit the Select option that appears.)
Once selected, a blue menu bar will appear at the top of the page. Here, you can reorganize, copy or delete the photo as necessary. For our purposes though, hit the More option, followed by Highlight. Likewise, you can remove photos from your Highlights using the same process.
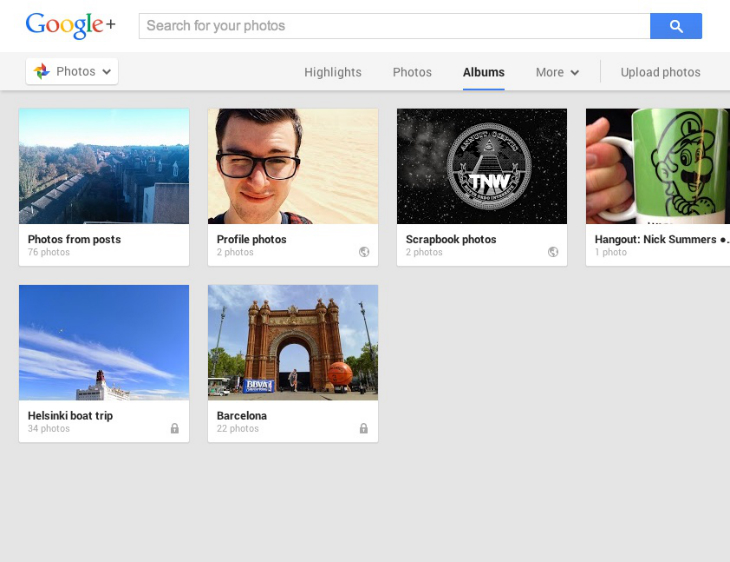
You can then review the rest of your photos using the tabs labeled Photos and Albums at the top of the page. Selecting and de-selecting images works in exactly the same manner, although in Albums view you’ll also be able to see the privacy settings allocated to each set of photos. The globe represents public availability, while a padlock is for total privacy and two circles shows that access has been granted for one or more of your circles.
When you dive into a specific album, you’ll see a new set of buttons in the top right-hand corner. Most of these are fairly self-explanatory, but of note is the option to download the album again to your computer.
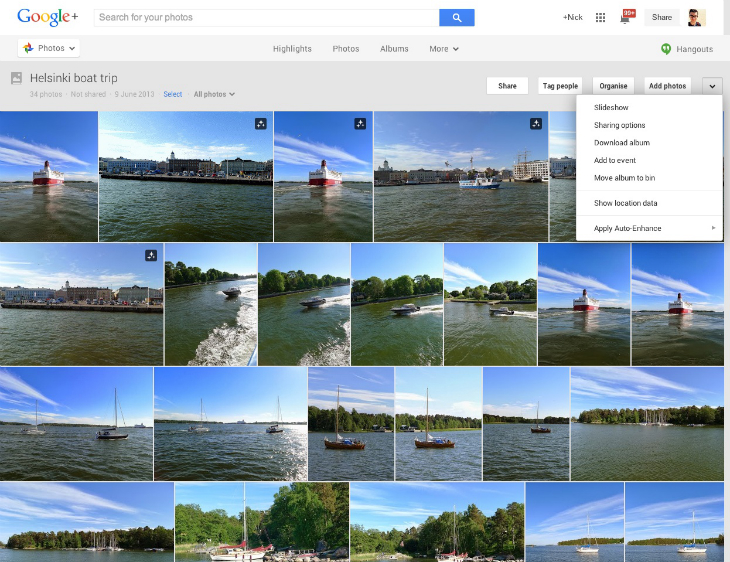
You’ll find the option using the downward facing arrow icon on the far right, and it’s an invaluable way of grabbing your files for local editing on multiple machines.
While browsing your photos, it’s also worth taking a look at the search bar at the top of the page. Unlike other areas of Google+ – which lists related posts and gives you the option to filter by people and pages, communities, and more – entering a search query here will only serve up results from your photo library.
It doesn’t matter if you haven’t written any captions, or shared your photos publicly with a specific hashtag. Just search for what you need and more often than not, Google+ will find the photos that you’re looking for.
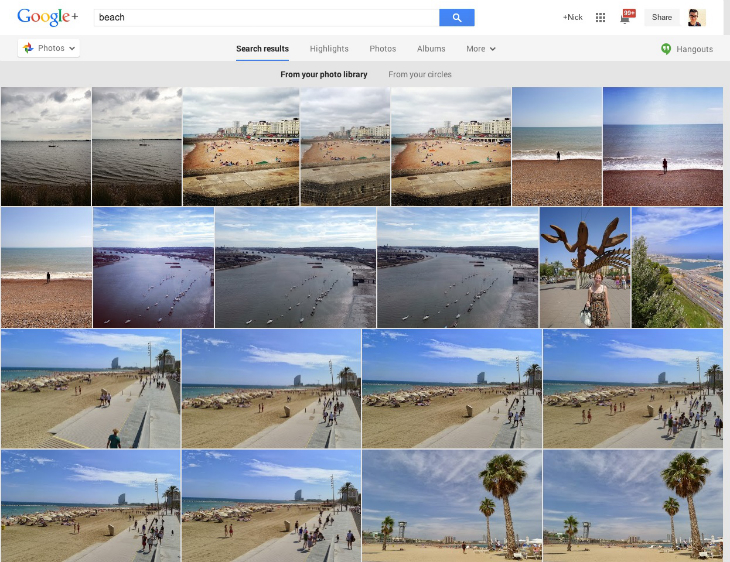
In the example above, I searched for ‘beach’ and instantly discovered every image I had captured near the ocean. Google recently added 1,000 more terms to improve photo search on Google+, so it’s worth trying a few keywords to see what works for you.
Android/iOS
The Google+ for Android app was updated recently with a few tweaks to the way that photos are displayed and organized. Now, when you tap the Photos option from the side-menu you’ll be greeted with a secondary list of options including Auto-Awesome, Videos and Photos of You.
The default Photos view is split into two tabs labeled Camera and Highlights. The former is a quick way of viewing everything that you’ve captured with your current device, while the latter combines your entire library in an identical fashion to Google+ on the web.
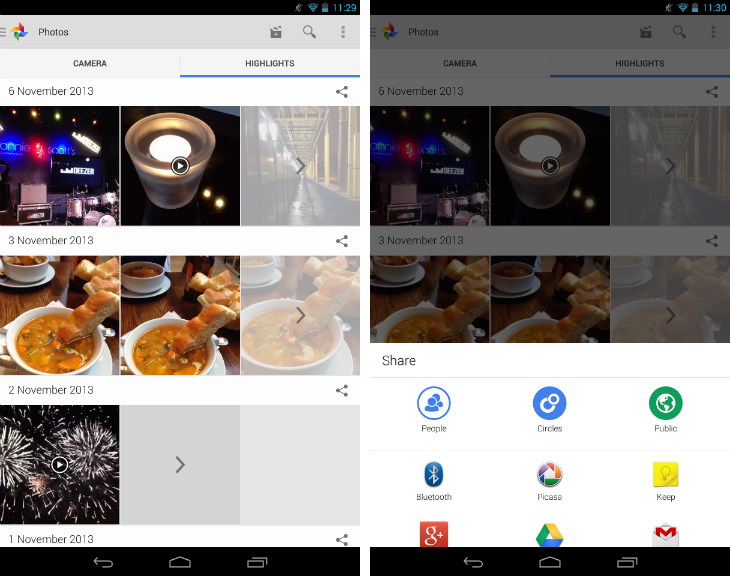
As before, Highlights will show only a couple of what Google perceives to be your best photography. You’ll see a Share icon at the end of each row (it looks like three grey circles joined by two interconnecting lines) which acts a shortcut for publishing the images as a post on Google+ or through other Android apps installed on your device.
Tapping the grey circle at the end of each row will reveal the full set of images tied to each Highlight. From here, you can use the Menu icon in the top right hand corner to select multiple images and then delete, share or move them to a new album as necessary.

You can also filter your photos by albums using the appropriately named option in the sidebar. Tap on a thumbnail to view the photo set and also move, share and delete any of the contained images, again using the Menu icon.
On the iOS side, it’s a similar experience. Once you’ve opened the sidebar and selected the Photos option, you’ll see a near-identical version of the Highlights view shown in the Google+ for Android app. You can select groups of photos using the tick button in the top right-hand corner, or switch to the Albums or Photos views by tapping on the word Highlights at the top of the app.
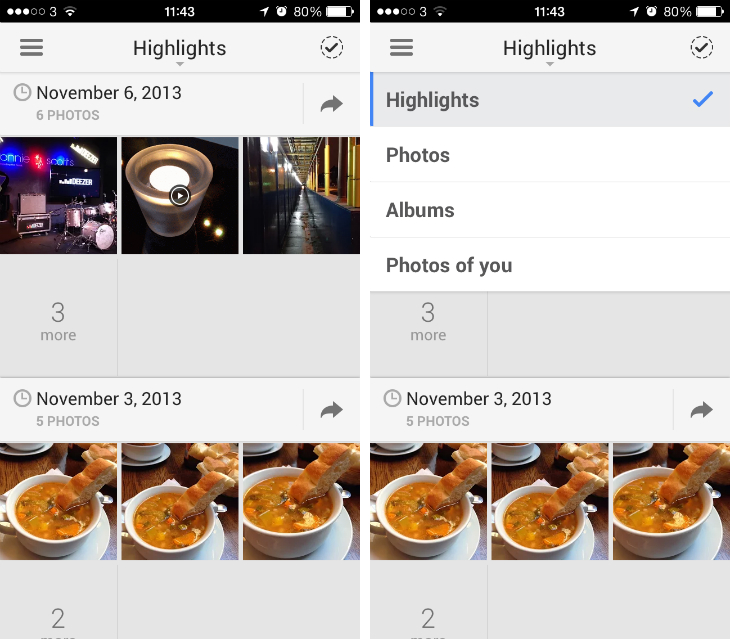
Table of Contents
Home | Create a profile | Upload your photos | Auto-backup | Managing photos | In the lightbox | Basic editing | Auto-enhance | Advanced editing | Auto-awesome | Photo spheres | Circles and hashtags | Communities
Featured image credit: Scott Olson/Getty Images
In the Lightbox
Google+ is terrific not only at storing your photos, but also making sure that they look their very best across the Web. Whenever you click on a photo, be it from one of your own albums or a post found anywhere on the platform, the image will then be displayed in the Google+ lightbox.
Photos are shown individually on a black background, with few distractions other than some comments and image data listed down the right-hand side. Just like a photography gallery or exhibition, Google+ puts the focus exclusively on the images themselves.
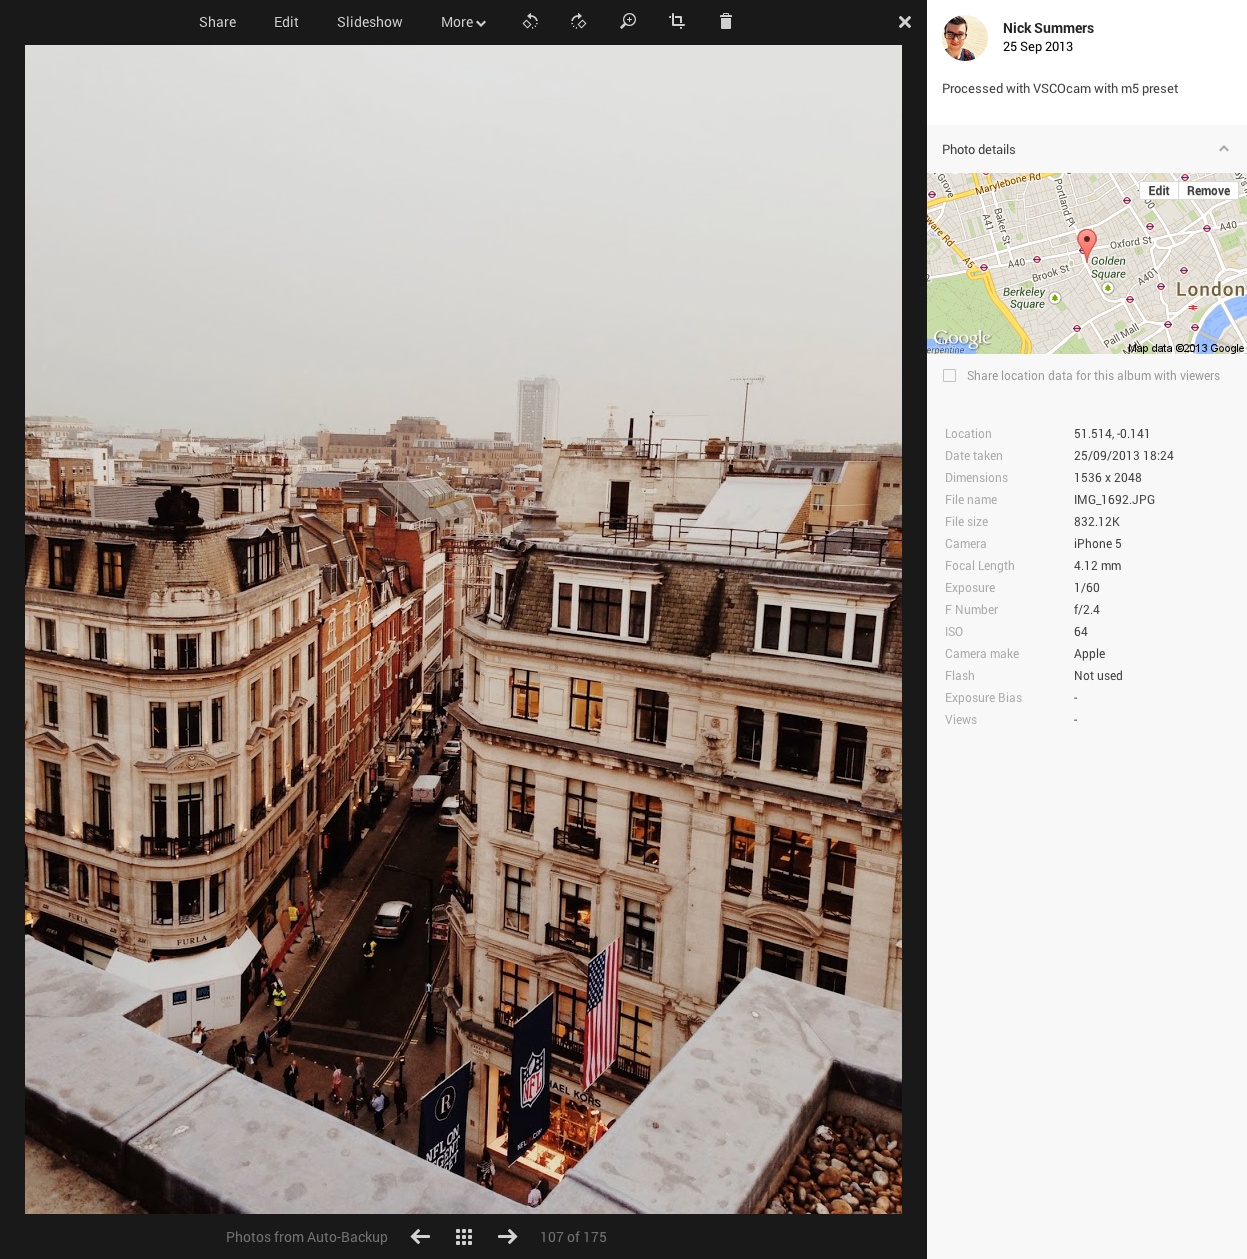
In the top right-hand corner you can see the caption for the image, which is crucial for explaining the message or intention of the shot, as well as encouraging discussion from potential clients and the Google+ community. If you’ve captured the photo with a device that supports GPS – almost all smartphones and tablets do – you’ll see a map displaying that location in the upper right corner. Clicking on the preview will show the exact positioning within Google Maps too, which is neat.
Underneath is a complete list of photo metadata. Casual snappers might not need this information, but for diehard shutterbugs this is an invaluable way of seeing what settings and device were used to create a specific effect or scene.
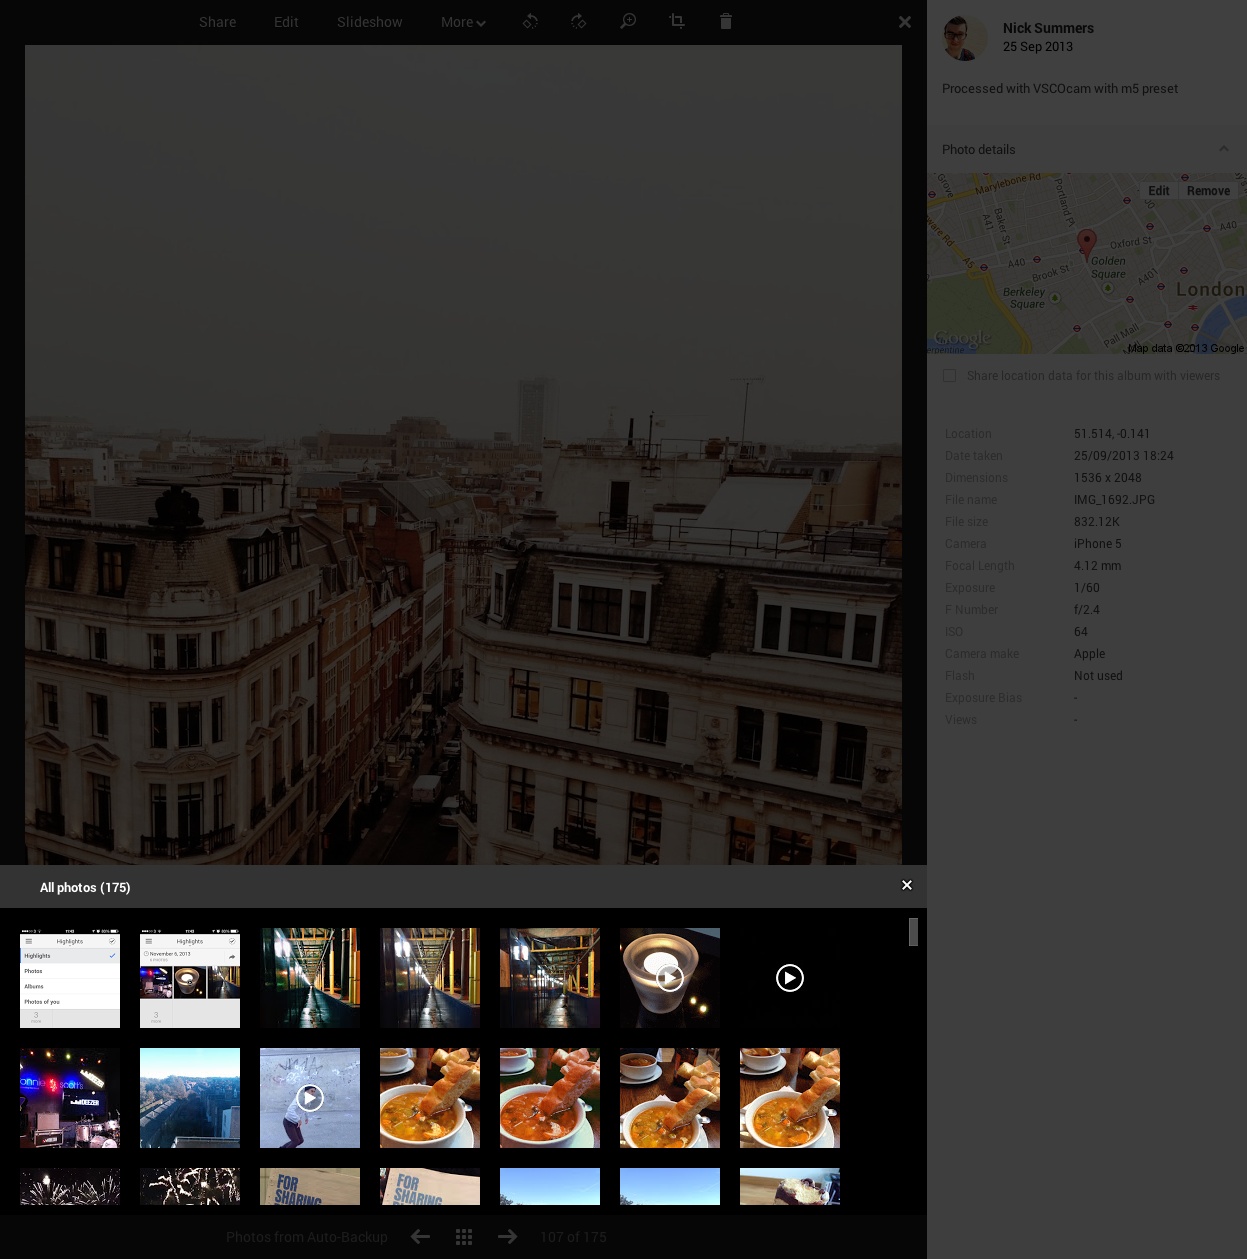
Using the white arrows at the bottom of the page you can quickly move forwards and backwards through the current album. Alternatively, clicking the three by three grid of white squares will reveal the complete set of album photos, which you can then use to jump back and forth as needed.
If you’re using Google+ to present an album, perhaps to a client, classroom or group of friends, you can also trigger a Slideshow using the aptly named shortcut at the top of the page. It’s really slick; either navigate the photo set using the arrow keys, or press play and Google will move through them at a slow, but steady speed.

Finally, use the magnifying glass icon to take a closer look at a photo in Lightbox mode. A thumbnail will appear in the top left-hand corner to help you keep track of where you are within the image.
Android/iOS
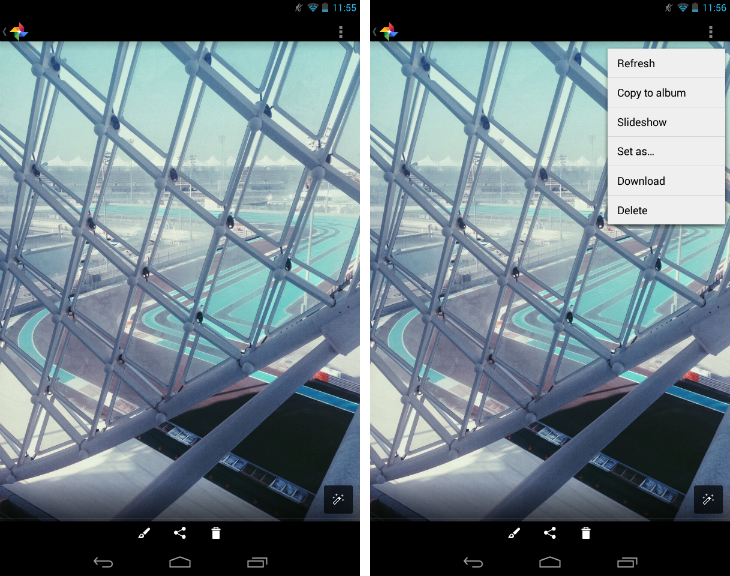
While the Lightbox mode in the Android and iOS apps share the same spirit as its browser-based compatriot, their functionality is rather more limited. On the Android side, you can start a slideshow using the More icon found in top right-hand corner of the screen. A few icons at the bottom will allow you to delete, share and edit the photo, but the image location and metadata is missing.
The Google+ for iOS app is a similar story. You can swipe left and right to move through the album, but that’s about it. Using the Settings icon at the top of the screen, there’s also the option to delete, share, edit and Auto-enhance the current photo.
Table of Contents
Home | Create a profile | Upload your photos | Auto-backup | Managing photos | In the lightbox | Basic editing | Auto-enhance | Advanced editing | Auto-awesome | Photo spheres | Circles and hashtags | Communities
Featured image credit: Scott Olson/Getty Images
Basic Editing – Rotate, Crop, Captions
Web
This is where the fun begins. Google+ goes above and beyond nearly every other social network by offering its users free, browser-based photo editing software. Sure, many professional photographers will alreadt have a copy of Adobe Photoshop or Apple’s Aperture app on their computer, but this is about opening up some of the broader tools to the general public. Forget subscriptions or resource-heavy native apps, Google+ is available from any device with a reliable internet connection.
First up is some basic housekeeping to ensure your photos are ready to be viewed by the public. From the Lightbox, you can rotate photos by 90 degrees clockwise or counter-clockwise using the two corresponding icons at the top of the page. Google+ rarely uploads photos in the wrong orientation, but it’s good to know the feature is still there.
If you click the crop icon (it looks like two right-angle rulers overlapping one another) you can focus on a specific part of the image and also resize it to a specific aspect ratio. Just drag the corners of the on-screen grid across the image until you’re content, then hit Apply.

From within the Lightbox viewer, you can also edit the caption in the top right-hand corner, as well as location data by clicking on the Edit and Remove buttons positioned on top of the Google Maps thumbnail. Now we’re ready to dig into some advanced editing!
Android/iOS
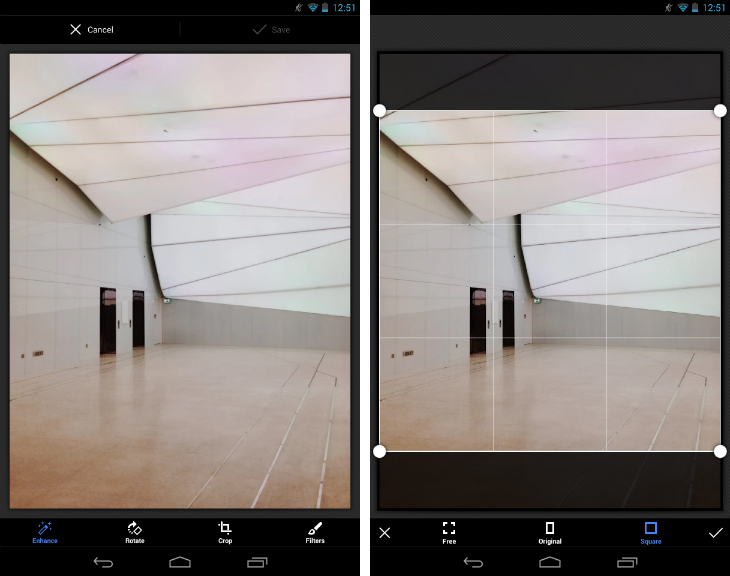
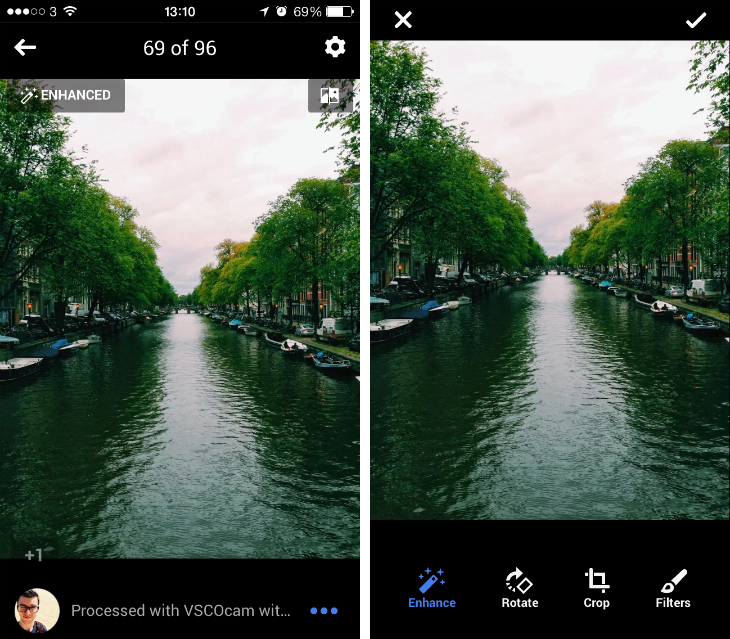
To access the basic Google+ photo editing tools in the Android app, just tap the paintbrush icon found at the bottom of the screen. Here, you’ll find four buttons labeled Enhance, Rotate, Crop and Filters. For now, we only need to use the center two. It’s worth noting that with the crop tool, you can resize the image freely or choose to use a preset square crop – perfect for Instagram and profile pictures.
If you’re an iPhone or iPad user, you can access the same four features – Enhance, Rotate, Crop and Filters – by tapping on the Settings icon (it looks like a small cog) in the top right-hand corner of the screen followed by Edit. When you’re happy with the results, just press the tick icon to confirm.

Table of Contents
Home | Create a profile | Upload your photos | Auto-backup | Managing photos | In the lightbox | Basic editing | Auto-enhance | Advanced editing | Auto-awesome | Photo spheres | Circles and hashtags | Communities
Featured image credit: Scott Olson/Getty Images
Auto-Enhance
Web
Before we dig down into the advanced photo-editing features of Google+, it’s worth considering Auto-enhance. As the name suggests, this is a feature that will tweak and edit your images automatically – no input required.
Now, before you raise a suspicious eyebrow, it’s worth remembering that this feature is entirely optional. Google denotes every time it applies Auto-enhance to one of your images and you can almost always turn it off with a single click.
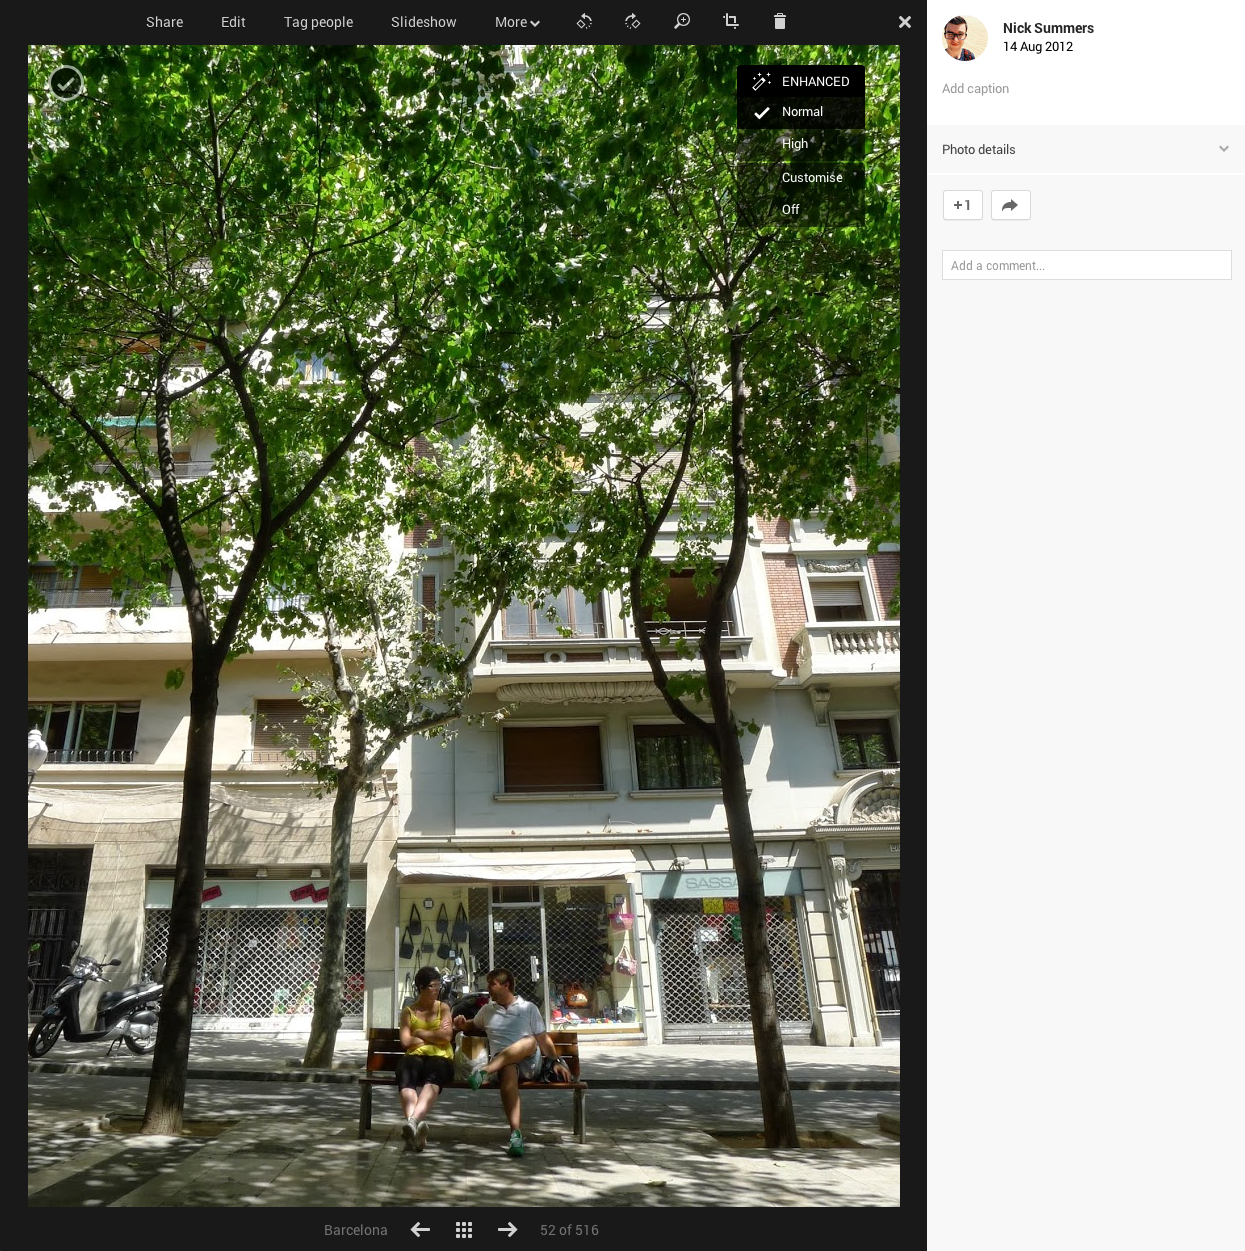
To see if a photo has undergone any of these subtle tweaks, just open the photo in Lightbox mode and roll your cursor over the image. If they have been edited, you’ll see the word ‘ENHANCED’ and a magic wand icon next to it.
Using the zoom tool mentioned previously, it’s worth looking at the new photo in some detail. If it looks great, Google+ has done its job and you can bypass the advanced editing suite altogether. For instances where you’re not quite happy with the adjustments though, you can continue to hover over the ‘ENHANCED’ tag and then turn the edits off or alter their strength to either Normal or High.
If you want to see exactly what Google is doing to your photos though – or just fancy tweaking some of the sliders yourself – you can hit the Customize option to see a breakdown of the following: Brightness, contrast, saturation, shadows, warmth, structure, noise reduction and vignette. When you’re done, just hit the Apply button.

If you’re confident in Google’s ability to tweak your photos with clever algorithms, you can batch edit an album by selecting the appropriate images and navigating to Apply Auto-enhance, located under the More option.
Android/iOS
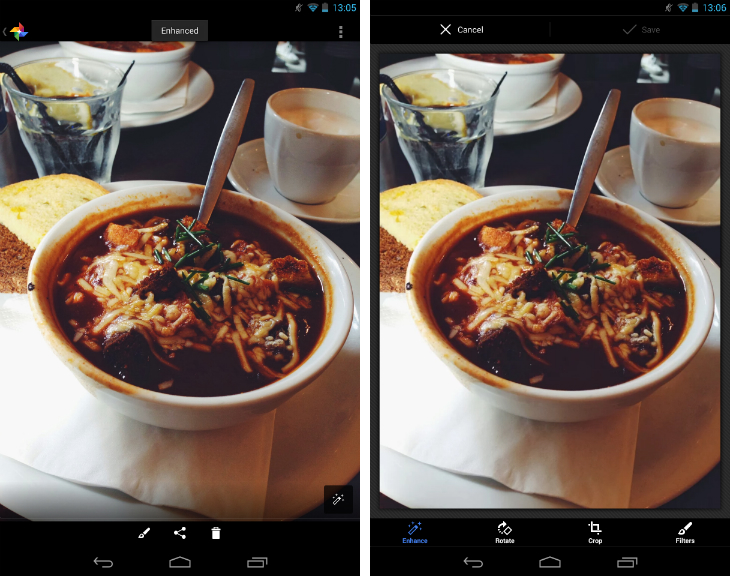
Within the Android app, you can’t determine if one of your photos has received the Auto-Enhance treatment until you dive down into the Lightbox photo viewer. Tap the small wand icon, shown in the bottom right-hand corner of the app, to toggle the feature on or off.
Alternatively, you can go into the advanced editing tools (accessed via the More icon, followed by the Edit Photo option) and hit the Enhance icon.
Likewise in the iOS app, the wand icon and the word ‘ENHANCED’ will be overlaid on photos that have been adjusted automatically. You can compare it to the original version by long-pressing the compare icon in the top right-hand corner. To dismiss the treatment entirely, tap the settings icon, then the Edit option. Identical to the Android app, you can then toggle the effect using the Enhance icon at the bottom of the screen.
At present, the Google+ for Android and iOS apps don’t allow you to customize the strength of Auto-enhance. You can turn it off entirely in the app settings under Camera & Photos, however.
Table of Contents
Home | Create a profile | Upload your photos | Auto-backup | Managing photos | In the lightbox | Basic editing | Auto-enhance | Advanced editing | Auto-awesome | Photo spheres | Circles and hashtags | Communities
Featured image credit: Scott Olson/Getty Images
Advanced Editing
Auto-enhance and basic photo tweaks aside, Google+ really comes into its own when you dig down into the advanced photo-editing options. Most of them have been pulled in from the Snapseed for Android and iOS apps, but they work just as well in the browser.
When viewing any photo in Lightbox mode, you can hit the Edit option at the top of the page and instantly access Google’s rather impressive suite of post-production tools. They’re identified by a series of large, square icons and the best way to familiarise yourself with them is just to load up an image and start experimenting.
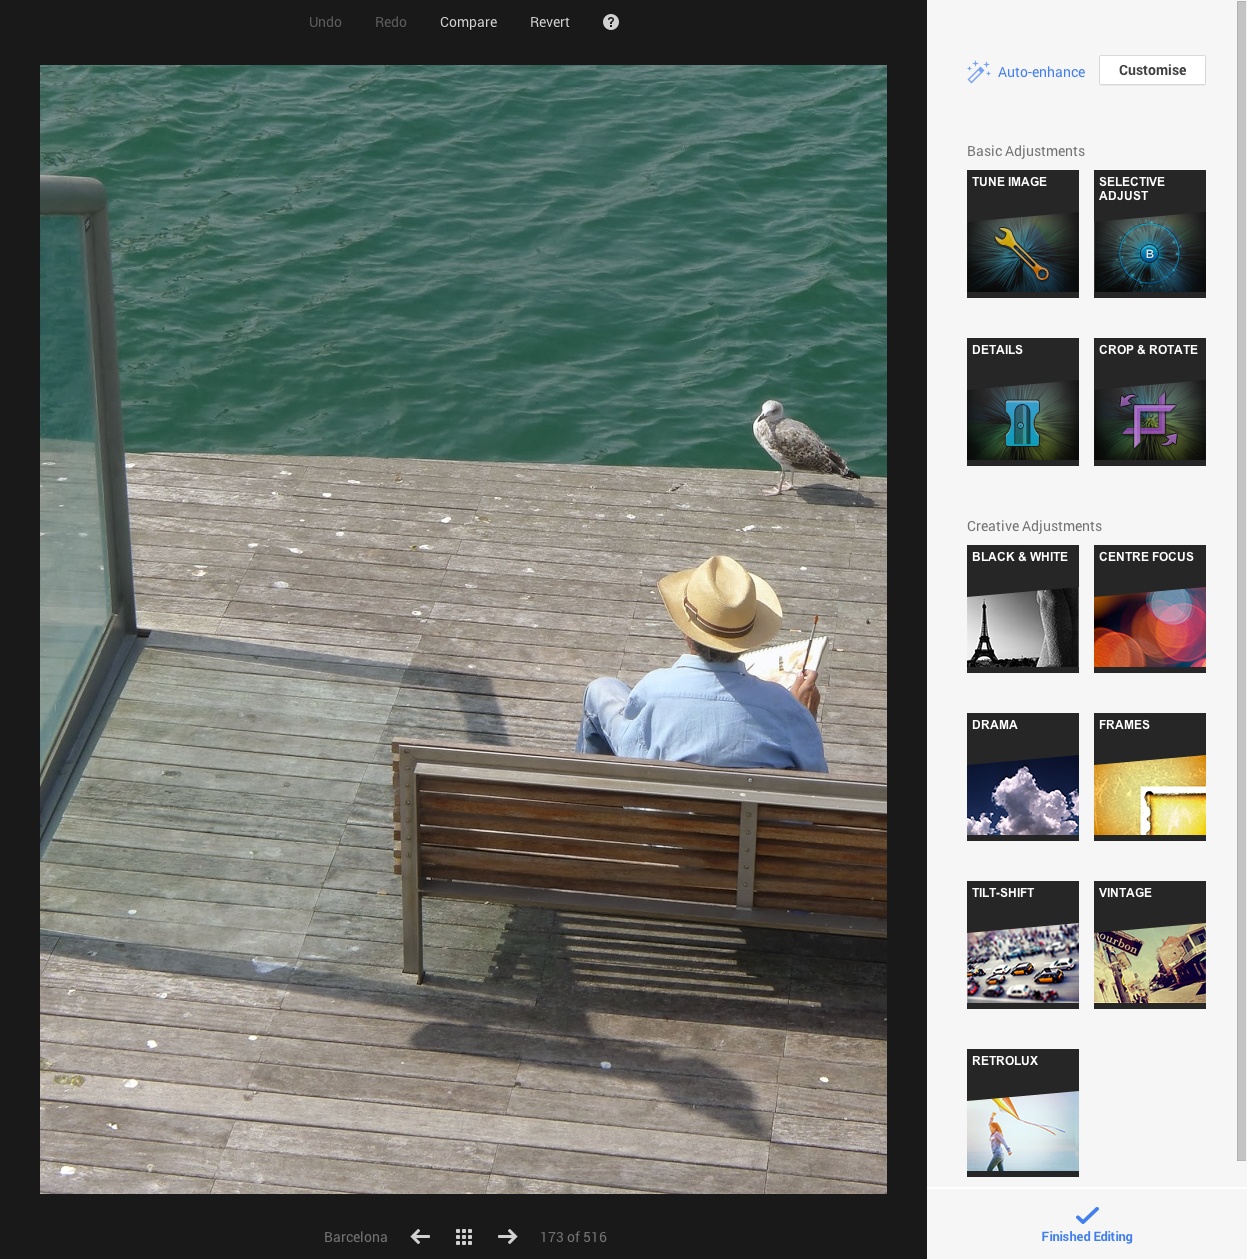
Tune Image is for basic exposure adjustments. The brightness, contrast, saturation, shadows and warmth sliders are all clearly labeled and easy to use. As you move each of them left and right, a blue line will remind you of the original setting; it’s a subtle UI touch, but makes a huge difference when you’ve been tweaking a photos for hours and forgotten whether the current version is any better than the original.
Details improves the sharpness and structure of an image, but it’s the Selective Adjustment tool that will really impress pro and hobbyist photographers. Google+ lets you add any number of Control Points to your original photo, choose the area of effect and then edit the brightness, contrast and saturation.
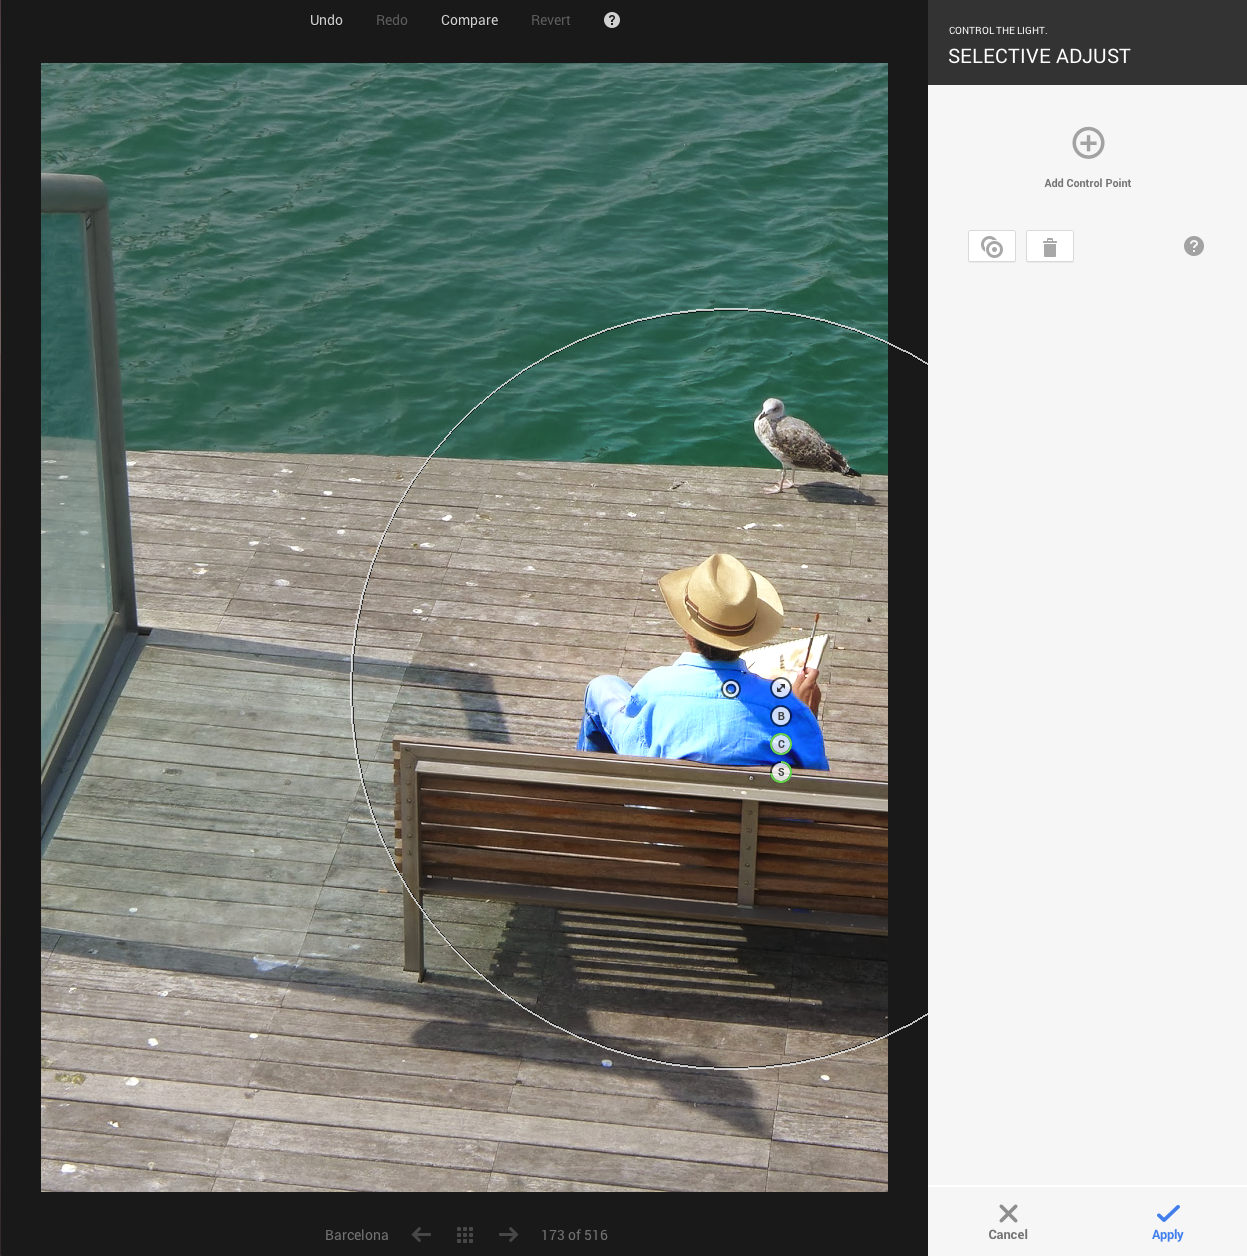
This allows you to fix certain parts of the shot that may have been affected by poor lighting conditions or the settings that your selected on your camera. It’s not a solution to every problem, but a useful means of salvaging what could have been a wasted shot.
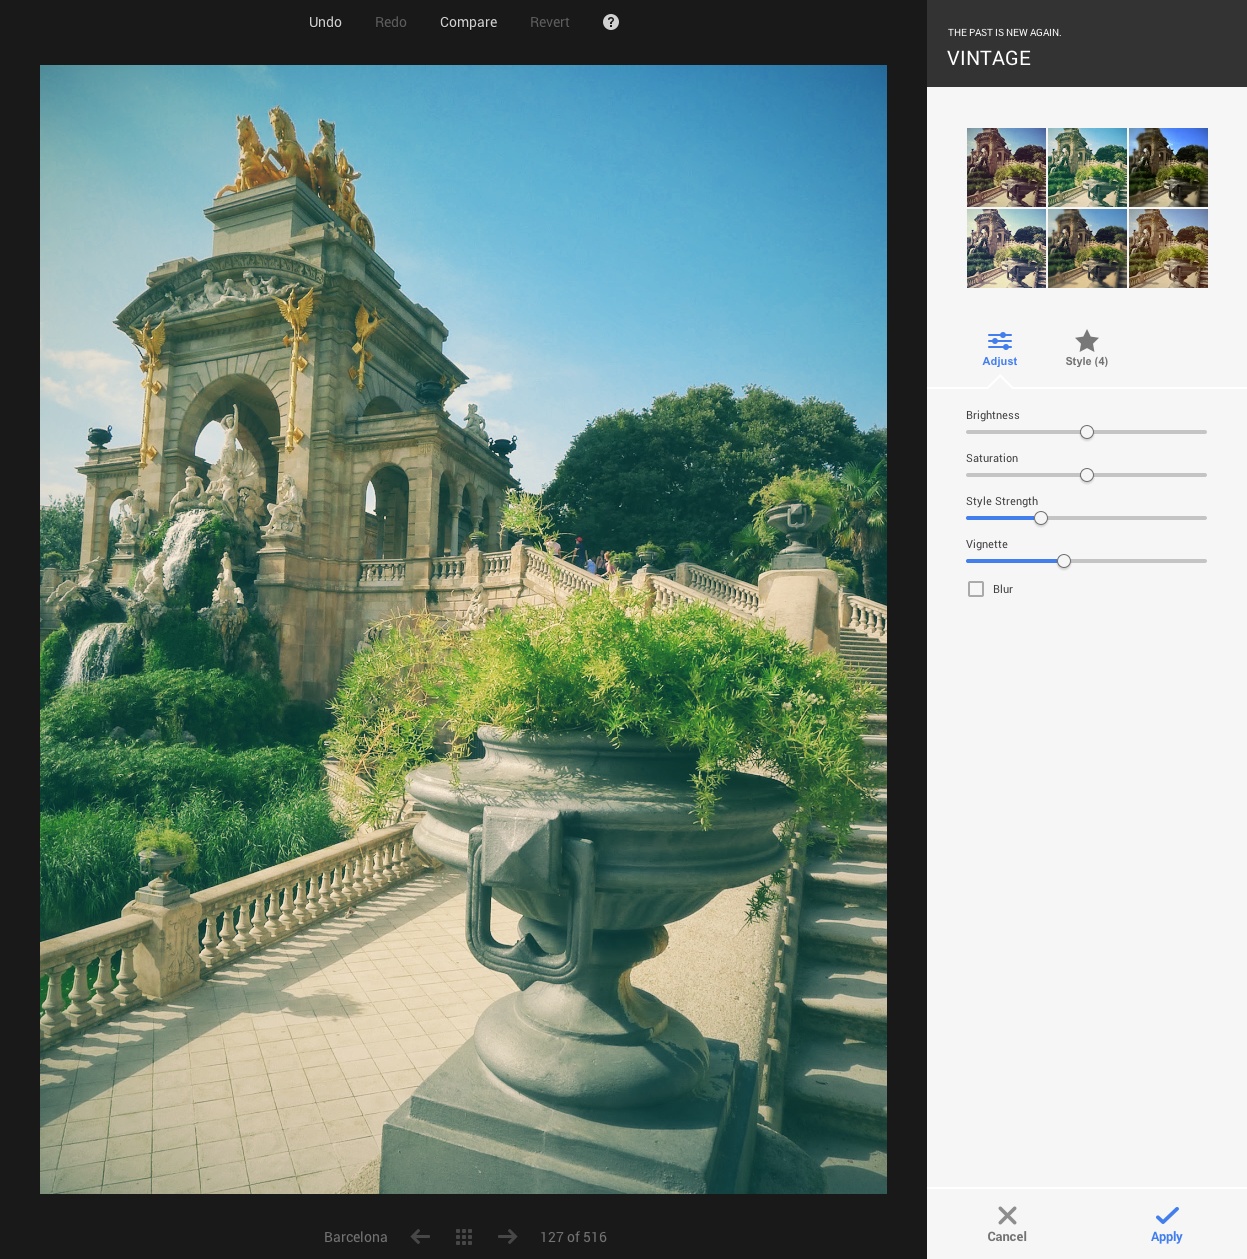
Black & White, Vintage, Drama and Retrolux are the names given to Google’s artistic filters. They’re aimed at the casual Google+ user, but you can create some interesting effects by toying with the various sliders and styles offered for each of them.
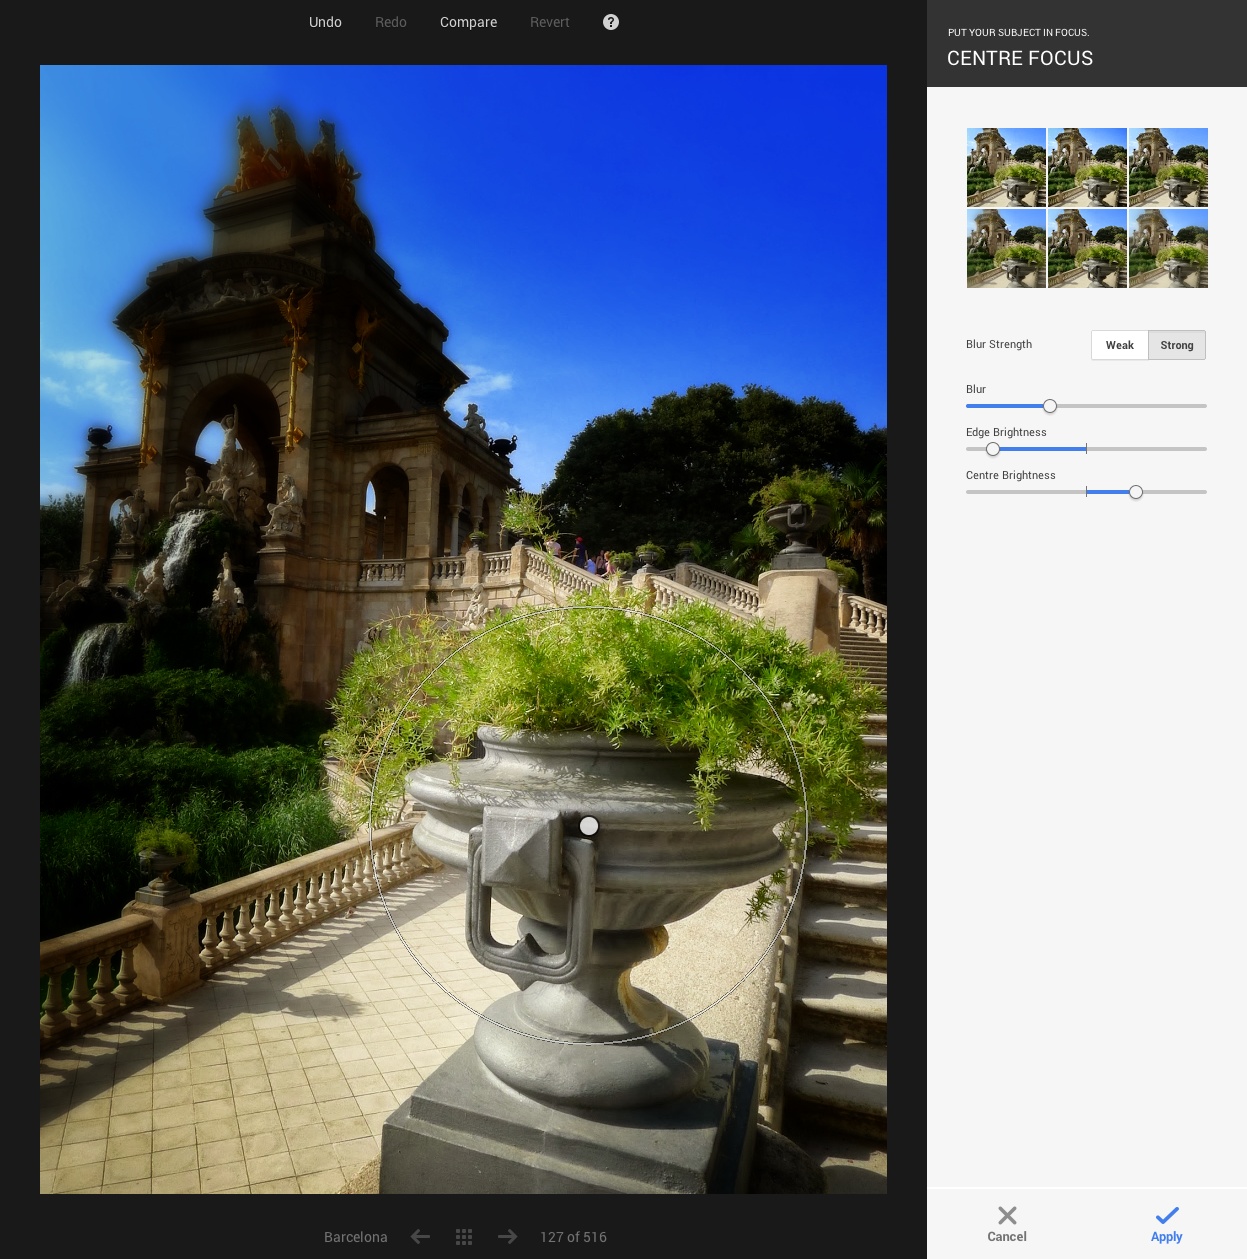
Centre Focus and Tilt-Shift are designed to recreate a shallow depth of field in your images (normally achieved with a low aperture setting) but in most use-cases they feel quite artificial. Nevertheless, they’re fun to tinker with and can spice up many run-of-the-mill smartphone shots, provided you keep the strength of the effect relatively low.
Finally, there are Frames. I’ve never liked adding artificial borders to my photos, but at least Google+ gives you the option. There are 23 to choose from and you can adjust their size using the slider hidden underneath the Adjust tab.
You’ll notice that alongside many of these tools, Google+ shows six different thumbnails near the top of the editing pane. These are preset adjustments which you can quickly select for a specific look. Each of them are named too – just hover your cursor over the thumbnail and jot down the relevant term.
If you’re applying multiple filters, be sure to make use of the Undo and Compare buttons at the top of the page. Once you’re finished, click Apply to confirm your edits.
Android/iOS
As mentioned in our breakdown of basic photo editing, you can tweak photos in the Google+ for Android app by tapping the paintbrush icon nestled underneath each image. Or, if you’re on iOS, by tapping the Settings icon at the top of the screen, followed by Edit.

The crop of editing tools available in both apps are a significant reduction from Google+ on the web. Aside from Auto-Enhance, Rotate and Crop, the apps only offer a series of artistic filters for you to apply to your photos.
Most of them are pleasant enough and while it’s possible to set each of them to one of four featured pre-sets, they’re not an adequate replacement for the high-level tools available in the browser.

The silver lining is the Snapseed for Android and iOS apps. If you grow accustomed to the editing tools available on the web, you’ll find a near identical experience in these editing apps. It takes a short amount of time to become accustomed to the control scheme – Snapseed uses vertical swipes for tool selection and horizontal swipes for adjusting the strength of the effect – but you’ll be rewarded for sticking with it. In my opinion, it’s one of the best (if not the best) photo-editing app available for both mobile operating systems.
Table of Contents
Home | Create a profile | Upload your photos | Auto-backup | Managing photos | In the lightbox | Basic editing | Auto-enhance | Advanced editing | Auto-awesome | Photo spheres | Circles and hashtags | Communities
Featured image credit: Scott Olson/Getty Images
Auto-awesome
Web, Android and iOS
Most people will agree that Auto-awesome is a very unorthodox name for a photo-editing feature. And yet, it’s the perfect description for what is an unbelievable set of tools for Google+ users.
Auto-awesome takes a set of photos and blends them together to create a new, composite image. You don’t have to do anything – Google finds and edits these incredible photos automatically. Whenever you see the Auto-awesome icon at the bottom of your image (it looks like three shimmering stars), you know Google has worked some of its magic.
If you capture the same image with multiple exposure settings, Google+ will often create a new HDR (High Dynamic Range) photo. This technique essentially pulls in the best parts of each photograph and layers them on top of one another. For instance, you might take some pictures of an interesting building and in one, the building is too dark but the skyline overhead looks fantastic. In another, the clouds are blown out but the structure is perfectly exposed. In theory, HDR can create a composite image that ensures both the building and skyline has the perfect range of shadows and highlights.
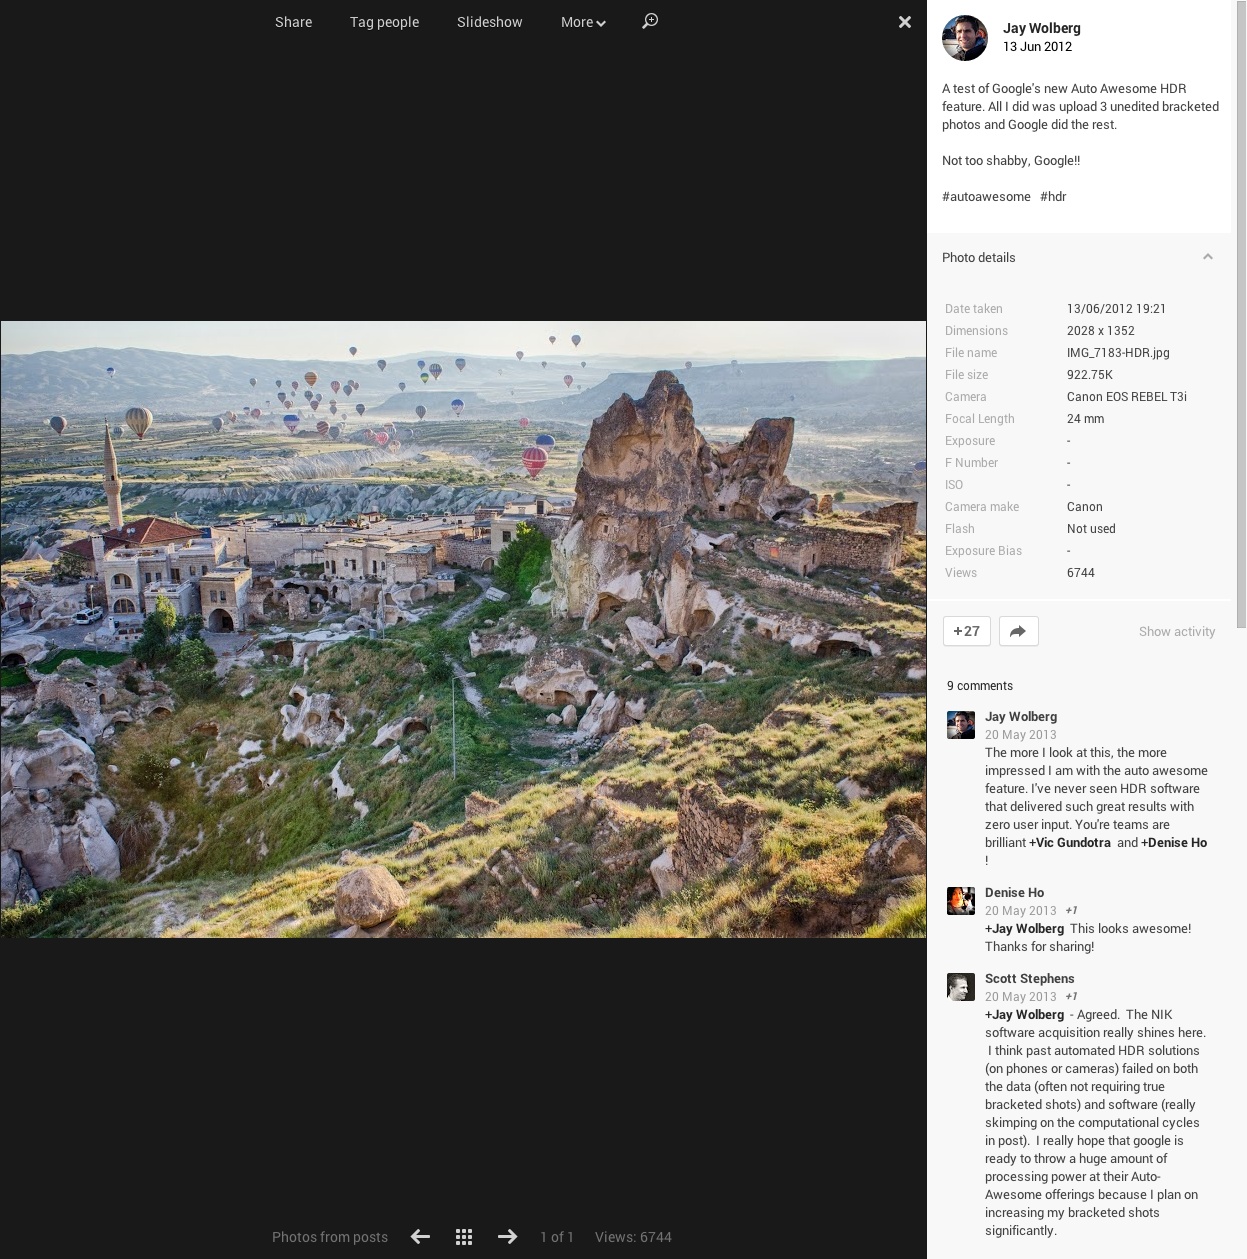
(By Jay Wolberg: Click here for the original Google+ post)
It’s worth noting that can also create your own HDR images manually via the new HDR Scape tool in the Snapseed for iOS and Android apps.
GIF lovers, listen up. If you shoot photos in quick succession, Google+ can blend these together into a short, looping animation. You’ll need at least five to trigger the feature, but once completed Google will give you a perfect GIF file ready for sharing.
Smile creates group photos “in which everyone looks their best”, while Pano stitches together adjacent landscape shots for spectacular wide-angle panoramas. Mix, meanwhile, will give you a photobooth-style collage made up of portrait photographs with similar backdrops.
Google updated Auto-awesome in October with two new effects called Eraser and Action. Eraser is designed for holiday shots and those awkward moments when someone walks right in front of your camera. If you capture at least three photos of the same scene, Google+ can remove unwanted subjects and replace them with backgrounds sourced from your other shots. Useful if you went to visit La SagradaFamília during peak hours, for example.
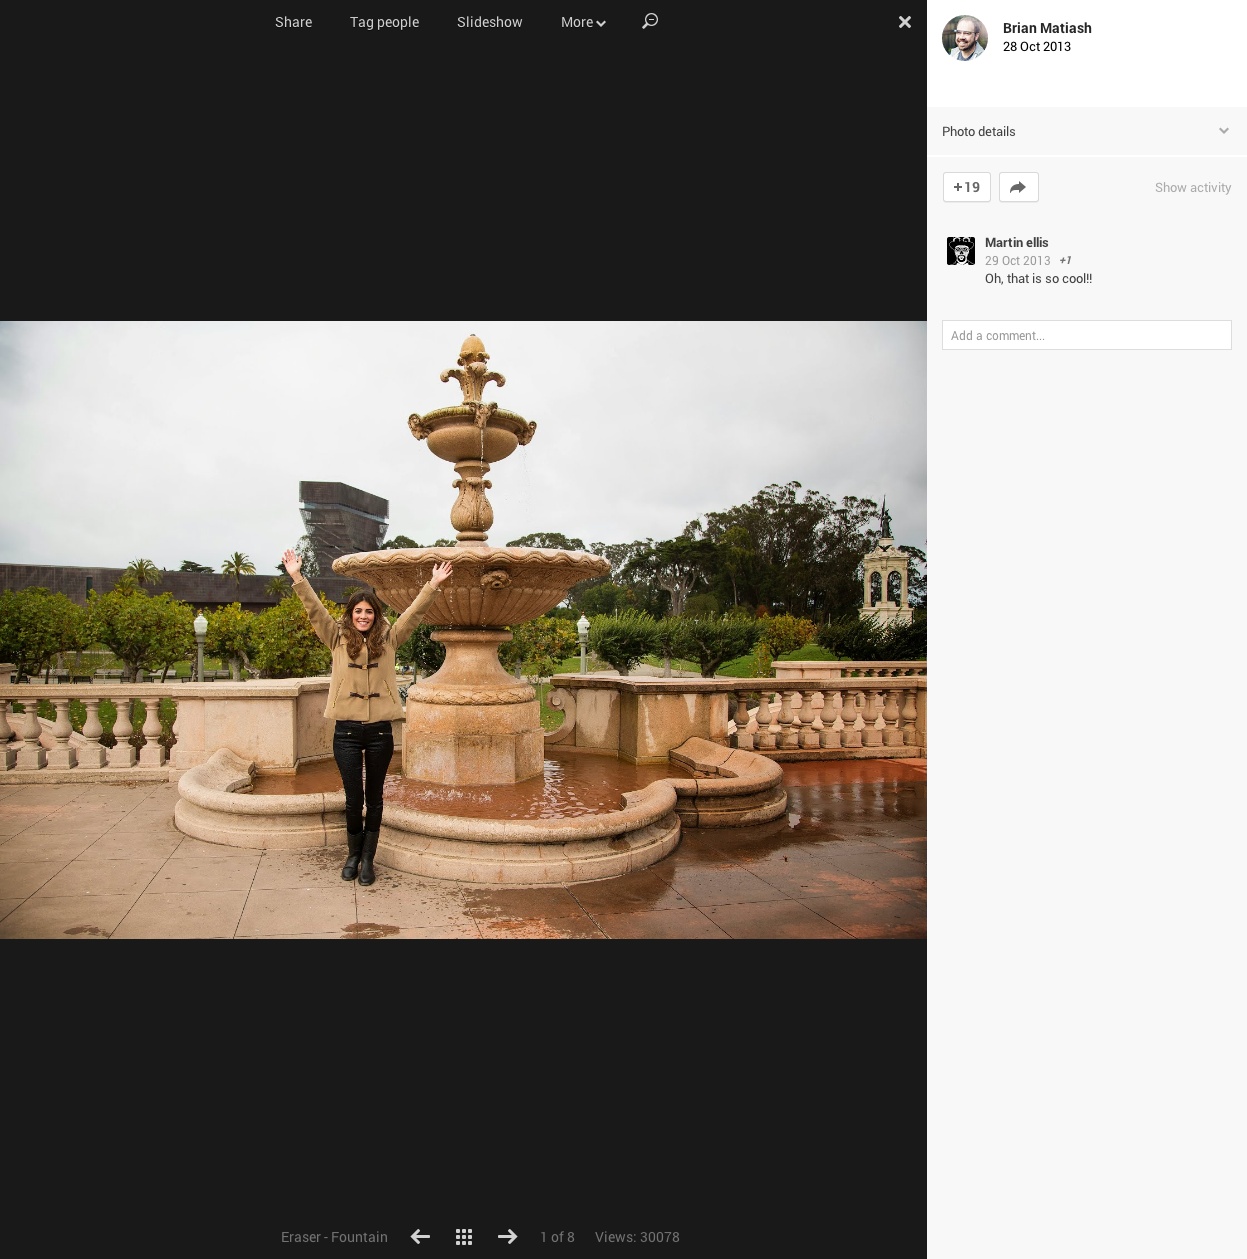
(By Brian Matiash: Click here for the original Google+ post)
Action should be a far more appealing prospect to hobbyist and professional photographers. When you upload burst mode photography, Google+ is able to identify if a single subject is moving rapidly in a shot and then create a composite that shows their trajectory in a single frame.

(By Paul Moody: Click here for the original Google+ post)
Someone throwing a basketball at their local court, for example, could be edited to show multiple versions of the ball moving through the air. Multiple photos showing a surfer carving across a huge wave, meanwhile, could then be merged together to clearly show their route.
As with Auto-enhance, it’s worth emphasizing that Auto-awesome is entirely optional. These supplementary photos do not replace the original files, and the feature can be disabled at any time under the Settings tab of the Google+ navigation menu.
Table of Contents
Home | Create a profile | Upload your photos | Auto-backup | Managing photos | In the lightbox | Basic editing | Auto-enhance | Advanced editing | Auto-awesome | Photo spheres | Circles and hashtags | Communities
Featured image credit: Scott Olson/Getty Images
Photo Spheres
Web, Android and iOS
Photo Spheres were introduced as a new mode for the camera app in Android 4.2 (Jelly Bean). To shoot one of these unique, 360-degree panoramic photos, just launch the camera app on your Nexus smartphone or tablet and tap the mode button, followed by the Photo Sphere icon.
Then, hold the device vertically and follow the on-screen instructions. You’ll need to slowly shift your body in order to line-up the camera with a series of blue dots, that will then be combined to create a full picture.
It’s also worth noting that it’s possible to create a Photo Sphere using a digital SLR camera – you’ll just need to add some extra metadata to your image to ensure Google displays it properly.
When you’re finished, you can then share these photos to Google+ through the web or mobile apps using the #photosphere hashtag. Other Google+ users can then immerse themselves in your photo spheres using the special viewer integrated with the social network.
Be sure to try it out!
Table of Contents
Home | Create a profile | Upload your photos | Auto-backup | Managing photos | In the lightbox | Basic editing | Auto-enhance | Advanced editing | Auto-awesome | Photo spheres | Circles and hashtags | Communities
Featured image credit: Scott Olson/Getty Images
Circles and hashtags
Web, Android and iOS
Once you have a library packed full of high-quality photos, the next step is to share them with the world. By focusing on all aspects of digital photography, Google+ has cultivated a thriving community of like-minded snappers. If you’re looking for some high-level critique, or just fancy sharing some photos from last night’s bar crawl with your friends, Google+ is undoubtedly the place to do it.
First, you need to create some circles. Google+ is unique in that it allows you to organize the people you follow into separate groups. These circles can be as large or small as you want, and labeled however you prefer. Google+ users can also be added to multiple circles, so if you have two groups labeled ‘Close Friends’ and ‘Analog Photographers’, you can add someone to both if they happen to fit both criteria.
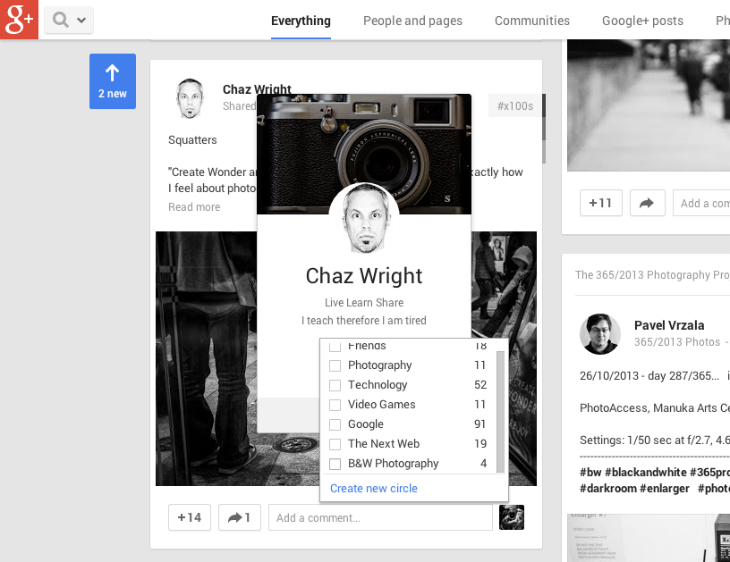
The trick is to create circles that are tailored to different aspects of your photography. You don’t want to bombard people who probably won’t be interested in a niche photo set; instead, find Google+ users who enjoy that genre and then create a circle to match. This is useful not only for sharing images, but also filtering your streams.
Head over to the Photos section of Google+ and select the images that you want to share with the world. You can pick them individually using the tick icon, or hit the Share button contained within each album. The pop-up window that appears will then allow you to co-ordinate your post for Google+. Here you can write a new caption, rearrange the thumbnail previews and also upload additional files from your computer.

Most importantly though is the field at the very bottom. This allows you to select which circles will see the post in their stream. By default, it will be set to Public, which is suitable if you’re just looking for maximum exposure. Now, however, you can also use those circles created previously to tailor who sees your work in their stream.
You can also add specific Google+ users and Gmail accounts too, which is perfect if you want to privately share some images with a client, or send what could be sensitive or first-draft photos to a particular subject for approval.
Before you hit share though, there’s one more feature to consider: Hash-tags. Similar to Twitter, these are customizable markers that the Google+ community uses to track particular ideas or topics. They can be used for pretty much anything, although they’ve proven popular with photographers in particular.
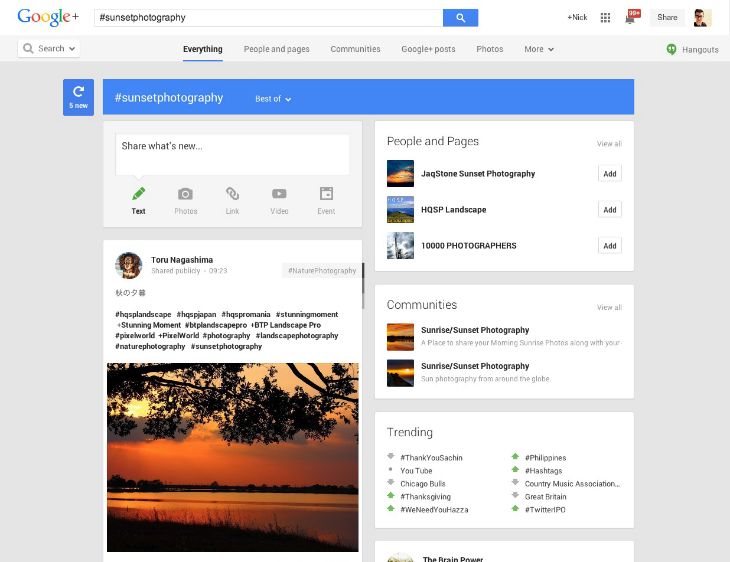
If you scroll down to What’s Hot in the navigation menu (web-only), you’ll be able to see a list of trending hashtags in a pane on the right-hand side. These often contain photography terms (#sunsetphotography, #blackandwhite and #showyourbestwork) that you can then add to with your own Google+ posts.
Engaging with the photography community in this way will inevitably increase the number of people who see and comment on your work. They’re also more likely to share the post with people within their own circles, thereby extending its reach even further. If you’re worried about reshares though, you can disable them for specific posts when you share photos from the browser.
Table of Contents
Home | Create a profile | Upload your photos | Auto-backup | Managing photos | In the lightbox | Basic editing | Auto-enhance | Advanced editing | Auto-awesome | Photo spheres | Circles and hashtags | Communities
Featured image credit: Scott Olson/Getty Images
Communities
Web
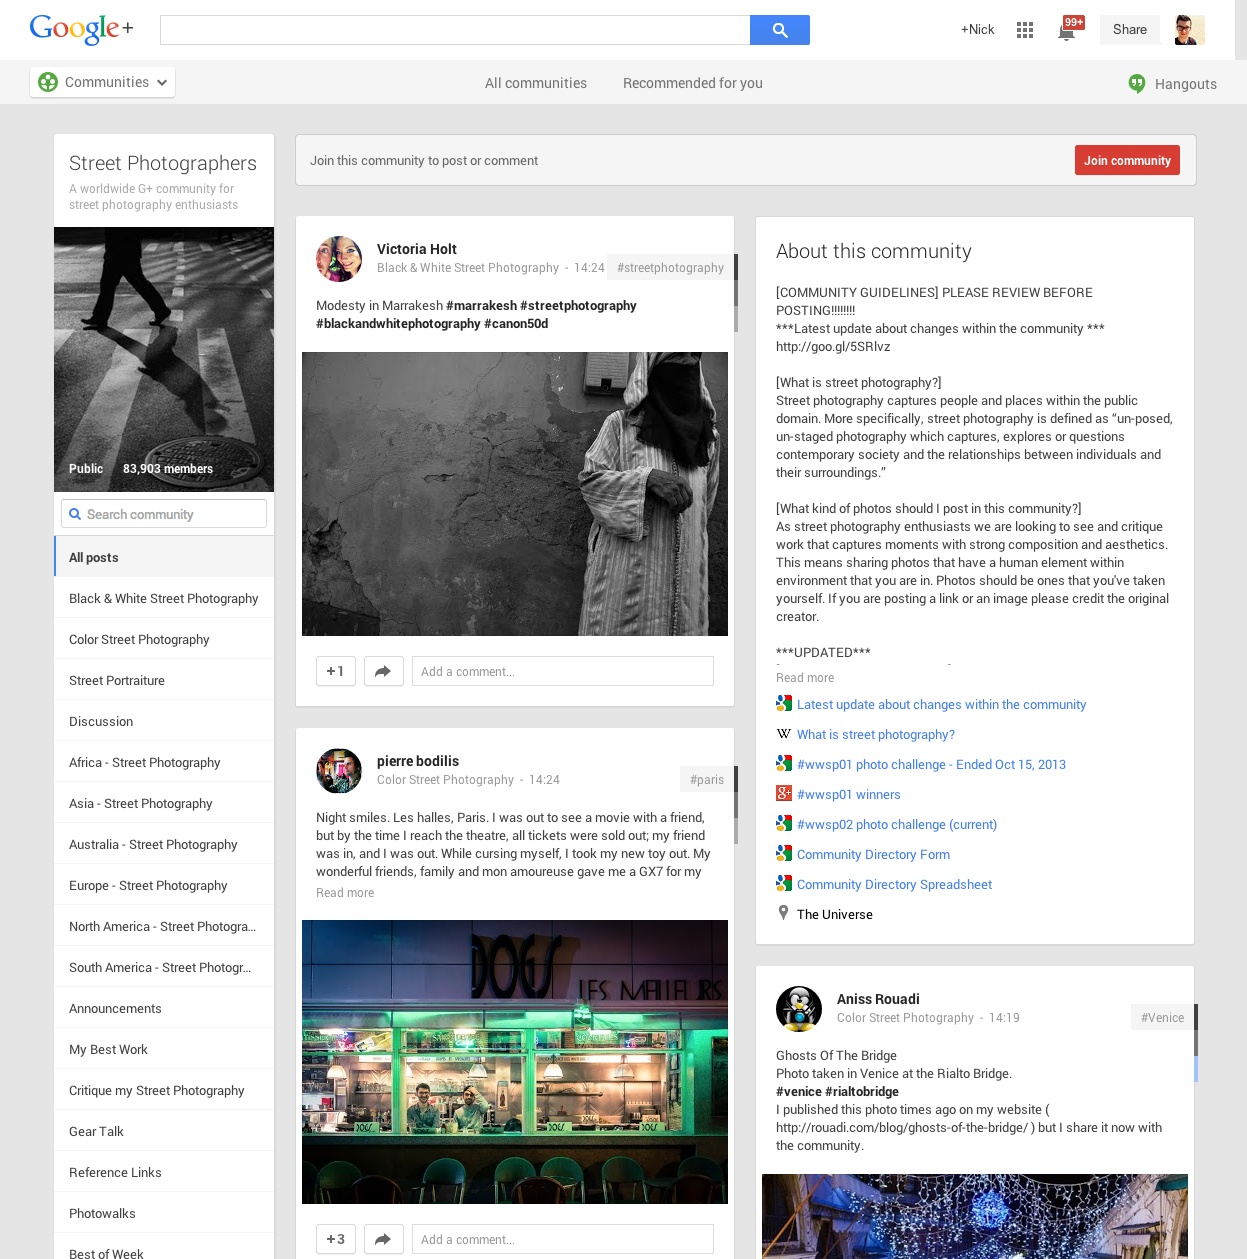
Communities are the most rewarding part of the Google+ ecosystem. These are user-created groups that anyone can join to discuss and share content about a particular topic. They can be centered on pretty much anything, including all aspects of photography.
You can discover communities by filtering any search result – once the initial posts are listed, just click on the Communities tab at the top of the page. Alternatively, select the Communities option from the navigation menu, and then type your query into the box in the top right-hand corner. When you find one that you like, just select the red Join Community button located at the top of the page.
You can now share posts from within the Community, or use this page instead of a circle when you share any of your photos. This is another incredibly useful way of targeting your images for the most relevant part of the Google+ photographic community.
Android, iOS
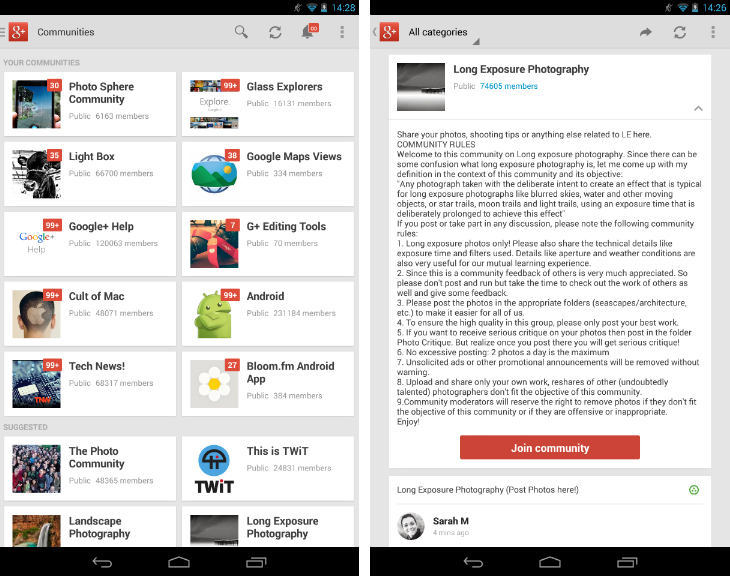
Within both mobile apps, you can discover and quickly access Communities through the navigation menu. Groups that you’ve already joined will be listed at the top, while suggested Communities are ranked underneath. You can also search for new pages by tapping on the magnifying glass in the top right-hand corner of the app.
Once joined, you’ll be able to select these Communities alongside your curated Circles whenever you share a post from within the mobile apps. I can’t recommend this enough – if you ever feel that you’re pursuing photography in complete isolation, this is a way to instantly reach out and connect with other people who are equally passionate.
Table of Contents
Home | Create a profile | Upload your photos | Auto-backup | Managing photos | In the lightbox | Basic editing | Auto-enhance | Advanced editing | Auto-awesome | Photo spheres | Circles and hashtags | Communities
Featured image credit: Scott Olson/Getty Images
Get the TNW newsletter
Get the most important tech news in your inbox each week.